OpenTRICK – General overview
The OpenTRICK user guide introduces the user to all the functionalities of the application.
Note that this user guide describes the views for a user having all access rights. Users with less access rights may have a restricted view or access to functionalities such that they cannot see or use all functionalities that will be explained in the user guide. The management of user access rights is explained in [Section] and [Section].
OpenTRICK Login page
After connecting to the OpenTRICK URL, the user sees the following login interface. He has the possibility to:
The different options are explained in the following sub-sections.
Creating an account
To use OpenTRICK, you shall first create an account. To create an account, click on the “Create an account” button, highlighted in red in [Figure].

After clicking on the “Create an account” button, you will be invited to enter further information required to set up your account(see [Figure] below).
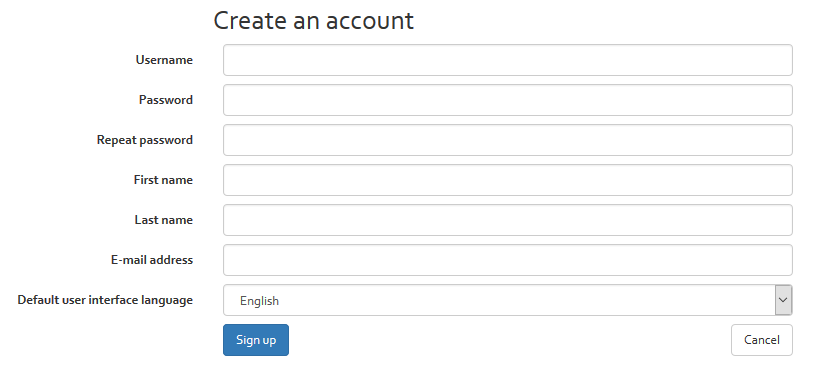
You should complete the form and then confirm by clicking on “Sign up”. All six fields seen in the above figure are mandatory. When completed correctly, you can log in.
Logging in
Once you have created your account, you can log in to OpenTRICK. The log-in screen can be seen in [Figure]. Here, you must enter the username and password and click “Sign in”.
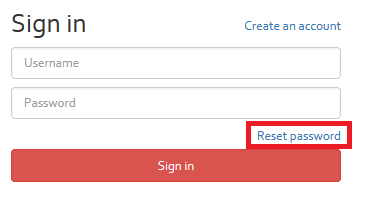
Reset password
In case you have forgotten your password, you can reset your password by clicking on the “Reset password” link on the login interface of OpenTRICK (see [Figure]).
You will be redirected to the reset password interface (see [Figure]) where you must enter either your username or your e-mail address that you indicated during registration.
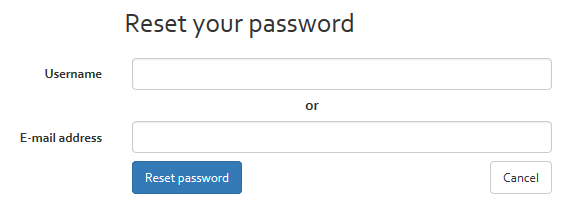
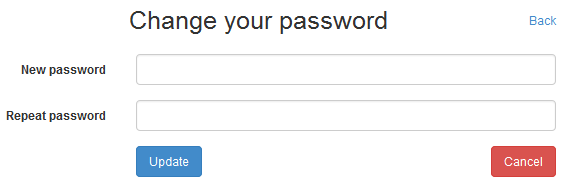
After clicking on the “Reset password” button, you will receive an e-mail that includes a link that redirects you to a web page where you can choose a new password (see [Figure]).
Two-Factor Authentication (2FA)
When Two-Factor Authentication (2FA) is enabled (both system-wide, and for the user in question), a user will be prompted to enter a security code in addition. He can obtain such a security either via e-mail, or via a smartphone app that supports the TOTP (Time-Based One-Time Password) protocol. Such an app is available for all major smartphones (Android, macOS, Windows Mobile) in the respective stores.
2FA via e-mail
Right after providing the login credentials, you will see the 2FA screen (see [Figure]). Select the “Send an email to …” entry from the select box, and confirm your e-mail address by typing it below.

A 6-digit code will be sent to your e-mail address right after you click “Send code”. Note that it can take several moments until you receive it – also make sure to check your “Junk” folder. Enter the code into the text box (see [Figure]) and proceed with signing in.

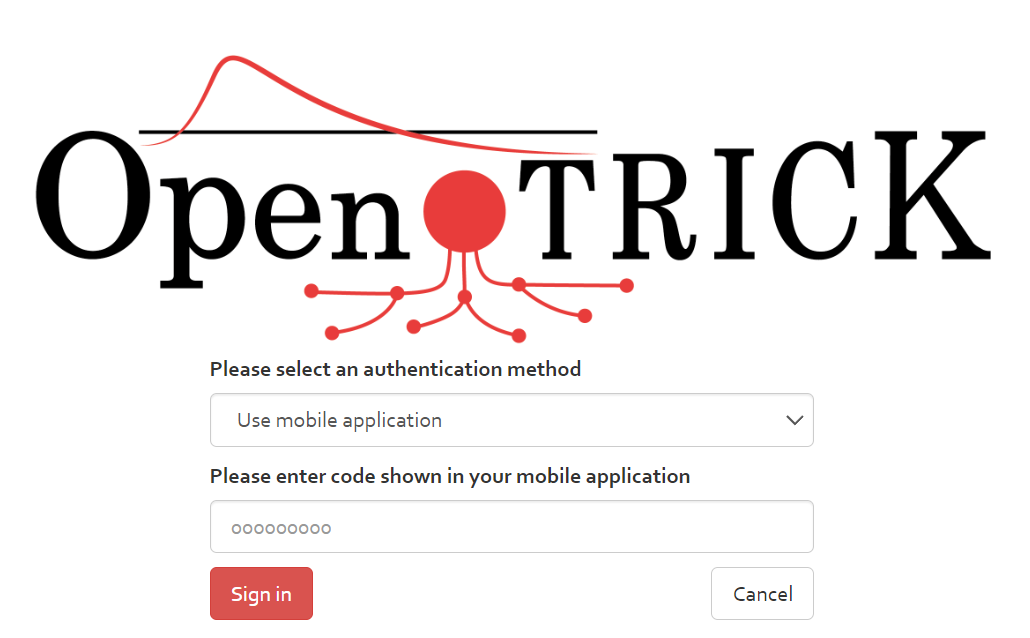
2FA via mobile
If you have set up 2FA via mobile in your profile settings (see [Section]), there is an additional entry “Use mobile application” in the select box. Open the Two-Factor Authentication app on your mobile, and copy the 6-digit code shown there into the text box in OpenTRICK (see [Figure]).
Home screen
After successfully logging in to OpenTRICK, you will be presented with the following screen, shown in [Figure] below.
This is the Home screen of OpenTRICK. As seen in the navigation bar at the top of [Figure], from here you have the option to click on the following links:
- Knowledge base;
- Analysis;
- Risk evolution;
- Import;
- Profile;
- Administration;
- Runtime;
- Logout.
The following sub-chapters further explain the contents of the different navigation tabs.
Knowledge base
The Knowledge base is split into the following 5 sections:
- Customers;
- Analyses language;
- Measures collections;
- Impacts;
- Analysis profiles.
The meaning and functionalities concerning those 5 sections will be explained in the following subsections.
Customers
This table contains a list of customer details which can be stored for reference. Information regarding customers can be added, edited, and deleted using the options in the navigation at the top of the table.

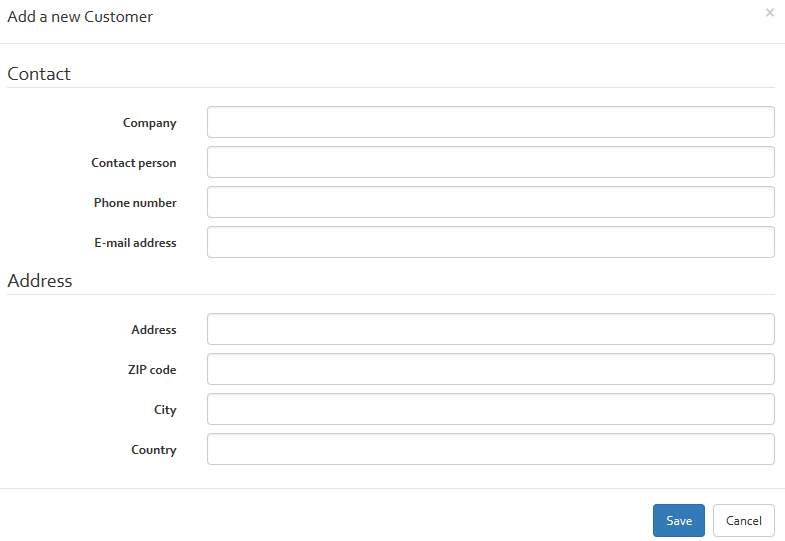
For adding a new customer, click on the “Add” button. All information fields must be filled out, including the company name, a contact person, a phone number, e-mail address, a postal address, the city where the customer is located, the zip code and the name of the country where the company is located.
For editing or deleting a customer, you must select the customer and click on the appropriate button (“Edit” or “Delete”).
Customers have report templates associated to them. These templates serve as a base for the exported reports for risk analyses associated to that customer. Click “Manage customer report templates” to open a dialog for managing them.
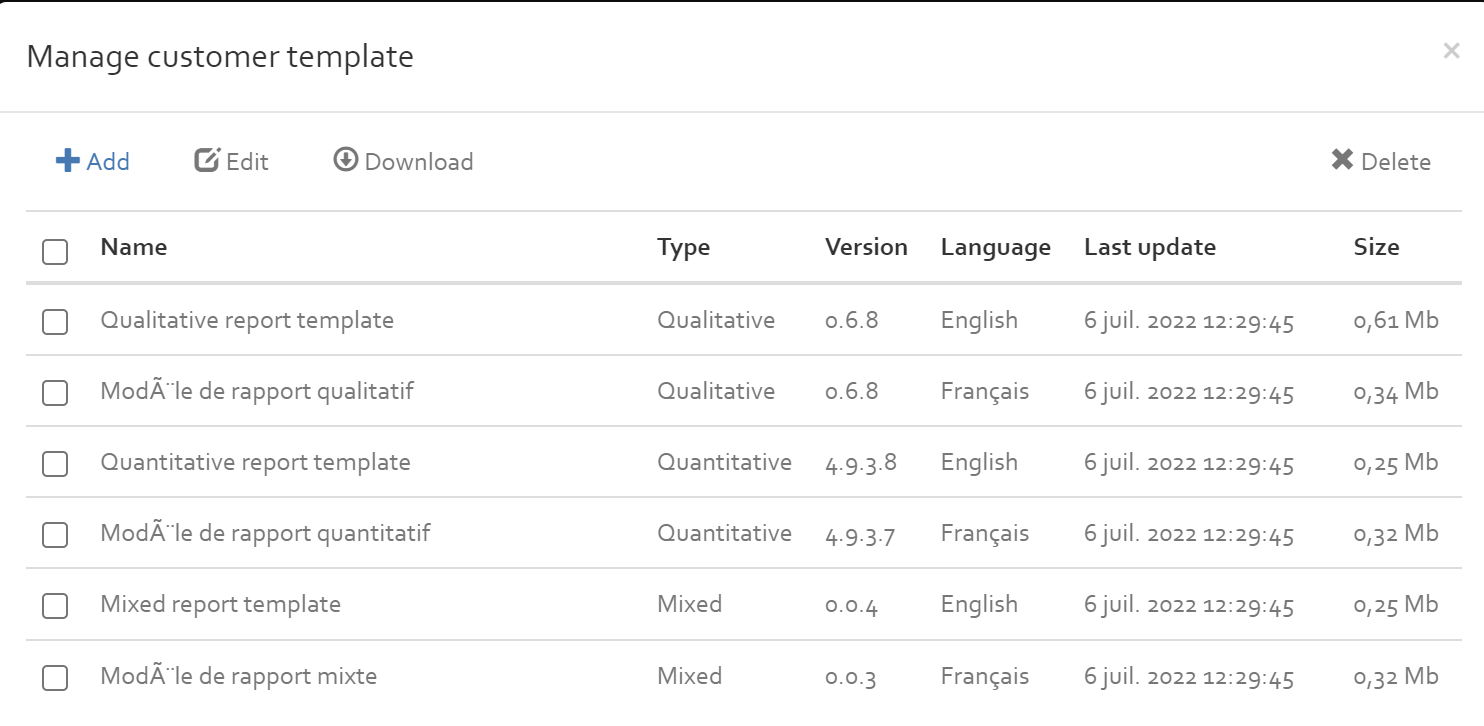
In the “Manage customer report templates” dialog, a list of all available templates is presented. At the top of the list, the default templates deployed with OpenTRICK are listed; these cannot be edited or deleted. Below, custom templates are listed. To add a template, click the “Add” button.

In that dialog, you need to specify a type and a language. These specify to which risk analyses the template applies to; the template will only be available for export if the type and language match. The version that is specified is used to check if the template is outdated, or not. If the version specified here corresponds to the version of the template deployed by default, then it is considered to be up to date. Otherwise, it is considered to be obsolete (in which case you can still use the template, but a warning will be displayed). The uploaded file must be in DOCX format.
Custom Excel templates
Staring release 2.16 onwards the tool also supports the excel templates which can be used to generate the following excel output files or reports by default. Like the word templates these templates can similarly be updated or revised.
- For exporting Risk Register Risks register report template is used
- For exporting Brainstorming Brainstorming Excel template is used
- For exporting SOA State Of Applicability report template is used
- For exporting any other excel file: Default Excel template is used
Adding macro enabled template
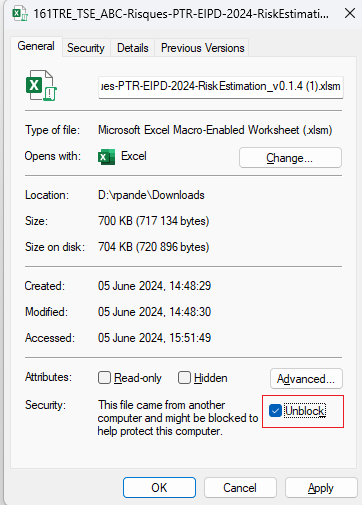
In order that the macros work well with the exported excel files for a specific customer it is required to add a Macro enabled excel Template (with extension: xlsm). Once an excel file for example risk estimation is exported from Trick the macros must be unblocked after the exported file is saved so that the Macros work well. After exporting file once this template is used right click on the exported file and go to Properties and click on unblock checkbox to unblock the macros.
Languages
This table shows the different languages that are supported for translating the security measures of a standard. If you add a language, you can define a translation in the newly added language for each security measure.

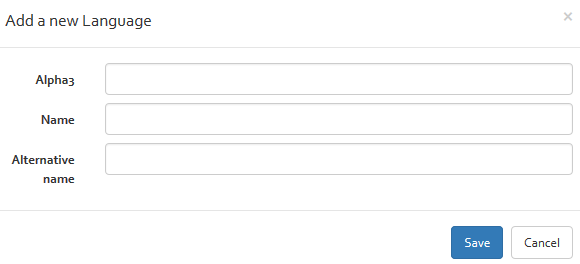
You can add, edit, or delete a language. Required information to add a new language is a language code according to ISO 3166-1 alpha-3, the language name, and an alternative name for the language.
To edit or delete a language, you must select a language and then click on the edit or delete button.
Measures collections
This section includes a repository of standards and collections of security measures that can be included in the risk analyses. The available options are explained in the following subsections.

Add
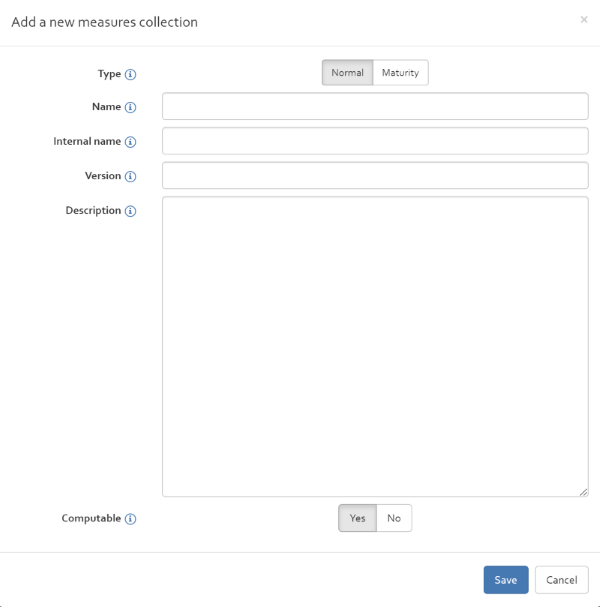
With the “Add” button, you can add a new measures collection from scratch. Required information are the name of the measure collection, the internal name, a version number (for standards: this is normally the year when the standard was published), a brief description of the measures collection (for standards: this could be the title of the standard), the type of the measures collection (per default normal) and an indication if the measures of the collection can be used to treat risks (by ticking the “Computable” check box) or whether they only exist for compliance reasons.
To add security measures to the newly created collection, follow the guide of the following section.
Show measures
The “Show measures” button opens a new dialog listing all security measures of the selected measures collection.
You have the possibility to add, edit or delete a security measure. With the help of the language select box on the right corner, you can switch between the different languages.

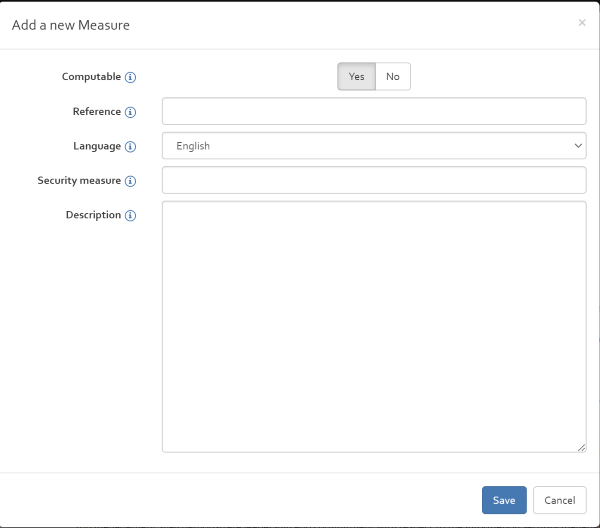
To add a new security measure, press the “Add” button and provide the following information:
- Computable: By ticking the computable box, the user indicates that the entered security measure is not a title of a chapter but a security measure which can be used to treat risk and should appear in the risk treatment plan.
- Reference: A reference number for the security measure to add.
- Language: Indicates the language of the entered security measure text.
- Security measure:Allows indicating the title of the security measure.
- Description: Allows describing the security measures and how to implement it.
To edit and modify an existing security measure, select the security measure to be edited and click on the “Edit” button.
To delete a security measure, select the security measure to delete and click on the “Delete” button. If a security measure is used in a risk analysis, it is not possible to delete the security measure except if you click on the “Force delete” (only if you are admin or supervisor) button.
Export
The “Export” button enables you to export a measures collection from the knowledge base of OpenTRICK. The export is an Excel file including all security measures. You have the possibility to make changes in this excel file and use the “Import” function to reimport the measures collection with the modifications made (see section “Import ”).
Edit
The “Edit” button can be used to update the general information concerning the measures collection (name, version, description, type, internal name, computable).
Get import template
With the “Get import template”, you can retrieve the template needed to import a new measures collection and its security measures (see section “Import ”). The template indicates on how the data must be structured in order to be imported into OpenTRICK.
Import
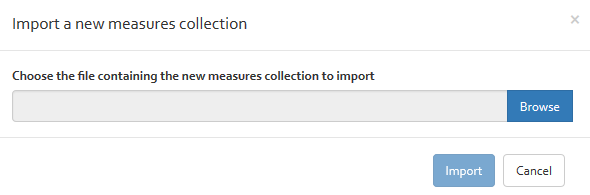
The import measures collection function allows you to import a new standard or collection of best practice that is still not included in the knowledge base of OpenTRICK.
To do so, you must click on the “Import” button. A new window pops up which allows you to select and upload a file that includes the measures collection to import. The import file and included information must match an exact format which is provided in the import template.
Delete
This functionality allows the deletion of the selected measures collection by clicking on the “Delete” button.
Impacts
The section “Impacts” allows you to add impact categories to the knowledge base of OpenTRICK. These impact categories can be reused in risk analyses.You have the possibility to “Add”, “Edit” and “Delete” impact categories.
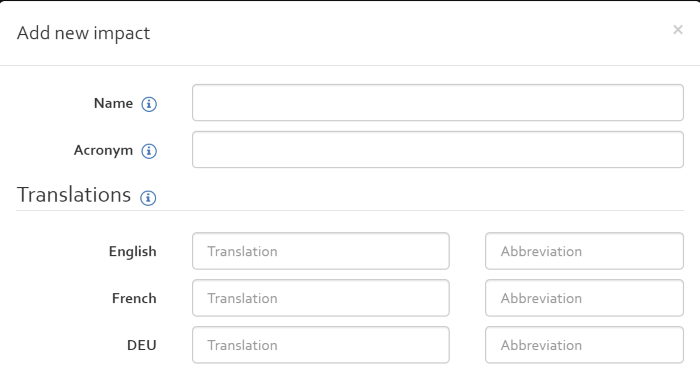
When adding impact categories, you have to indicate:
- A unique ID for the impact in the “Name” field;
- An acronym in the “Acronym” field that is used to derive the acronyms for the different scale values by appending the scale level (e.g. for the acronym “il”, the parameters for the impact scale in a risk analysis will have the acronyms “il0”, “il1”, “il2”, etc.);
- An English, French and Deutsch translation (and abbreviation) that will be used throughout the user interface and in the reports.
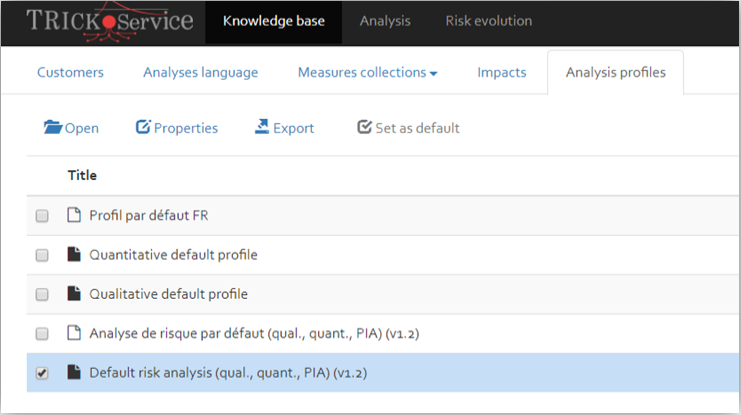
Analysis profiles
This view shows a list of analysis profiles, which act as templates for risk analysis. During the creation of a new risk analysis a risk analysis profile can be selected as basis. This allows creating risk analysis from templates that already include some parameters and characteristics which then do not have to be recreated from scratch.
Three profiles (one for quantitative risk analyses, one for qualitative risk analyses and one for mixed risk analyses) are set as default. These profiles will be used for the creation of a new risk analyses if no other profiles are selected.
You have the possibility
- to open an analysis profile and work on the profile by clicking on the “Open” button;
- to set an analysis profile as default by selecting the profile and click on the “Set as default” button;
- to edit general information concerning the profile (Language of the profile, description of the profile and title, ) click on the "properties" button;
- to delete a profile by selecting the profile and clicking on the “Delete” button.
How to create a new profile is explained in [Section].
Analysis
The Analysis page shows you a list of all current analyses. Using the drop-down lists in the centre of the screen (see [Figure]), you can easily filter the analyses by customer and analysis name.
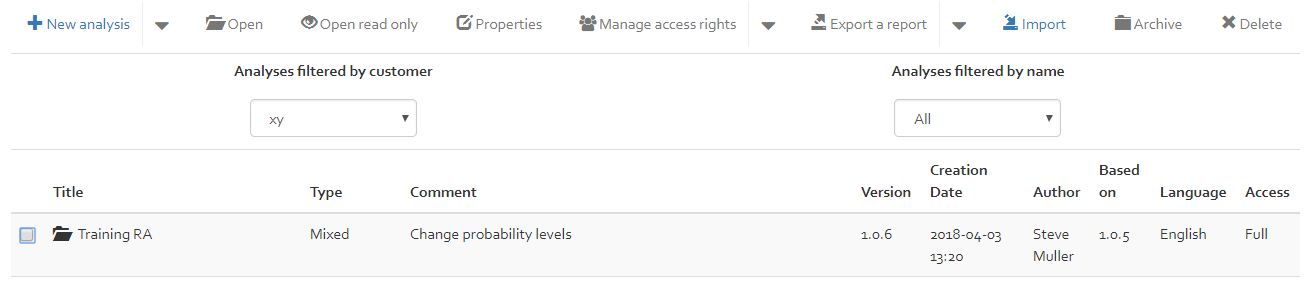
When no analyses are selected in the list, you can do the following:
- New analysis: Create a new analysis.
When an analysis is selected in the list, you can do the following:
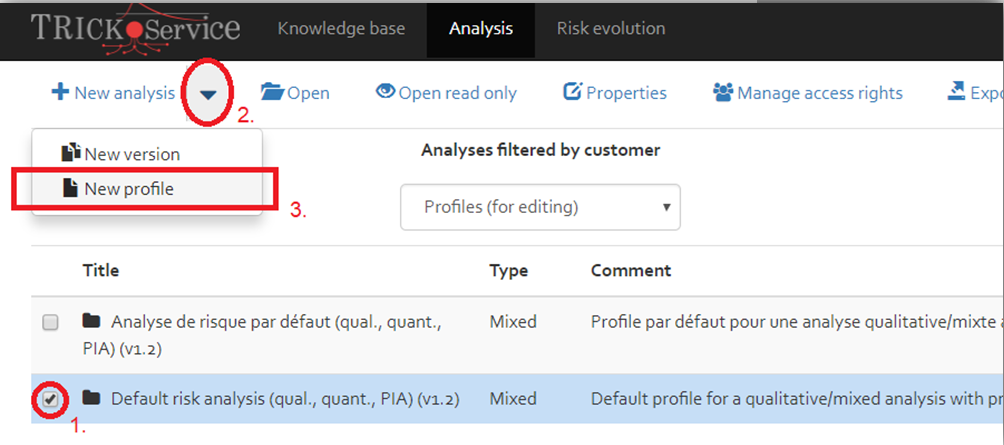
- New version: Create a new version for the selected analysis;
- New profile: Create a profile from the selected analysis;
- Open / Open read only: Open an analysis in “read-write” mode or in “read-only” mode;
- Properties: Display and change the settings of the selected analysis;
- Manage access rights: Manage the users who can access the selected analysis;
- Manage probe subscriptions: Manage the external agents/probes that can report dynamic risk information via the API;
- Export a report: Export an exhaustive Word report for the select analysis;
- Export the database: Download a back-up for the selected analysis;
- Import: Upload a previously exported back-up for the selected analysis;
- Archive: Flag the selected analysis as archived (this will disallow any future changes);
- Delete: Remove the analysis completely.
Further documentation for these actions can be found in the following subsections.
Creating a new analysis
To create a new analysis, click on the “New analysis” button (see [Figure]).
Once you clicked on the “New analysis” button, the pop-up box depicted in [Figure] will appear.
Now you have two options:
- Create an analysis from scratch;
- Create an analysis based on existing analysis.
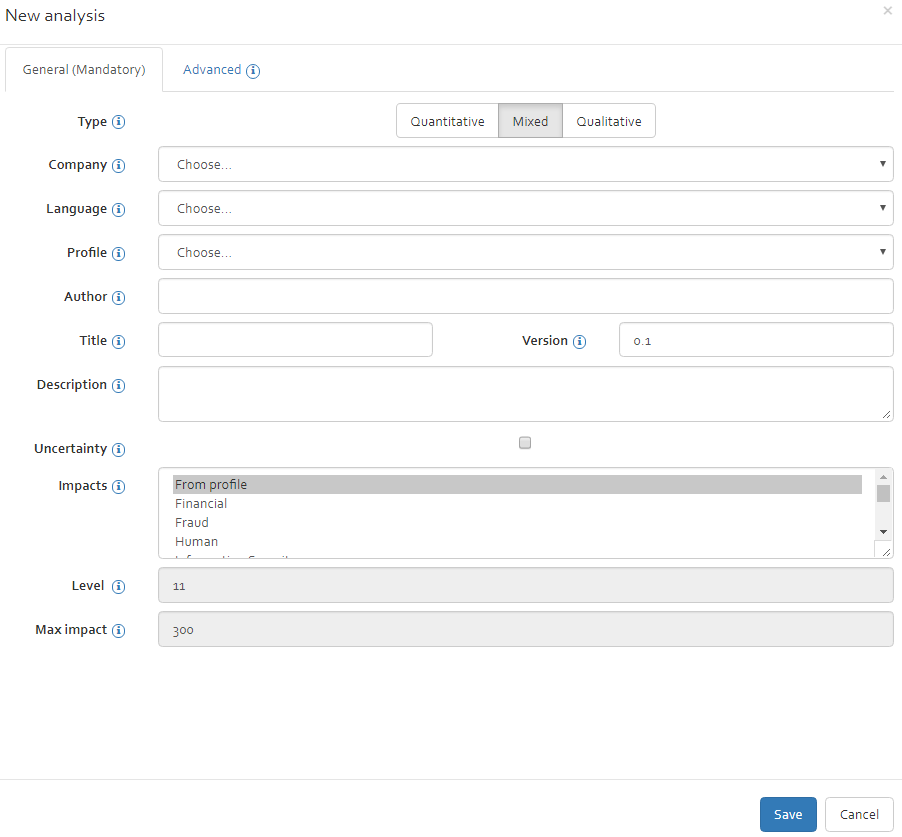
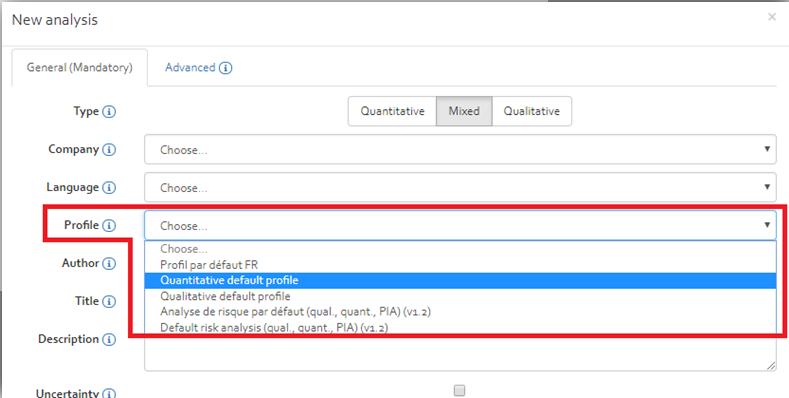
Create a new analysis from scratch
The information required to create the analysis is the following:
- Type: Choose if the risk analysis should be made quantitatively, qualitatively, or a mix of both;
- Company: Select for which company the risk analysis is being conducted for (linked to the list of companies stored in the Knowledge Base);
- Language: Select the language of the risk analysis (linked to the list of languages stored in the Knowledge Base);
- Profile (optional): Select an analysis profile template on which the new analysis should be based on (see [Section]) (linked to the list of analysis profiles stored in the Knowledge Base);
- Author: The author parameter is automatically generated depending on who is logged in to OpenTRICK when the new analysis was created;
- Title: Indicate a name for the new risk analysis;
- Version: For a new analysis, the version is automatically generated as
0.0.1. This parameter may be edited for exceptional circumstances; - Description: Enter a short description of the risk analysis including any information which may be useful;
- Uncertainty: Checkbox to indicate if you want to take account of the uncertainty of assessments (only for quantative or mixed analysis). Several features, specific to uncertainty will be added to the risk analysis if the checkbox is ticked.
- Impacts: Select the impact scales that you wish to import into the risk analysis (only for qualitative and mixed analysis). The default is to use the same impact scales as in the profile (“From profile”).
- Level: Specify the number of levels that shall be used for the impact and probability scales in the analysis (only for qualitative and mixed analysis). This option cannot be changed if “From profile” is selected in the list above, since in that case the level from the profile is considered.
- Max impact: Specify the maximum value for the quantitative impact scale (only for mixed analysis). This option cannot be changed if “From profile” is selected in the list above, since in that case the maximum from the profile is considered. Note that the value provided here is only used to initialise the scale with default values; you can fully change the scale afterwards. Once all the parameters have been filled in, click the “Save” button to generate the new risk analysis.
Create a new analysis by taking parts of existing analysis
If you want to reuse parts of existing analyses for creating a new one, click on the “Advanced” tab.
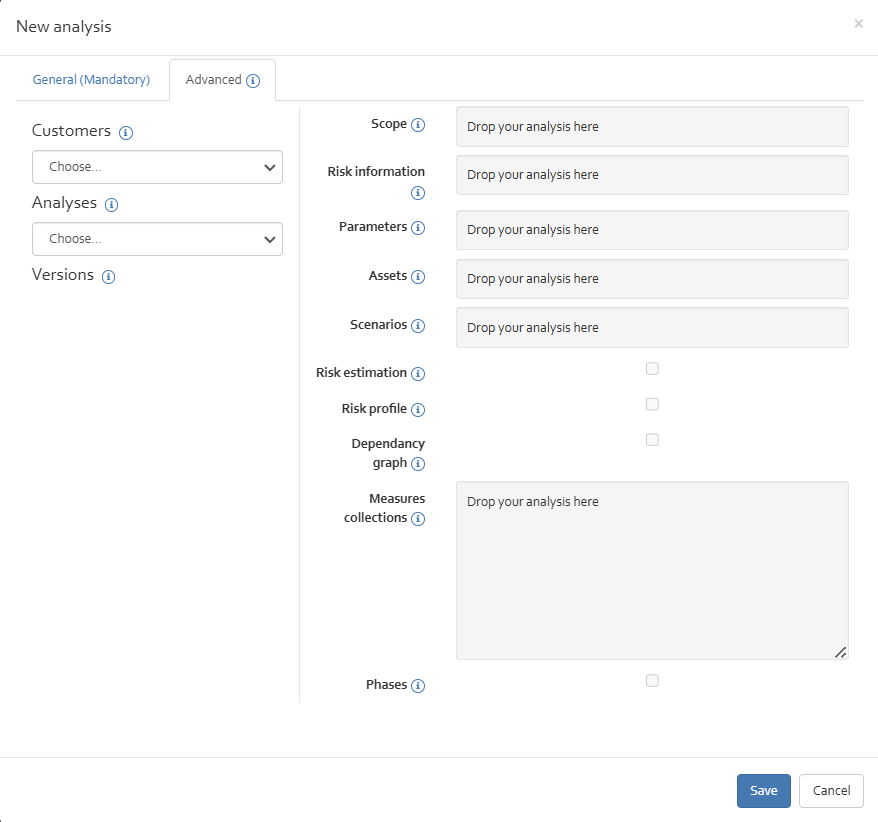
In the advanced tab, choose a customer and an analysis from which you want to pick some parts to be put in your new risk analysis. Now you get a list of existing versions of the risk analysis. To copy the parts you want to reuse, drag, and drop the version from which you want to copy parts in the corresponding fields on the right side.
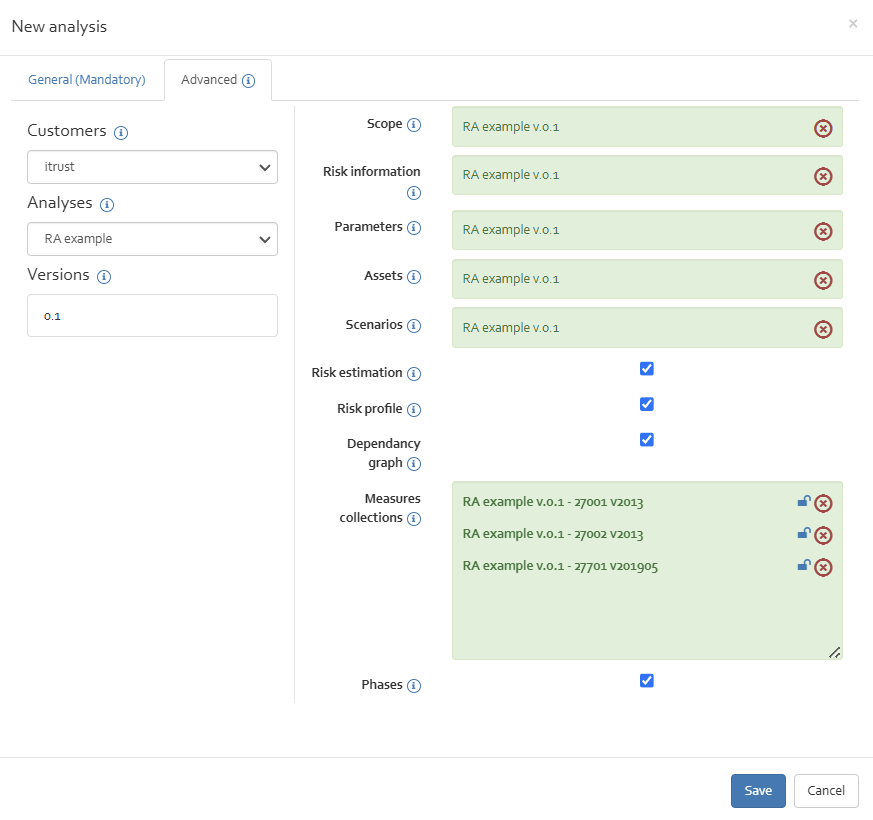
You can copy the scope, the risk information (brainstorming), the parameters, the assets, the scenarios, the risk estimation, the used measure collections, the risk profile, and the implementation phases from the existing analysis.
Manage access rights
The button “Manage Access Rights” allows editing the access rights of other users for a risk analysis version. Select the version for which you want to change access rights and click on the “Manage Access Rights” button. A new window will appear where you can choose the appropriate access right level for the different OpenTRICK users (Note: only the users that have access to the associated customer will be listed). The changes will be saved by pressing the “Save” button.
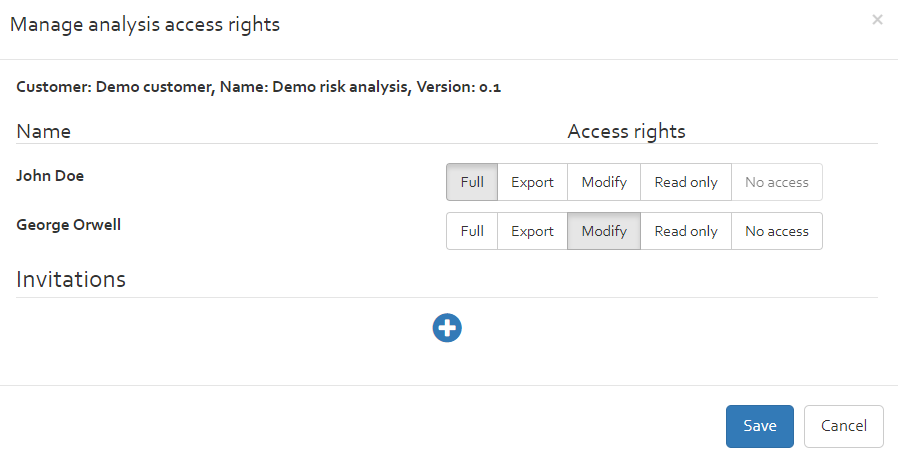
Different access right level exists:
- No access: The user has no access rights;
- Full: The user has all access rights for the selected analysis (read and write);
- Export: The user has read rights and the right to export a risk analysis;
- Modify: The user has the right to modify a risk analysis;
- Read only: The user has only the right to see a risks analysis but not to modify data.
Inviting new users
For privacy reasons, the access right dialog will only list users that already have access to the customer related to the analysis. If access rights shall be granted to other users as well, invitations have to be used instead. The lower part of the dialog lists all currently invited people and the access rights that are granted (see [Figure]). The latter can be changed at any time. To add a new user, click the [+] button, and add his e-mail address into the text box. Invitations will be sent upon clicking “Save”. The targeted user will have to accept the invitation before he actually obtains the granted access rights. The pending invitations can be seen in the user profile, see [Section].

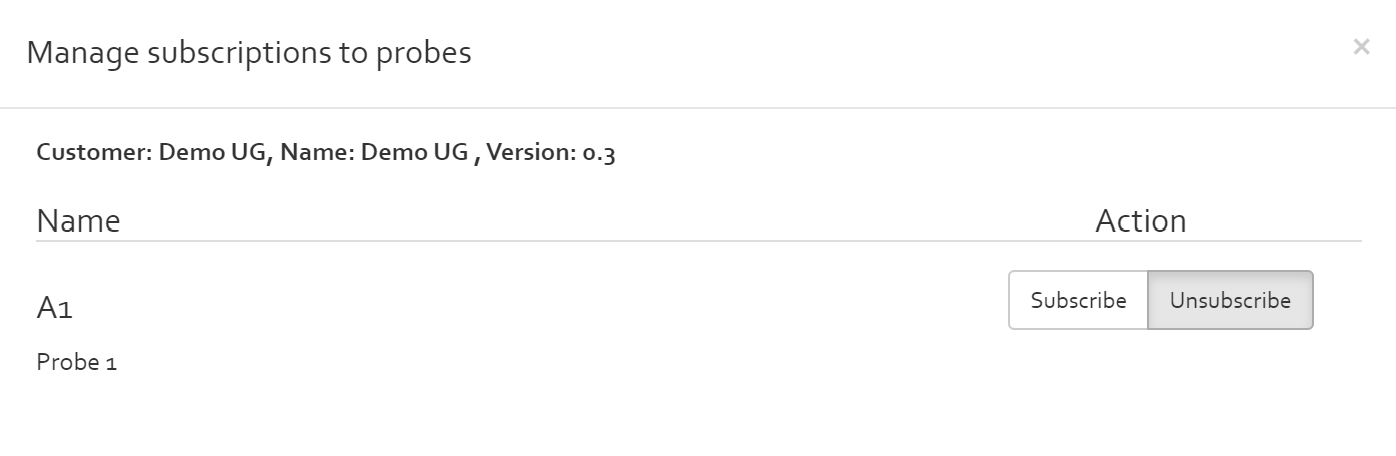
Manage probe subscriptions
The button “Manage probe subscriptions” opens a dialog where the user can pick one or more probes to subscribe to. If a risk analysis has subscribed to a probe, all parameters that are dynamically set by the probes will be made available and periodically updated in the risk analysis.
New version
With the new version button, you can create a new version of the selected risk analysis. All data is copied from the old version to the new version. It is recommended to create new versions if data in a risk analysis is modified or updated. This allows the tracing the changes and reverting back to an earlier version if needed.
Information to indicate when creating a new version is the author name (per default the author text field is filled with the users first name and last name), the new version number (must be greater than the version number, the new version is based on) and a comment on what will be changed in the new version.
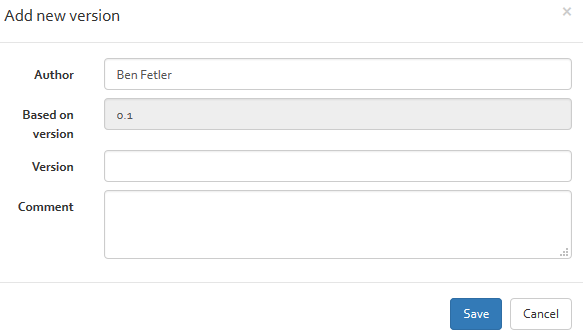
After clicking on the “Save” button, the new risk analysis version will be created.
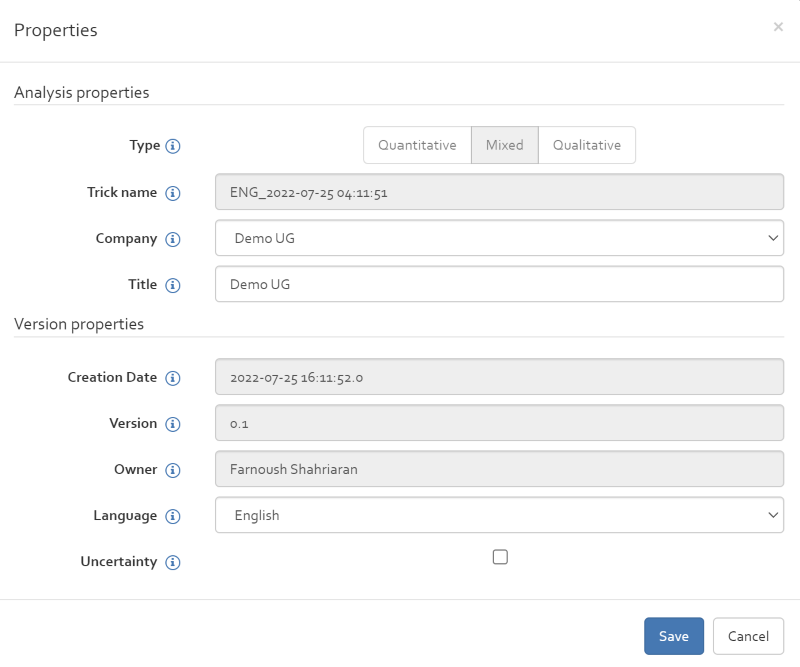
Properties
The “properties” button allows to modify the following information regarding the selected analysis:
- The company to which the analysis is assigned to;
- The language of the analysis;
- The title of the analysis;
- The selection/deselection of the Uncertainty feature.
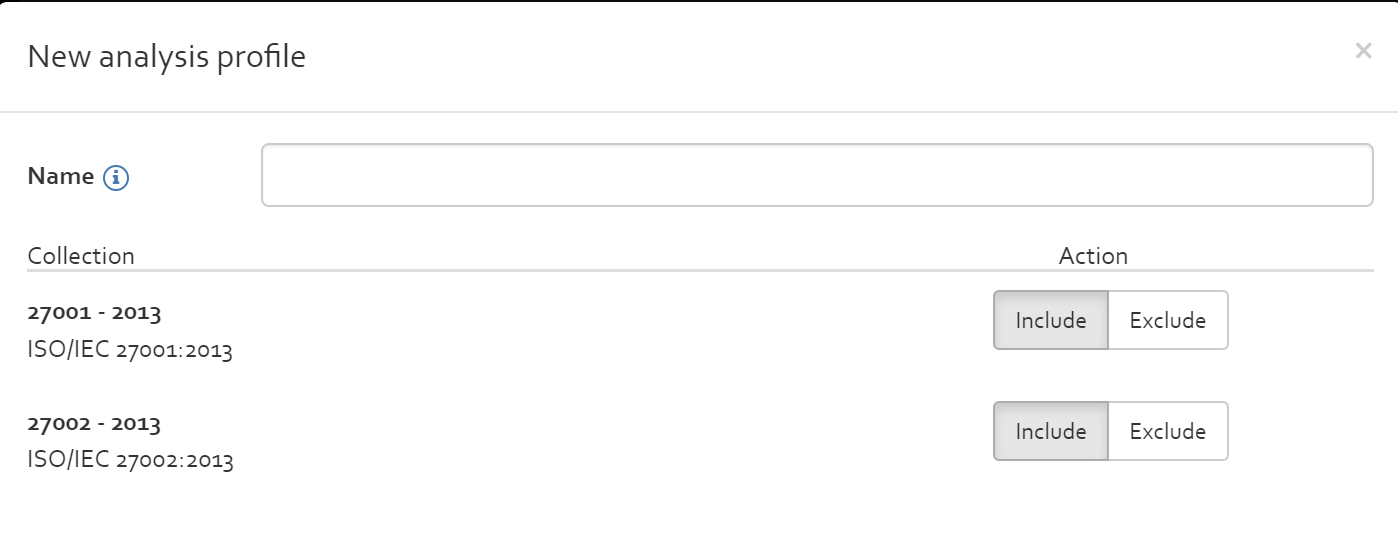
New profile
With the “New profile” button, you can create a new profile based on the selected risk analysis. A profile can be reused as basis to create new risk analysis. The list of available profiles can be found in the knowledge base (see [Section])
Note that no sensitive data are copied to a profile. The risk scenarios defined in the selected risk analysis will be taken over and the user has the possibility to choose which security measures collection should be included in the new profile:
After providing a name to the profile to create, you can add the new profile to the knowledge base by clicking on “Save” the button.
The newly created profile can be viewed in Analysis profiles in the knowledge base
Updating analysis profile
There are two ways to update an analysis profile:
- Updating an analysis created from analysis profile
- Exported as an SQLite file from the knowledge base
Updating an analysis created from analysis profile
Create: A new analysis can directly be created from a risk profile by clicking “New analysis” in the analyses overview,
and by choosing the desired profile from the select box in the dialog. See Figure [Figure]
Modify: Once the profile is available as a risk analysis, it can be modified like any normal risk analysis.
Set-up scenarios, adjust risk reduction factors (RRF), import measures.
Re-import as profile: When all modifications have been made, the risk analysis needs to be converted back to a profile.
In the analyses overview, select the analysis that shall be converted, and select “New profile” from the menu –
see Figure [Figure].
A dialog opens for setting up the profile. Type a name under which the profile shall be known as.
It is highly recommended to add a version number to the name, so as to distinguish it from older versions later on.
Indeed, neither the history nor the version of the underlying analysis will be copied over to the profile!
Tip: If for some reason you do not want or have version numbers in the name, first rename the old profile (e.g. name it “ … (old)”), and then create the new profile. The reason for that is because OpenTRICK does not allow multiple profiles with the same name.
Then, select all measure collections that shall be imported by default in all risk analysis based on the profile.
Note that it is preferred to include measure collections in the profile, as this will also include all RRF values
associated to the measures! RRF values are stored in a risk analysis/profile, not in the knowledge base.
Cleanup: When the profile has been successfully created, make sure to remove any older profiles from the knowledge base.
Note: Profiles which have been set up as “default” cannot directly be deleted. First set the newly created profile as “default”, before the old one can be deleted.
It is recommended, however, to keep the underlying analysis (not profile) in OpenTRICK.
Exported as an SQLite file from the knowledge base
A profile can be exported as an SQLite file from the knowledge base – see Figure [Figure] That file can then be imported like a normal analysis into OpenTRICK for editing. It will become an analysis after import.
Import
The Import page allows importing an SQLite database including a risk analysis into OpenTRICK.
The selected file must be an SQLite database that has been previously exported from (any) OpenTRICK instance. Backwards-compatibility is guaranteed.
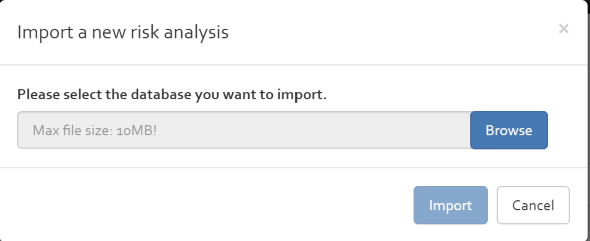
The analysis is imported for the customer that is currently selected (as a filter) in the analyses overview.
Export the database
With the “Export the database” button, you can export the selected risk analysis. The exported file is an SQLite database file including all data of the risk analysis. The exported file can be used as backup or to import it in another OpenTRICK instance (e.g.: locally installed OpenTRICK).
Export a report
The “Export a report” button is a short-hand method to generate the exhaustive Word report for the selected analysis. This button is equivalent to opening the analysis, and exporting the report from within the analysis.
Archive
To archive a selected analysis you can use the "Archive" button which this will disallow any future changes of the analysis.
Delete
You can delete a risk analysis by selecting the risk analysis and clicking on the “Delete” button.
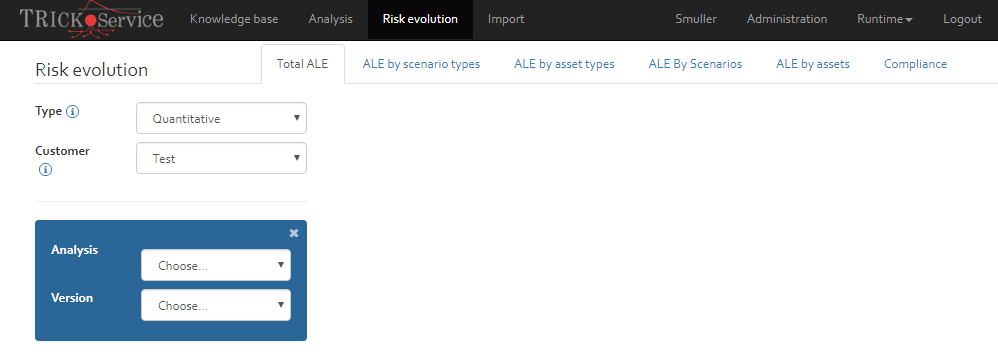
Risk evolution
The risk evolution page offers the possibility to visualise the evolution of risk over a period by selecting different risk analysis versions. To do so, you must select a customer, a risk analysis, and a risk analysis version.
Profile
The profile page can be accessed from the username button on the right-hand side of the ribbon. The profile page includes five different sections:
- My profile
- My Credentials
- My invitations
- My sqlites
- My reports
- My sign-in settings
My profile
This section includes the information related to your profile and allows updating the user information and changing the password.
Information that can be changed are:
- Connection information (password);
- Personal information (first name, Last name, E-mail address);
- Application setting (default user interface language).
The username and roles attributed to the user cannot be modified by the user.
This section also allows to see the Authentication type (Standard – User & password, LDAP or both) and the role to which you have been granted permission.
My Credentials
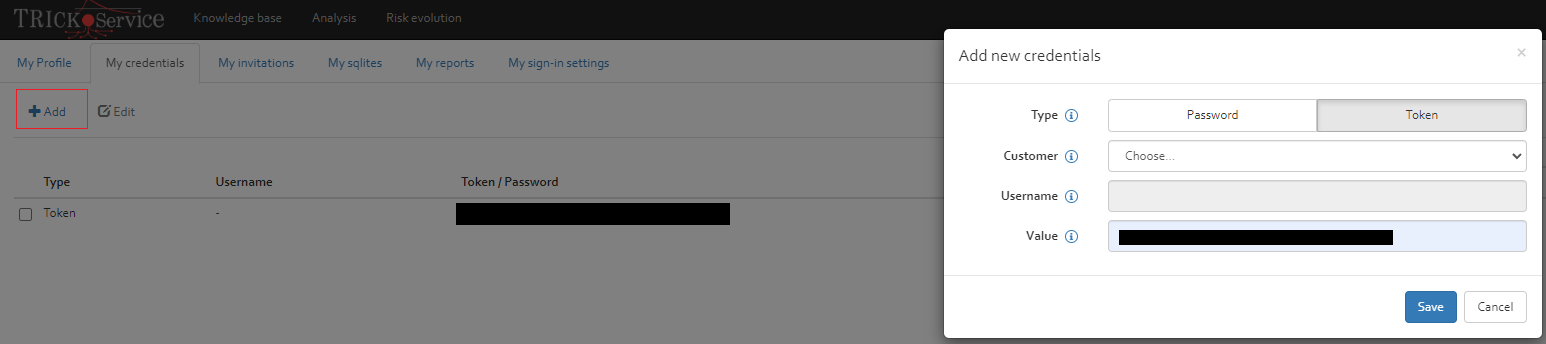
In this section you can "Add" and "Edit" your credentials. Click on "Add" button.
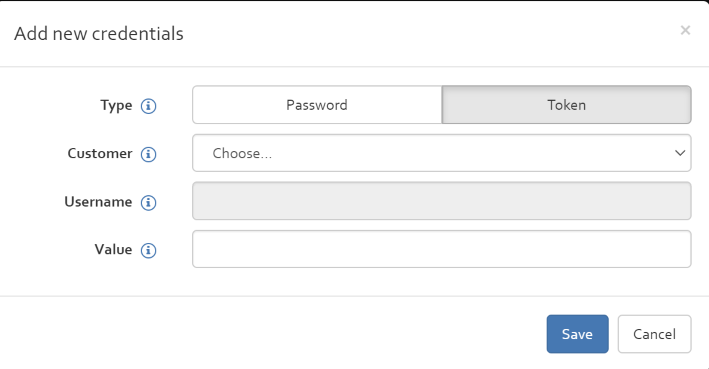
In the add new credential window, you have two options for creating credential for the customers for accessing the Ticketing system (Jira/Redmine/Email): Token or Password.
- Token: to create a token as credential, you need to enable Token and choose the customer and add the value of the created Token which is available in the ticketing system (Jira/Redmine/Email).
- Password: You can also enable "password" and by choosing the customer, adding a username and the value of the password in the ticketing system create a credential.

You also can edit a credential by selecting the credential and click on the "Edit" button and save your changes. To delete a credential, you can select the credential and click on "Delete" button.
My invitations
This sections shows all risk analyses which the user got invited to access (see [Figure]). In order to access the risk analysis, the user must first accept the invitation by clicking on the “Accept” button. Alternatively, he can also deny by clicking the “Deny” button.

My sqlites
When exporting a risk analysis from OpenTRICK, a copy of the exported SQLite file is stored on the server hosting TRICK Service. This has several reasons:
- If you want to download again a SQLite file of a risk analysis, you can do this without having to re-compute a dump of an analysis.
- You have an overview of all exports done in the past.
As mentioned you can download or delete the SQLite files of the list by clicking on the buttons within the action column.
My reports
As for the “My sqlite” section (see [Section]), you can find in the “My reports” section a list of all exported risk analysis reports. When exporting a word report, a copy of the report is stored on the server hosting OpenTRICK. This has several reasons:
- If you want to download again a report, you can do this without having to re-compute a word export.
- You have an overview of all reports exported in the past.
You have the option to delete a report or to download it again by clicking on the corresponding buttons in the action column.
My sign-in settings
In the sign-in settings you can enable or disable the Two-Factor Authentication (2FA) for your account.
When you enable 2FA by clicking the respective button, all subsequent logins will require you to confirm your identity by enforcing you to enter a security code that is sent to your e-mail address. See [Section] for further details on the Two-Factor Authentication process.
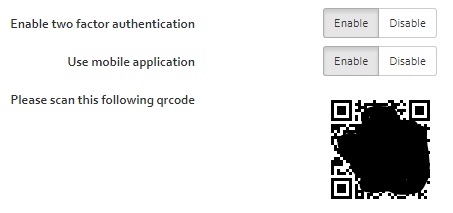
Enabling 2FA for mobile devices
When you additionally enable the “Use mobile application” feature, you additionally have the option to enter a one-time password when you log in, that is generated each time by your mobile device.
The procedure to enable 2FA for your mobile consists in the following:
- Enable two factor authentication by clicking the “Enable” button.
- Enable “Use mobile application” by clicking the “Enable” button.
- Install an application that supports the TOTP (Time-based One-Time Password) protocol from the app store of your device. Such an application is available for all major platforms (Android, macOS, Windows Mobile) (e.g. “Microsoft Authenticator”).
- Open the app and scan the QR Code shown on OpenTRICK.
Administration
You can only view and access the administration page if you are assigned to the role of an administrator or supervisor.
The different sections and functionalities of the admin page are explained in the following.
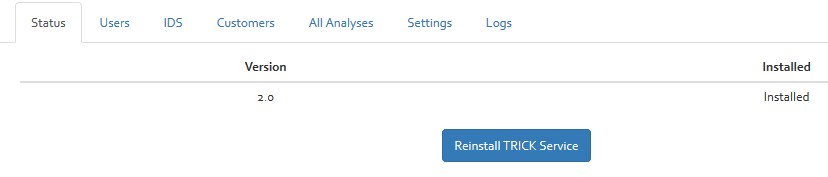
Status
The status section provides information about the installed version of OpenTRICK and the option to reinstall OpenTRICK. This re-initialises the database and removes all data.
Users
The Users section includes a list of all OpenTRICK users. Further options of this section are adding, editing or deleting a user. The different options are explained in the following subsections.
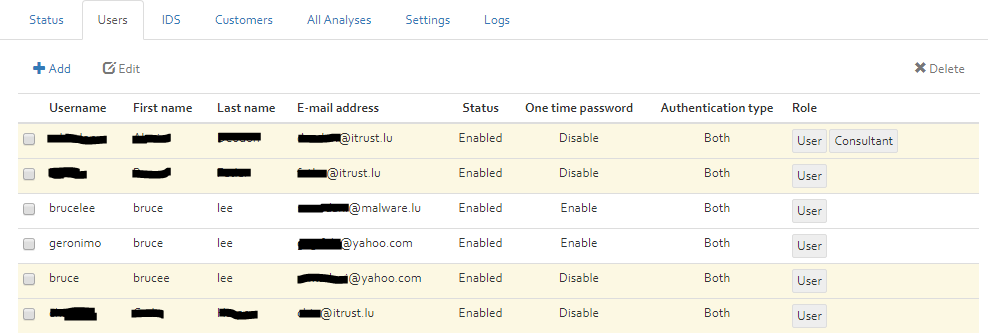
Each user has different roles attributed. Existing roles are:
- User;
- Consultant;
- Administrator;
- Supervisor.
The different roles have different degrees of access rights which are illustrated in the table of “Annex A – OpenTRICK user roles”.
A user can be enabled or disabled. A user that has the status “Disabled” cannot login anymore to OpenTRICK. A user can be disabled if all roles of the user are revoked.
Add
Two possibilities exist to add a new user:
- The user himself signs up on the login page of OpenTRICK (see [Section]);
- An administrator adds him manually by clicking on the “Add” button in the user section.
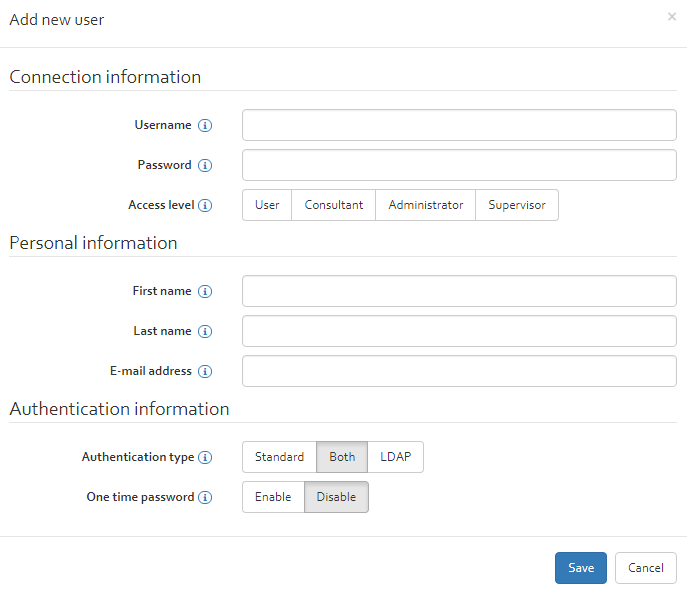
After clicking on the “add” button, a new window will appear requesting some information about the user to add. Required information are:
- Username: Username with which the user has to login.
- Password: The password which the user needs to login.
- Access level: The role the user should be assigned to. An overview of the access rights of the roles can be found in “Annex A – OpenTRICK user roles”.
- First name: The first name of the user.
- Last name: The last name of the user.
- E-mail address: The users e-mail address.
- Authentication type: Choose between standard (username & password, LDAP or both);
- One time password: Whether to enable Two-Factor Authentication for this user. When enabled, the user will have to set up two-factor authentication the first time he logs in.
After all information have been provided click on the “Save” button to create the new user.
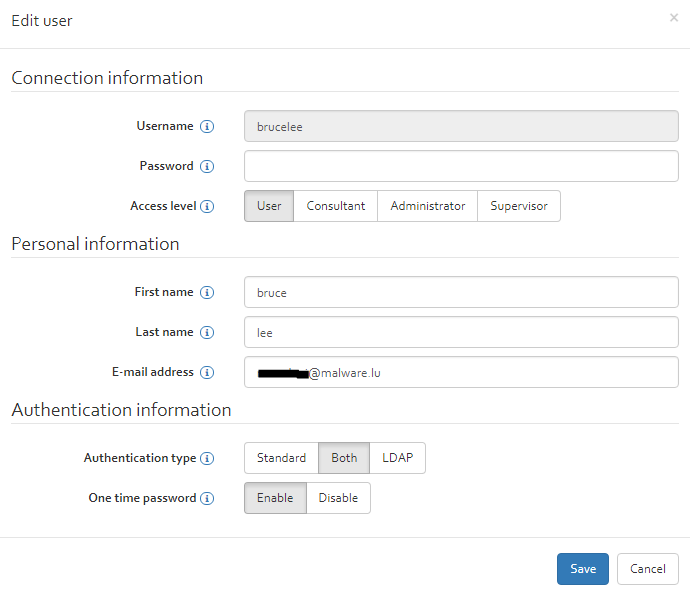
Edit
To update user information, select a user and click on the “Edit” button. All user information can be modified and saved by clicking on the “Edit” button.
Delete
A user can be deleted by selecting the user to delete and clicking on the “Delete” button.
Probes
This section lists all Probes that have access to OpenTRICK. In contrast to a regular user, a probe can only access the OpenTRICK API (see Annex B) but not the web interface. Just as for regular users, it will also need additional access rights for every analysis it wants to connect to (see [Section]). Click on "Add" button, you can add a new probe. In the "Add new probe" window, you should enter a probe prefix, a decription and enable/disable the "Allow access" and click on "Save" button. The token will be created automatically.

The displayed values are the following:
- a name, for identifying the Probes throughout OpenTRICK;
- a renewable access token used for login (there is no user name or password);
- a description text;
- the “Last update” column shows when the probes has last accessed
/Api/setvia the OpenTRICK API; - the “Last alert” column shows when the probes has last accessed
/Api/notifyvia the OpenTRICK API; - “Allow access” indicates if the probes is enabled or disabled;
- “Number of subscribers” specified how many risk analyses have given access to the probes.
Entering this token in the powershell client the probe is able to change dynamic parameters..
When checking a user, the “Edit”, “Renew” and “Delete” buttons will become available.
The “Renew” button permits to assign a new access token to the selected probes user.
When editing or adding a new user, the “Name”, “Description” and “Status” properties (as described above) can be changed.
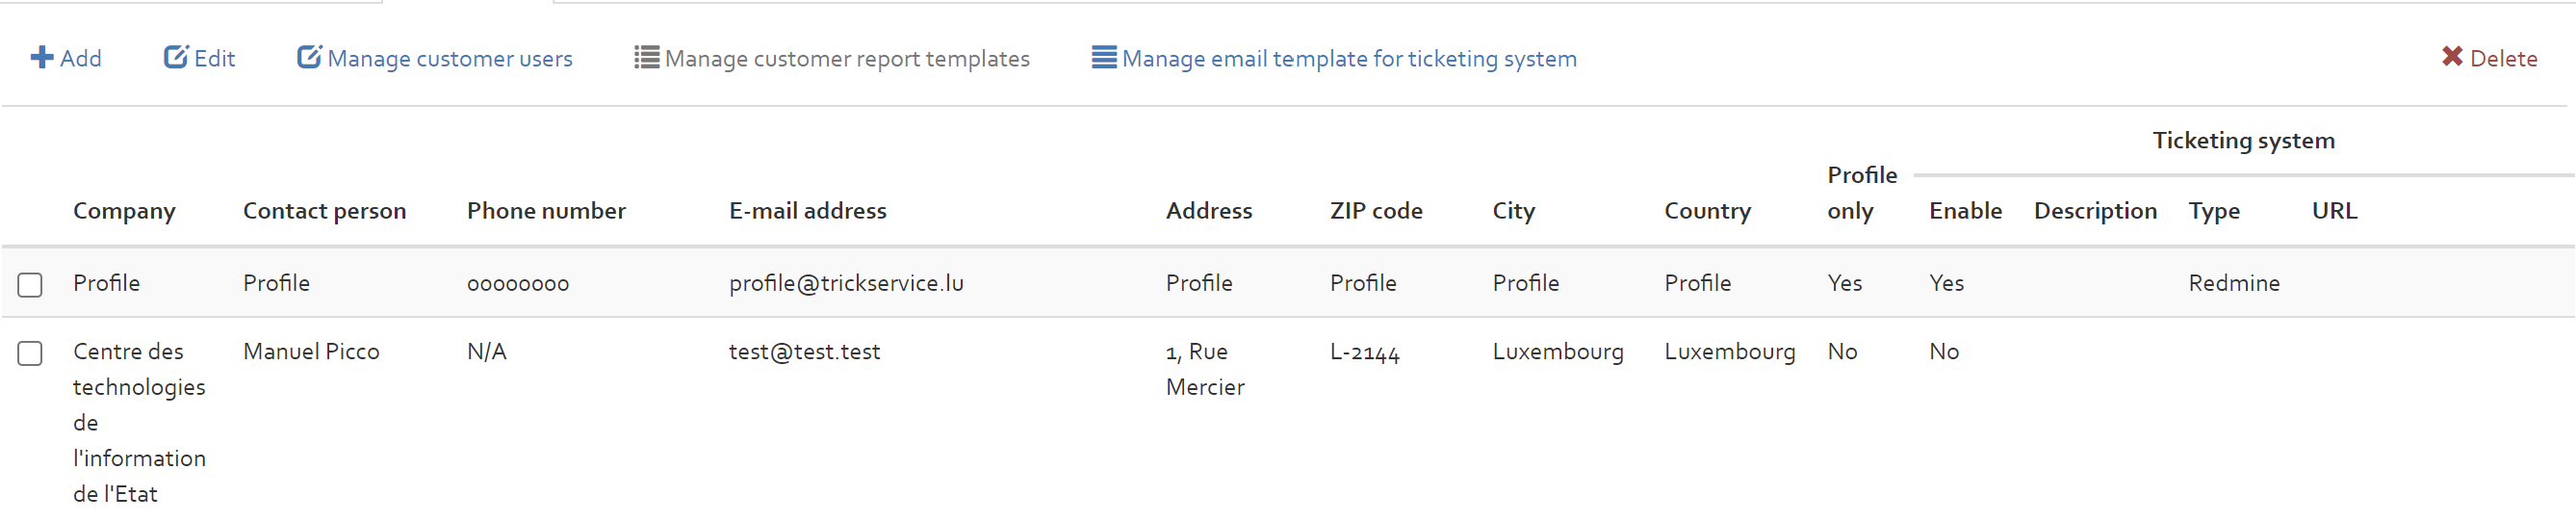
Customers
The customers section includes a list of all customers. Further options of this section are adding, editing, manage customer users or deleting a customer.
The options “Add”, “Edit” and “Delete” are explained in [Section]. The option “Manage customer users” is explained in the following subsection.
Manage customer users
With the “Manage customer users” option it is possible to define which user is assigned to which customer. Note that this still does not provide access to the different risk analysis of a customer but only the right to see the customer.
By selecting a customer and clicking on the “Manage customer users” button, a new window appears where the different users can be selected for having access to a customer.

Manage customer report templates
Selecting a customer (only can be activated for the customers that are linked to the risk analysis profiles "profile only" ), you can click on "Manage customer report template" button to "Download" or "Edit" selected templates in the list.

Managing customer ticketing system
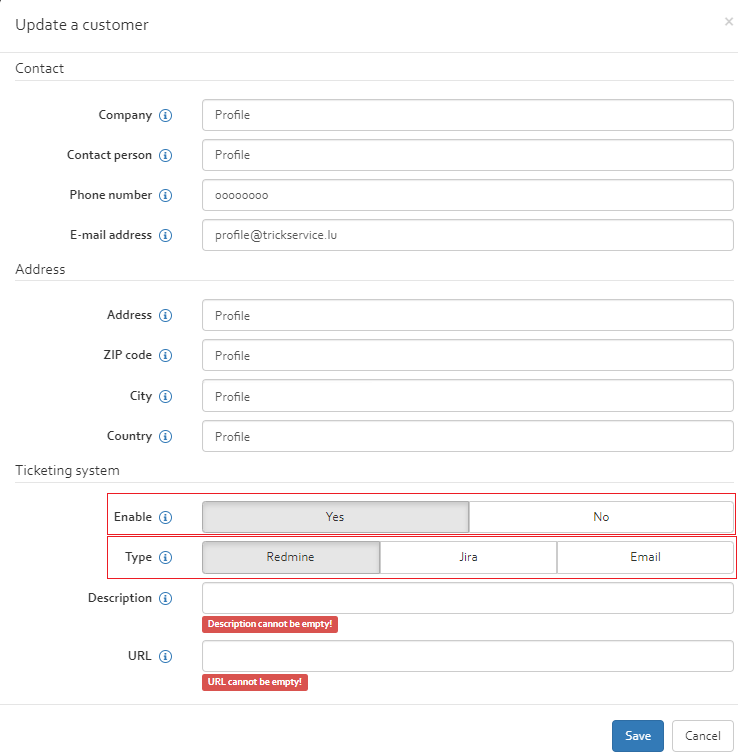
A customer can be authorised to one of three ticketing systems (JIRA/Redmine/Email). In order to enable one of these ticketing system select Edit after selecting a customer and then select the appropriate ticketing system (see [Figure]):
- JIRA: This option authorises the customer to the JIRA ticketing system
- Redmine: This option authorises the customer to the Redmine ticketing system
- Email: This option authorises the customer to the Email ticketing system
Managing customer ticketing system Redmine/Jira
This section describes the process of configuring the redmine ticketing system. Both redmine and jira ticketing system need to be configured in similar manner.
- The steps to configure the ticketing system as Redmine are explained below.

After the analysis is configured and linked to redmine project user can go ahead and create and update tickets (see [Section])
Managing customer ticketing system Email
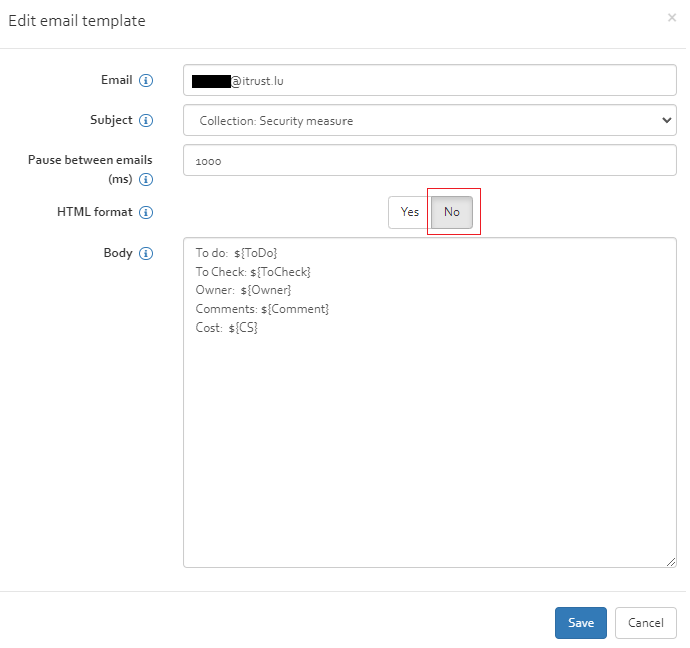
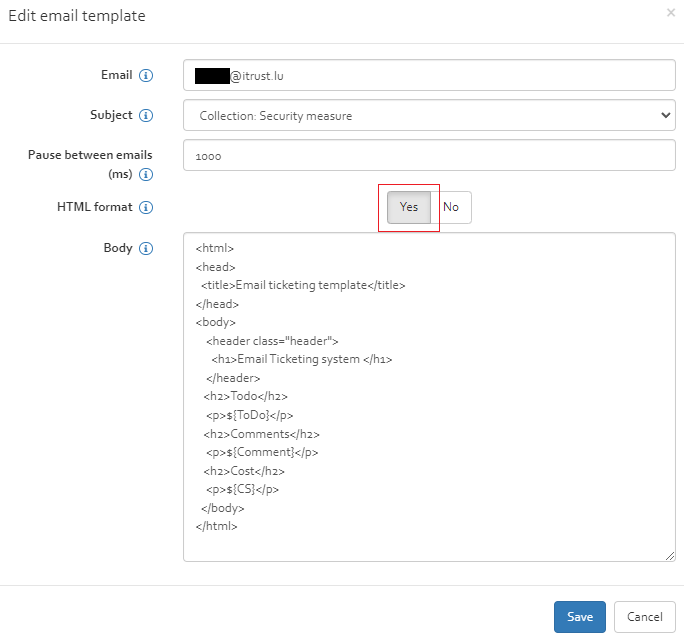
If email ticketing option is selected then an email template needs to be additionally set for the customer. In order to do this select the customer and Click "Manage email template for ticketing system" [Figure]. Edit the template in the dialog box that appears [Figure]
- The fields of the template are explained below:
- Email: The email id of the responsible user whom the ticketing system email(s) will be sent
- Subject: The subject of the email to be sent by the ticketing system. It is limited by 998 characters and must be chosen from one of the following options:
- Security measure:If this subject is chosen then the subject line of email is replaced by the corresponding Security measure for which the ticket was created.
- Collection Security measure: If this subject is chosen then the subject line of email is replaced by the collection number followed by corresponding Security measure for which the ticket was created.
- To do: If this subject is chosen then the subject line of email is replaced by the "To do" column of Security measure for which the ticket was created.
- To check: If this subject is chosen then the subject line of email is replaced by the "To check" column of Security measure for which the ticket was created.
- Pause between emails: This is the interval between sending two consecutive emails. This ensures that the email delivery system does not consider these emails as spam.
- HTML Format: The body of the text message could be specified in an HTML format or in TEXT format. This option allows the user to choose between the two.
- Body: The body is a template email message in either a raw text format or html format which can contain the placeholders enumerated below.
However for a better compatibility with ticketing system prefer to use text format.
In order to separate the different fields/placeholders and view them in outlook in new lines it is recommended to place " ; " (space followed by a semi colon followed by 3 spaces) after each line in the body.
Please note that special characters in the template should not be used for an effective ticketing system management. These placeholders stand for respective columns of the Risk Treatment/Compliance Collection (see [Section]).${Std}for Collection name.${Ref}for Reference.${SecMeasure}for Security measure.${Desc}for Measure desciption.${ST}for Status.${IR}for Implementation rate.${IW}for Internal workload.${EW}for External workload.${INV}for Investment.${LT}for Life time.${IM}Internal maintenance.${EM}for External maintenance.${RM}Recurrent maintenance.${CS}for Cost.${PH}for Phase.${PHB}for Phase start date.${PHE}for Phase end date.${Comment}for Comment.${ToDo}for To do.${Owner}for Owner.${ToCheck}for To check.
For an example of using HTML format (see [Figure])
Once the email template is created tickets can be created by emails (see [Section])
All analyses
The “All analyses” section includes a list of all analyses of the different customers. The different risk analyses of the different customers can be shown by selecting a customer in the analyses filter positioned on the top of the list.
Options related to this section are managing the access rights towards the risk analyses of the different customers, the option to switch an analysis to another customer and the option to delete risk analyses.
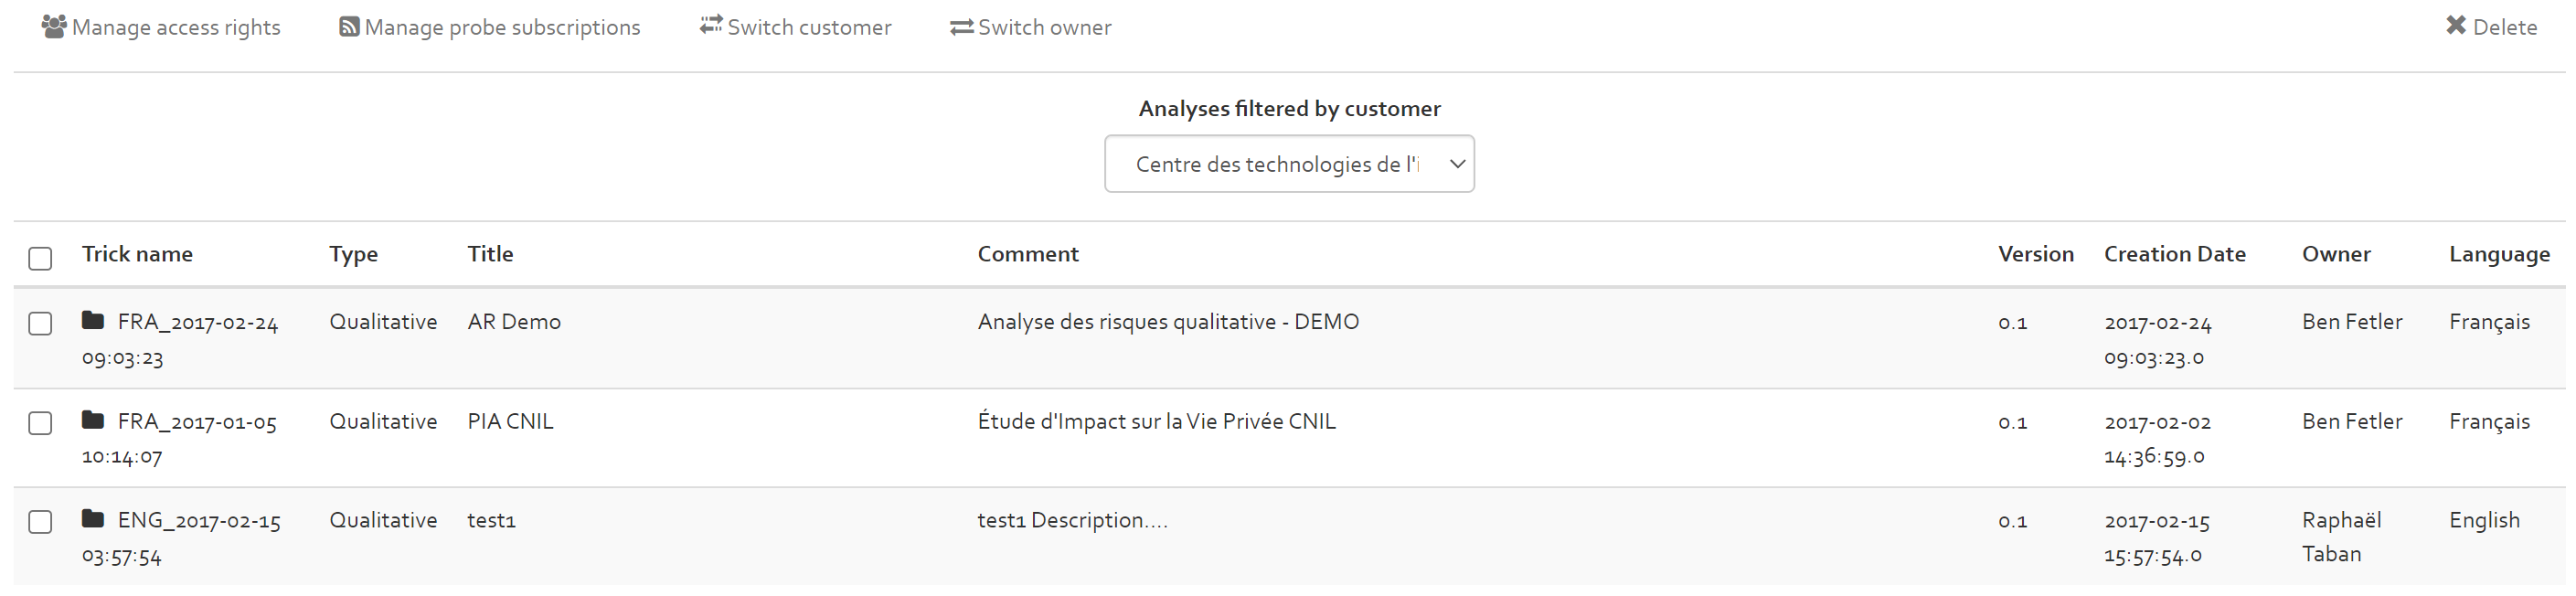
The manage access rights option functionality works the same as the one explained in [Section].
To delete a risk analysis, select the risk analyses to delete and click on the “Delete” button.
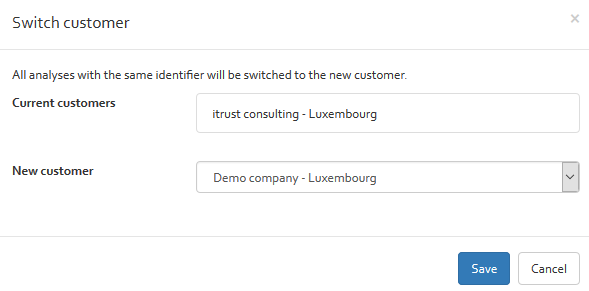
To switch an analysis to another customer, select the analysis and click on the “Switch customer” button. Next, select the new customer to which the risk analysis should be moved to and click on the “Save” button.
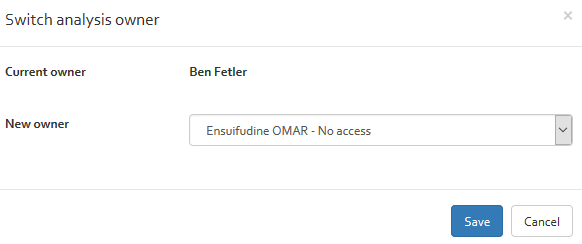
To switch the owner of an analysis, select an analysis and click on the “Switch owner” button. Next, select the new owner and click on the “Save” button.
Settings
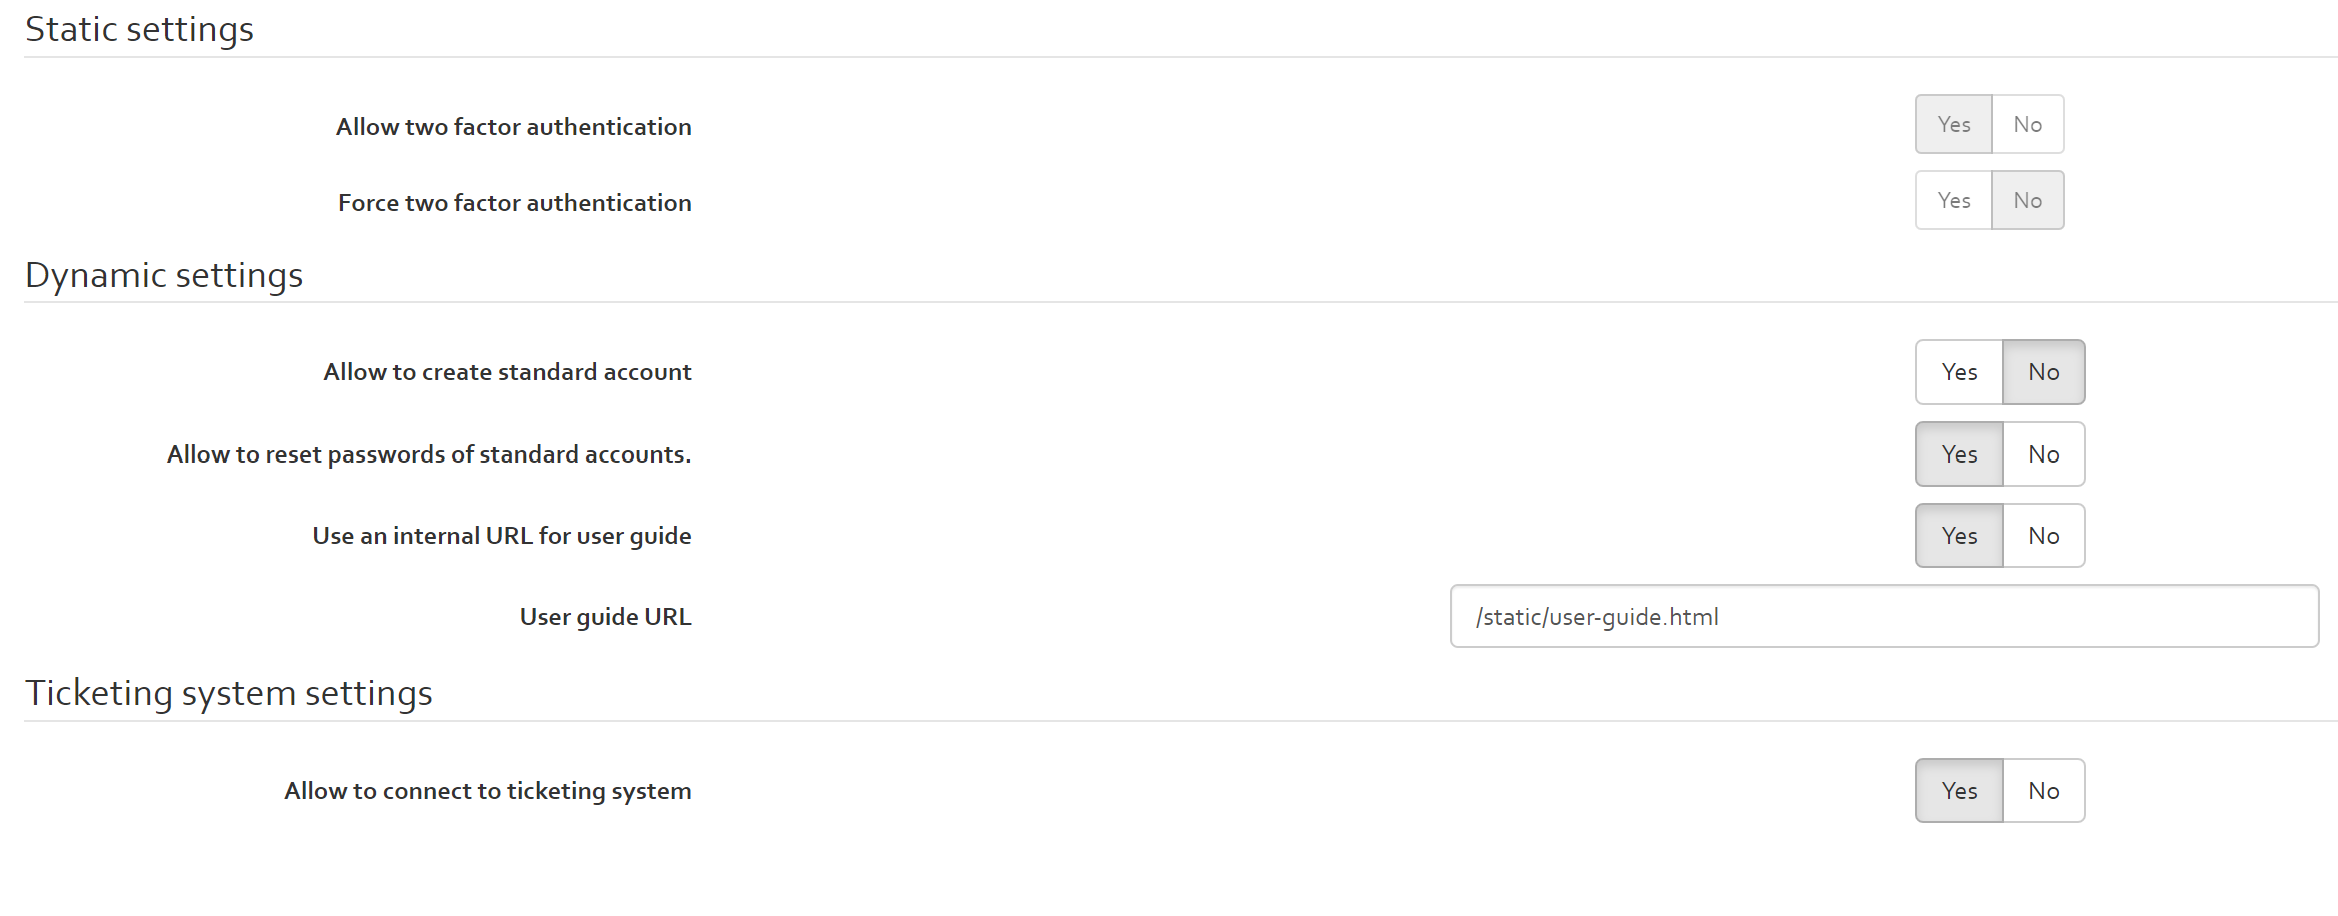
On the settings section, you can:
- enable or disable (on the login page) the functionality that allows users to sign up by themselves
- enable or disable (on the login page) the functionality that allows users to reset their password in case they have forgotten it.
- Enable or disable the functionality to connect OpenTRICK to a ticketing system (useful for follow up of actions from the risk treatment plan).
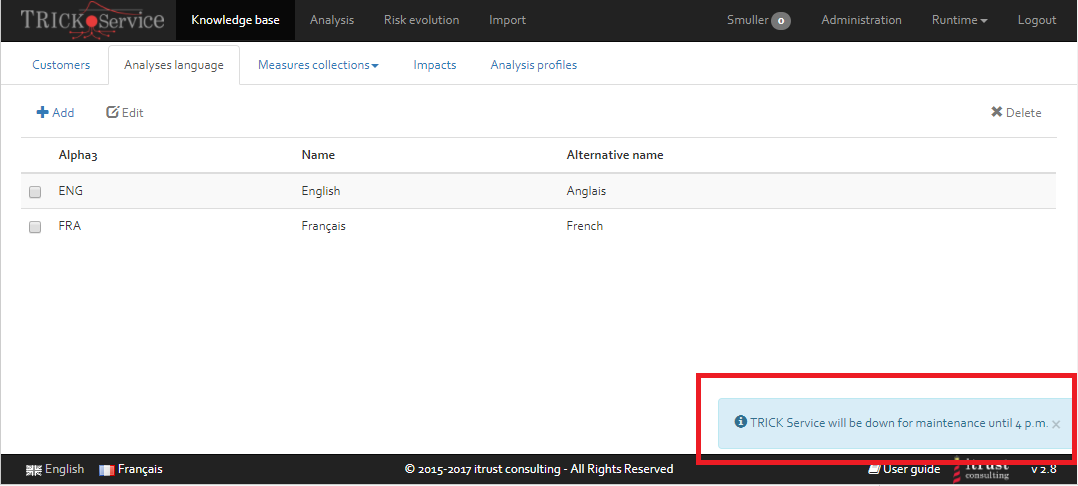
Broadcast center
The broadcast center lists all notifications that are sent to all users of the platform (see [Figure]). The notification will appear in the lower right corner of the screen, when a user visits the platform. See [Figure] for an example.

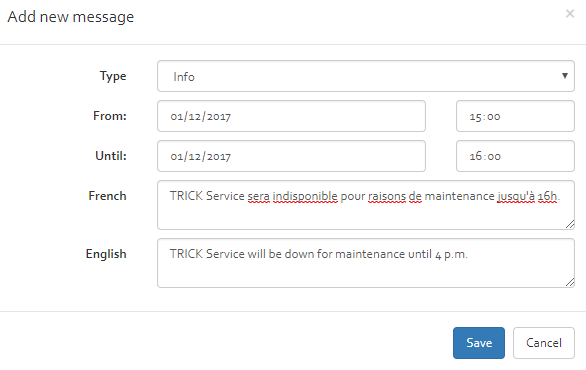
A new notification can be scheduled by clicking the “Add” button. Existing notifications can be edited or deleted by clicking the appropriate buttons in the upper right corner of a notification (see [Figure]). When creating/editing a notification, a dialog as depicted in [Figure] appears. An administrator can then specify:
- Type: The type of notification, which essentially translated to a colour (Info: blue, Success: green, Warning: yellow, Error: red);
- From: the date/time when the notification shall first appear;
- To : the date/time when the notification shall stop appearing;
- French: the message displayed for French-speaking users;
- English: the message displayed for English-speaking users.
Logs
The “Logs” section includes an interface that allows an administrator to access and consult OpenTRICK log entries.
Runtime
The “Runtime” menu is only meant for internal use. It provides functionalities to upgrade very old releases of OpenTRICK (before v2) to more recent versions.
Logout
The Logout button on the far right-hand side of the ribbon can be used to log out of OpenTRICK.
Creating a risk analysis using OpenTRICK
This chapter provides information on performing a risk analysis using OpenTRICK. Once the user has loaded his risk analysis (cf. [Section]), the following page will be displayed:

[Figure] shows a second ribbon displaying the different options linked to a risk analysis. Although all the information is contained on a single page, this ribbon allows quick navigation quickly to the different sections, rather than continually having to scroll through all the information.
History
The first section, History, seen in [Figure] above, shows the evolution of the current risk analysis.
The following sub chapters describe each of the other sections contained in the risk analysis ribbon. Any section which has a blue background colour is editable by clicking on it. Once the information has been inputted, the user can click anywhere on the screen outside of the edited section to record the change.
Risk context
The risk context tab has the following sub sections:
Scope
The first step of the risk assessment consists of defining the scope of the risk assessment. This section contains a table with two columns: “Description” and “Value”. The “Value” column should be edited by the user, based on the following information:
| Description | Value |
|---|---|
| Organisation type | Type of the organisation: Government, agency, company… |
| Profit type | Profit type of the organisation (S.A., s.à r.l., etc.). |
| Name of organisation | The name of the organisation. |
| Organisation presentation | A short description of the organisation. |
| Sector | The business sector in which the organisation is active, e.g. public, financial, etc. |
| Responsible | The person(s) who is/are responsible for performing the risk assessment. |
| Manpower | Number of employees working for the organisation. |
| Activities | The services that the organisation provides to its customers. |
| Business processes | A list of the business processes which support the company in achieving its goals. |
| Legal, regulatory and contractual requirements applicable to the organization | Laws applicable to the organisation’s type, e.g. for a company that handles sensitive customer information this would include laws on data protection. |
| The organisation’s information security policy | Title of the organisation’s security policy including the date on which it was published. |
| The organisation’s overall approach to risk management | Title of the organisation’s risk management policy including the date on which it was published. |
| Locations of the organisation and their geographical characteristics | The address of the organisation and a brief description of the environment e.g. number of rooms in the building, private or shared building, etc. |
| Various obligations | Legal and contractual obligations of the organisation. |
| Identification and analysis of the stakeholders | Description of the stakeholders and their requirements. |
| Establishment of the required relationships between the organisation and stakeholders | The relationship between stakeholders and the organisation e.g. commercial, partnership, etc. |
| Expectation of stakeholders | What the stakeholders expect from the organisation. |
| Socio-cultural environment | Information regarding the environment in which the organisation operates, e.g. dynamic start-up company. |
| Interfaces (i.e. information exchange with the environment) | What interfaces does the organisation use to exchange information e.g. website, email, etc. |
| Definition of roles and responsibilities | The roles and responsibilities of the organisation’s employees. If the information is contained in a dedicated document, the title of the document should be indicated here. |
| Definition of decision escalation paths in case of change of risks | Description on how major decisions are made within the company in relation to security incidents. |
| Development of the information security risk management process suitable for the organisation | Brief description of the organisations risk management process. |
| Specification of records to be kept | A list of records which will be kept as part of the risk analysis. |
| Excluded assets | A list of any assets which are not in the scope of the ISMS. |
| The organisation’s function and structure | The structure of the organisation, e.g. board members, Managing Director, Heads of Departments, etc. |
| Strategic objectives, strategy and politics | The business strategy of the organisation including its objectives and goals. |
| Financial parameters to define risk criteria | Provide information related to the financial aspects taken into account for the definition of risk criteria. |
| Risk evaluation criteria | Definition of the risk evaluation criteria as defined by the organisation under analysis. |
| Impact criteria | Definition of the impact criteria chosen by the organisation under analysis. |
| Risk acceptance criteria | Definition of the risk acceptance criteria or reference. |
Parameters
The parameters page includes the labels of probability/Impact scales, the risk acceptance threshold, CSSF parameters, various parameters and security maturity related parameters. Some of these parameters are only applicable for qualitative or mixed risk analysis..
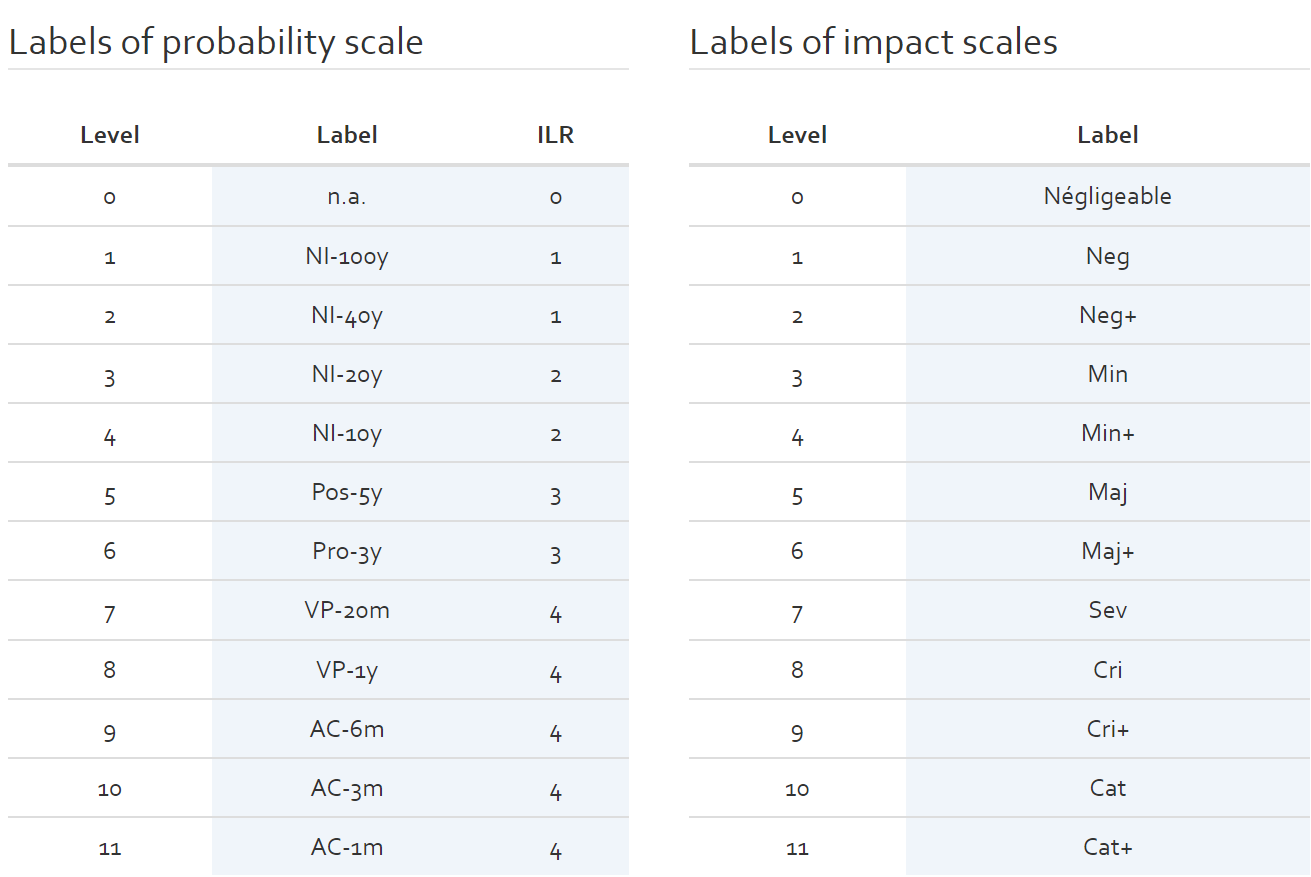
Labels of probability/impact scale
This section allows the user to define the (short) labels for the different probability and impact scales used in the risk analysis. The labels are used throughout the risk analysis and the report. They are meant to be synonymous with the actual level value.
Risk acceptance threshold (Qualitative risk analysis)
The risk acceptance threshold is used to indicate the different levels of risks and what reaction is expected for risks of this level.
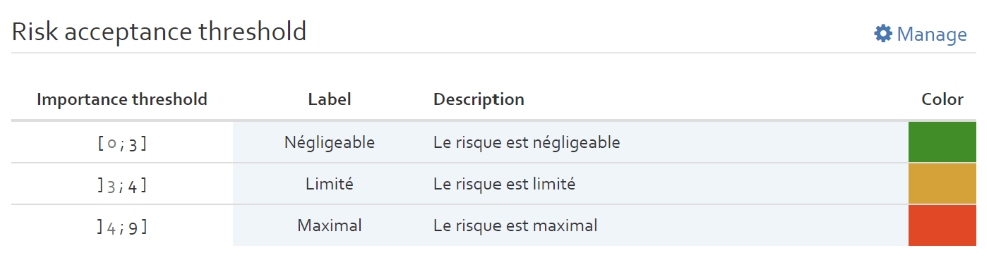
By clicking on the “Manage” button, the user can define different importance thresholds. By clicking on the “+” button, the user can add a new threshold. For each new threshold level, the user should indicate a label (name of the threshold, e.g. critical, high, medium, low), the upper limit of the threshold value, a description of the threshold indicating what should be done with risks associated with this level and a colour used in the risk heat map (see [Section]).

CSSF parameters (Qualitative and Mixed risk analysis)
For qualitative and mixed analysis, you are able to change the CSSF parameters:
- Impact threshold: the scale for rating the impact of a risk.
- Probability threshold: the scale for the liklihood of a risk occuring.
- Direct size: the number of most important “direct” (in the CSSF sense) risks.
- Indirect size: the number of most important “indirect” (in the CSSF sense) risks.
- CIA size: the number of most important “Confidentiality/Integrity/Availability” risks.

ILR SOA Scales Mapping
The ILR SOA Scales mapping classify the level of compliance of a security measure based on the implementation rate of a security measure. By default the scale classification is as depicted in figure below. The threshold rates, description as well as color can be configured by double clicking the entries. In the ILR compatible JSON files these settings are used in "soaScaleComment" structure while exporting the JSON file for Serima. Refer ().

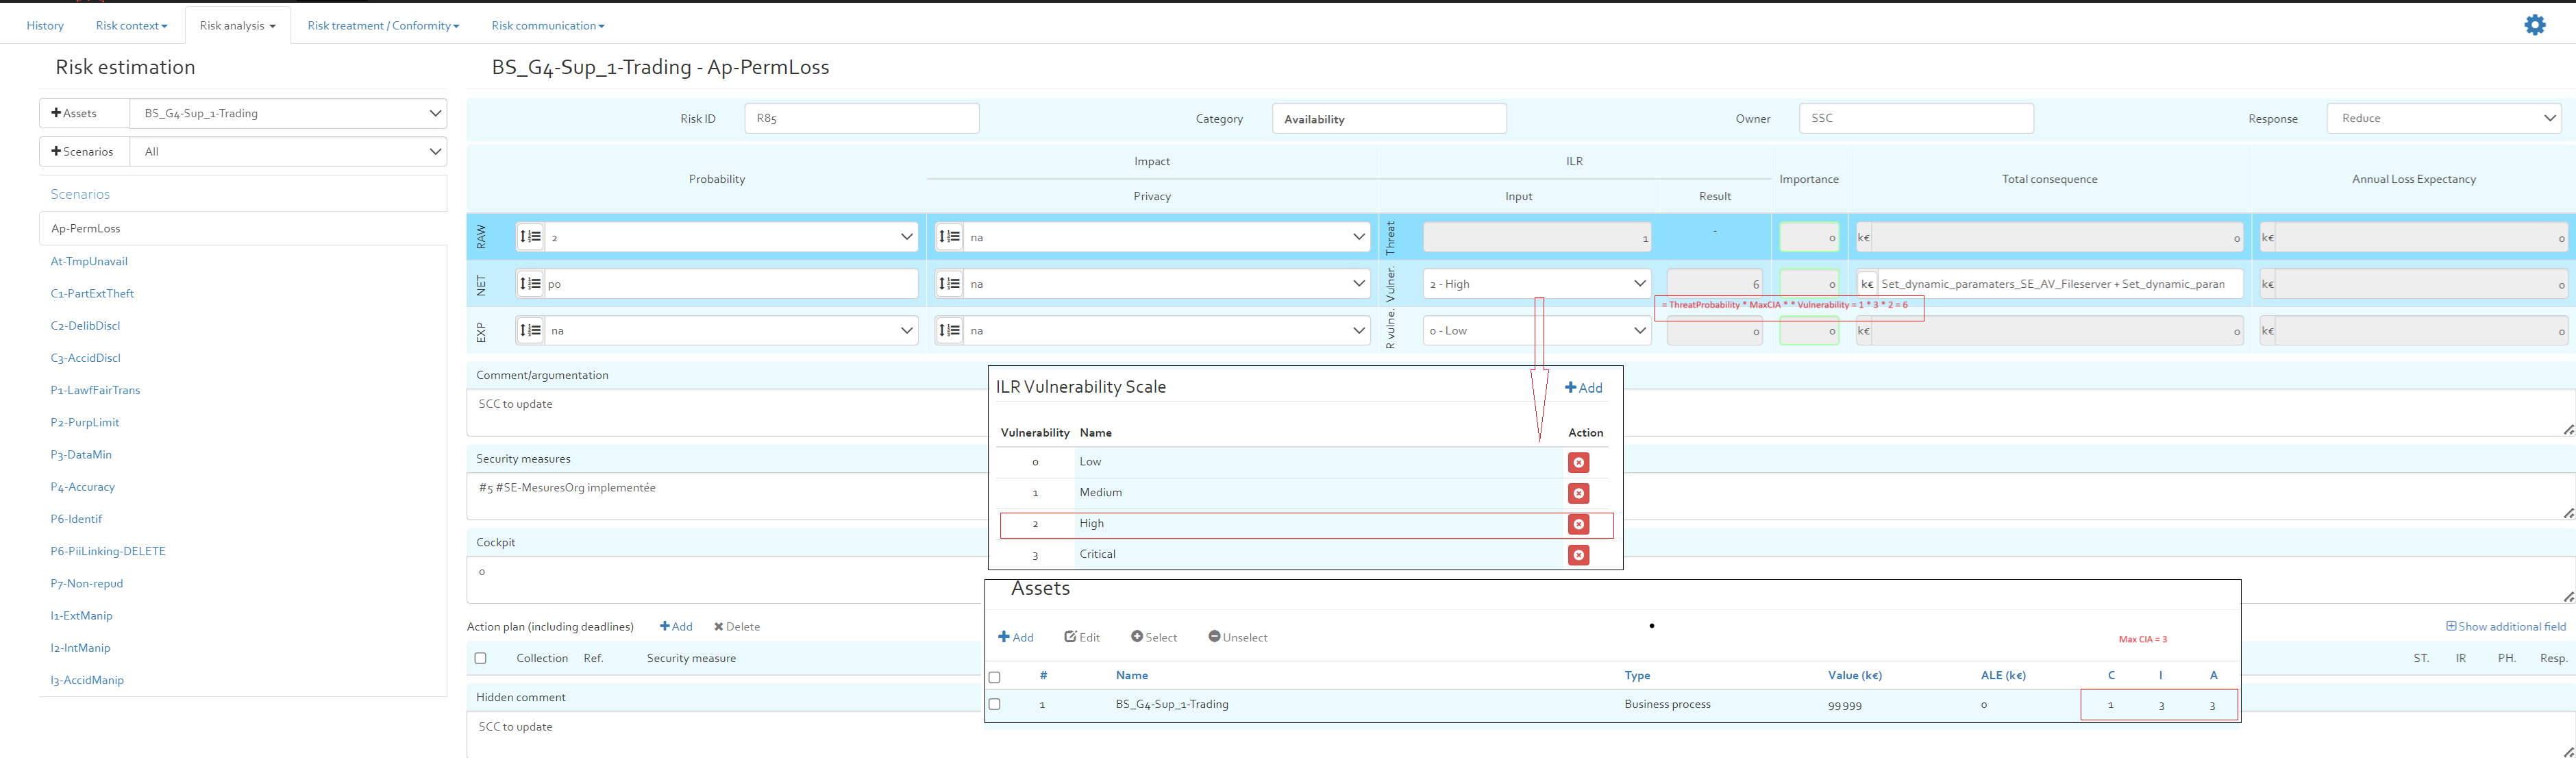
ILR Vulnerability Scale
The ILR Vulnerability Scale Refer ([FIGURE]). This scale is used to define the levels of vulnerabilities in a qualitative risk estimation. For further details refer ([SECTION])

Report settings
These settings allow configuration of color schemes which is used for the generated Reports for the current analysis

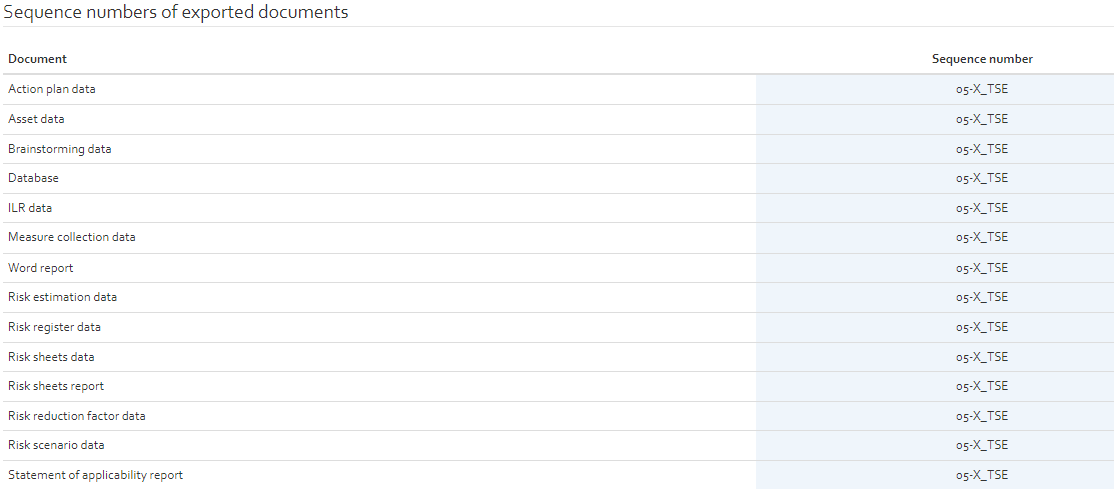
Sequence numbers of exported documents
These settings are used as prefixes of the file names/data exported from OpenTRICK
Various parameters
The options of the “Various parameters” table are the following:
- Internal setup rate: Average cost of one internal man-day. Used to compute implementation costs of security measures.
- External setup rate: Average cost of one external man-day. Used to compute the implementation costs of security measures.
- Default lifetime: Default lifetime of a security measure before it must be re-implemented. When ever you do not enter a value for the lifetime of a security measure, OpenTRICK will consider the default lifetime specified here, instead.
- Max RRF (only for quantitative analyses): Used to fine-tune the Risk Reduction Factor (RRF). The Max RRF value is expressed in percentage. The RRF will be multiplied with the MAX RRF value to fine-tune the RRF.
- SOA: Used to only consider measure with implementation rate < SOA for the SOA section. If an ISO 27002 security measure has an implementation rate that is higher than the SOA threshold parameter, the security measure is sufficiently implemented to fulfil the ISO/IEC 27001 minimum requirements.
- Mandatory phase: Option to define a phase in which all security measures become mandatory to be implemented.
- RRF threshold: The RRF threshold determines which security measures need to be implemented in the qualitative action plan for a given risk scenario.
The measures are determined based on three conditions.
- The implementation rate of the measure is not 100 %
- The measure is applicable
- RRF will be computed using measure and risk estimation (Asset and Scenario combination). The computed RRF must be greater or equal to RRF threshold for the measure which is applicable

Probability & Impacts
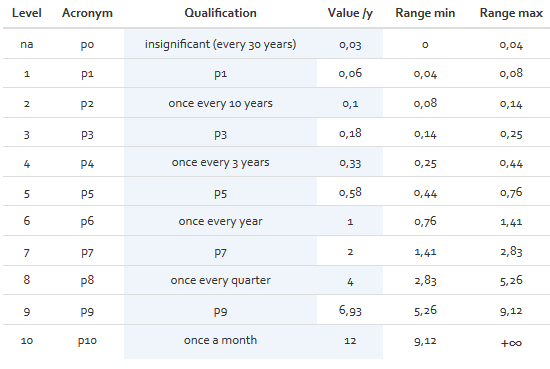
Probability scale
The probability scale for quantitative risk analysis:Each level represents the yearly probability that a risk may occur. The values may be edited, depending on the preferences of the organisation on how to define the different probability levels (see figure below).
The probability scale for qualitative risk analysis:Each level is described qualitatively (see figure below)
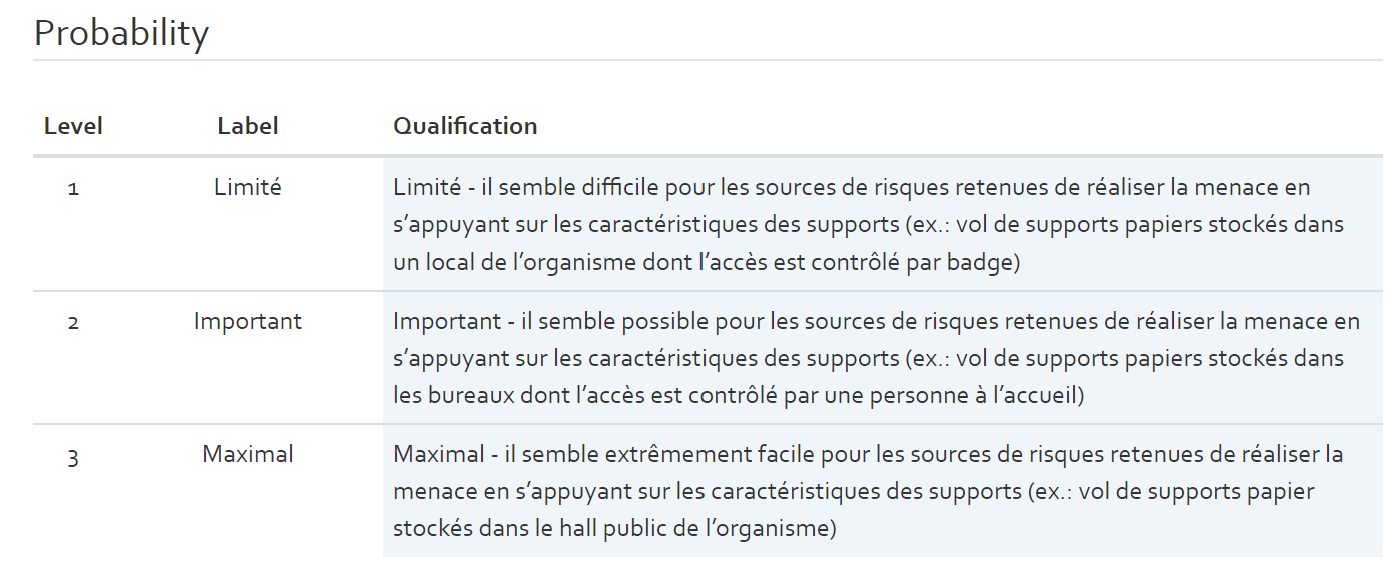
The probability scale values are needed during the risk estimation step.
Impact scales
Qualitative risk analysis
The impact scales section includes an impact scale for each type of impact selected during the creation of the risk analyses. The user can modify the labels and description of each impact level.

Quantitative risk analysis
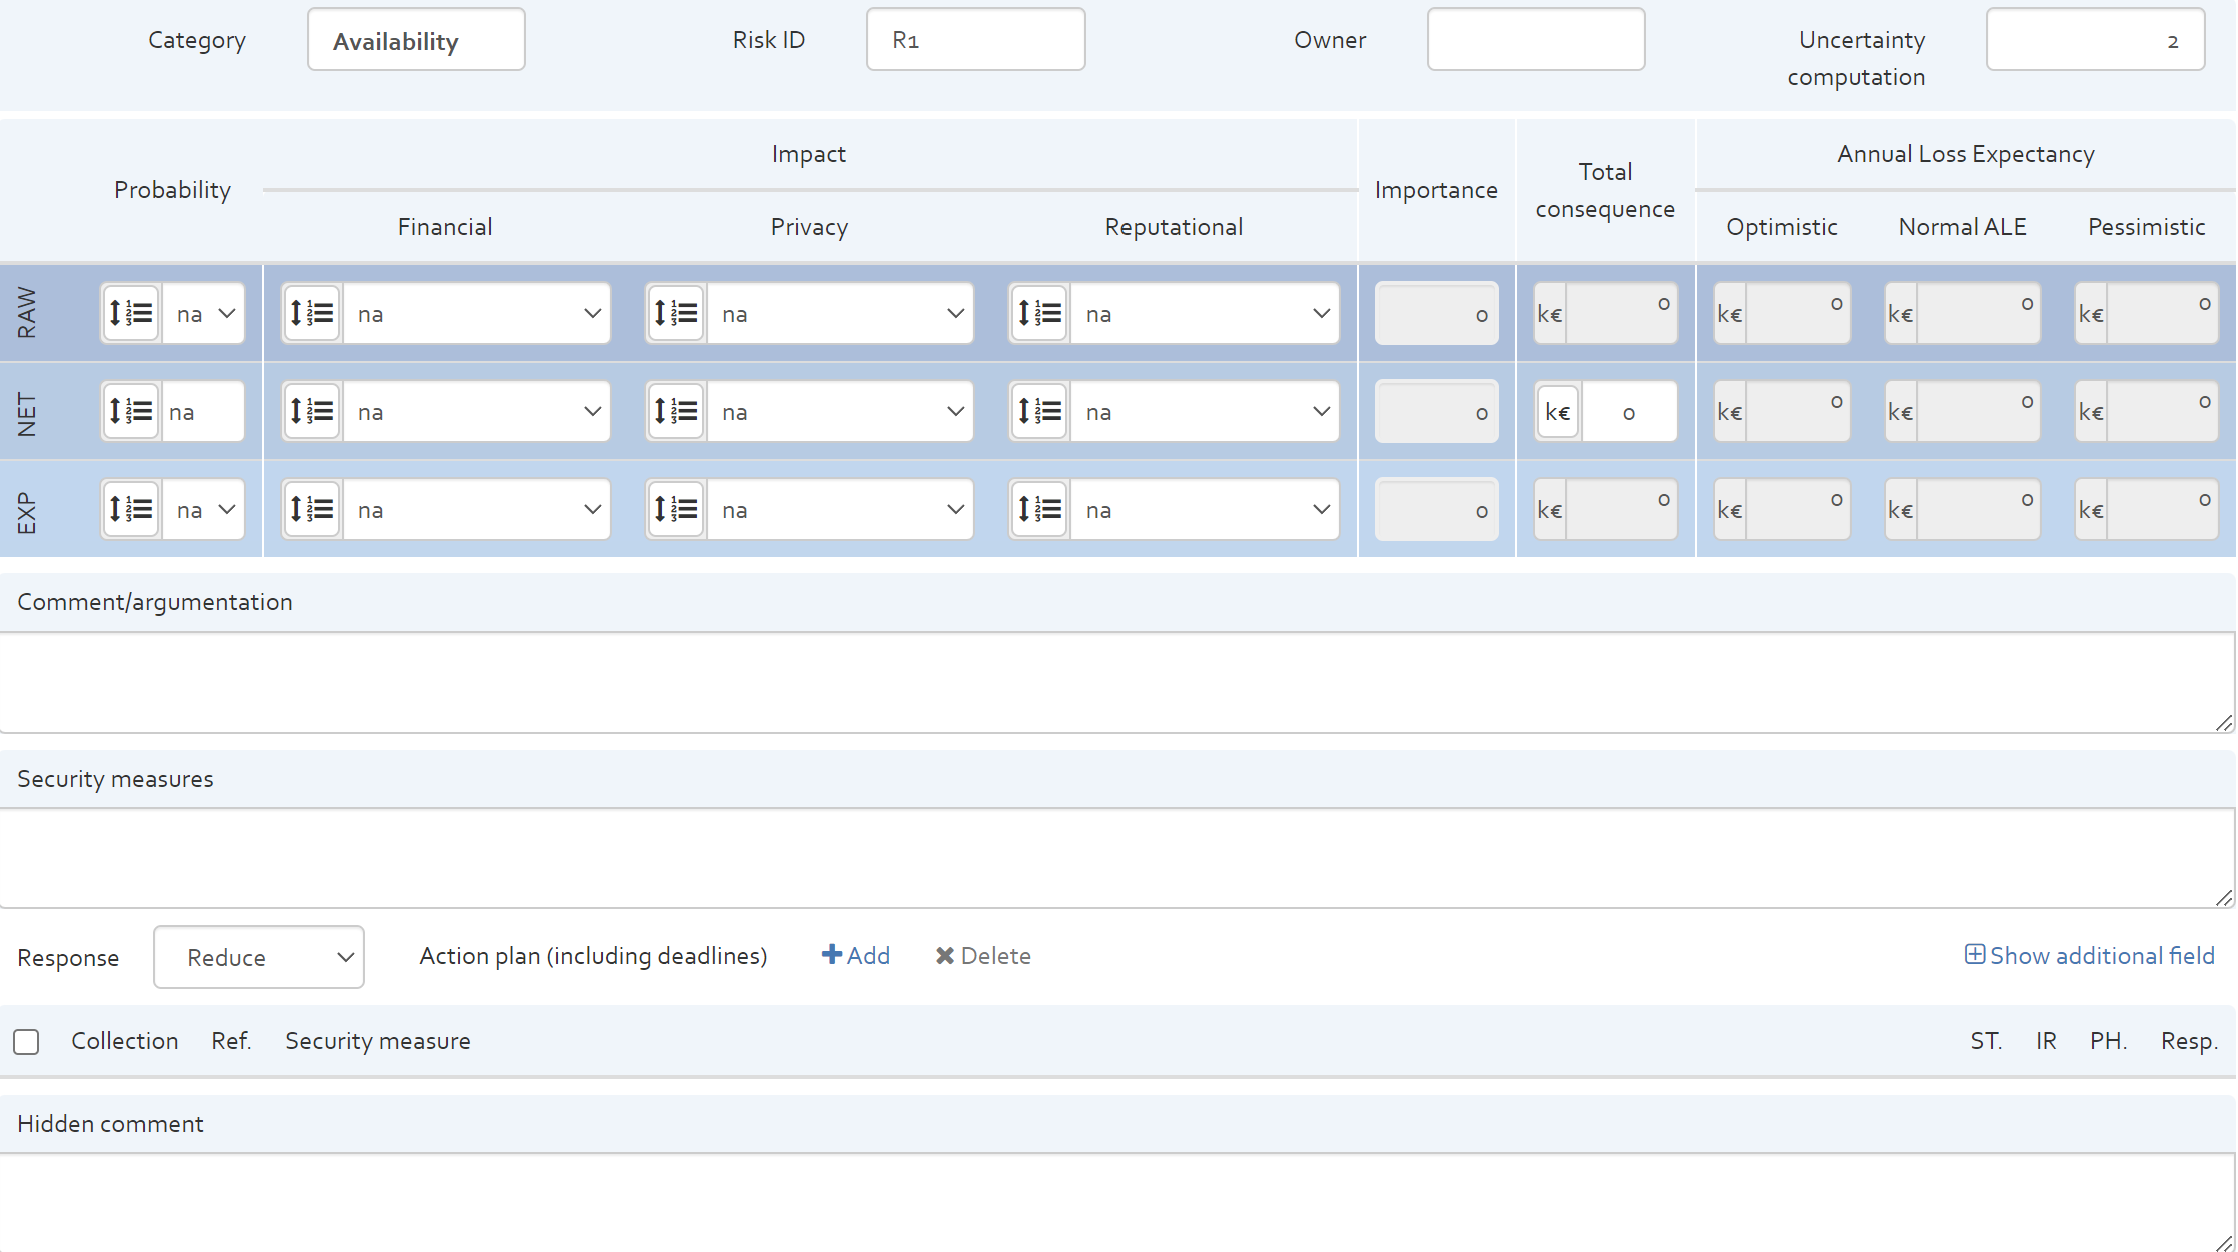
The following figure shows the default parameters for the total consequence scale:
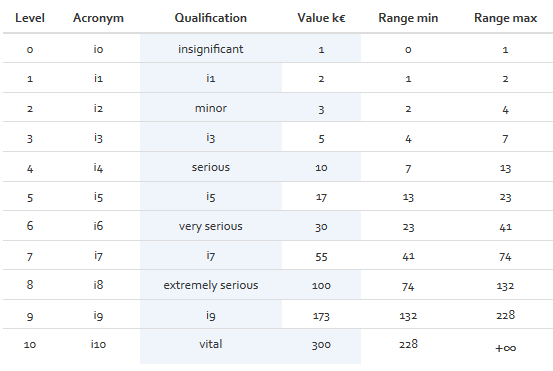
Each level represents the impact that a risk may have on the organisation should it occur; ranging from insignificant to vital. In [Figure], all areas highlighted in blue are editable. The indicated values should be in accordance with the size and financial situation of the organisation.
The impact scale values are used for computation during the risk estimation step.
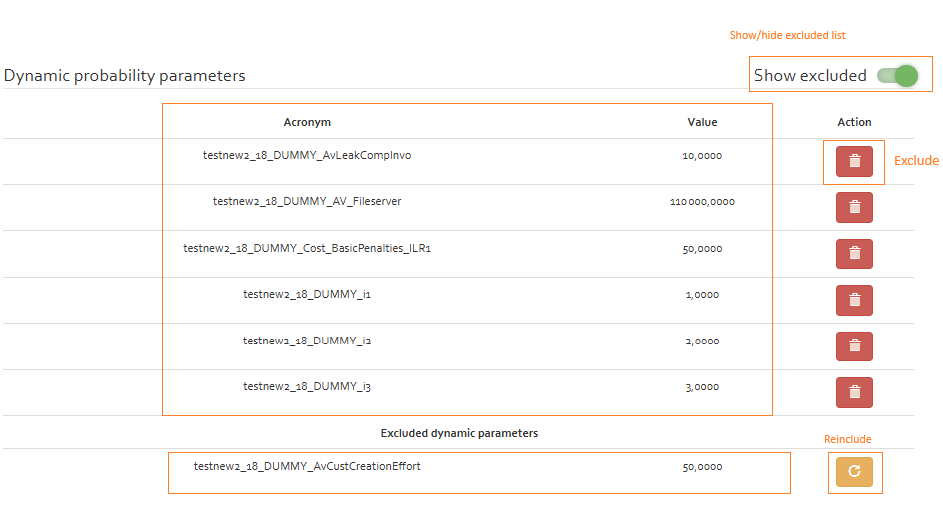
Dynamic probability parameters
In order to do a quantitative evaluation modelling dynamic parameters can be added to the risk analysis.
- The following steps can be used to achieve this:
- Add Probe to access OpenTRICK API. Refer [SECTION]
- Enable probe subscription for the risk analysis. Refer [SECTION]. Note that multiple analysis can share the same probe and thus there are certain limitations with the use of these probes.
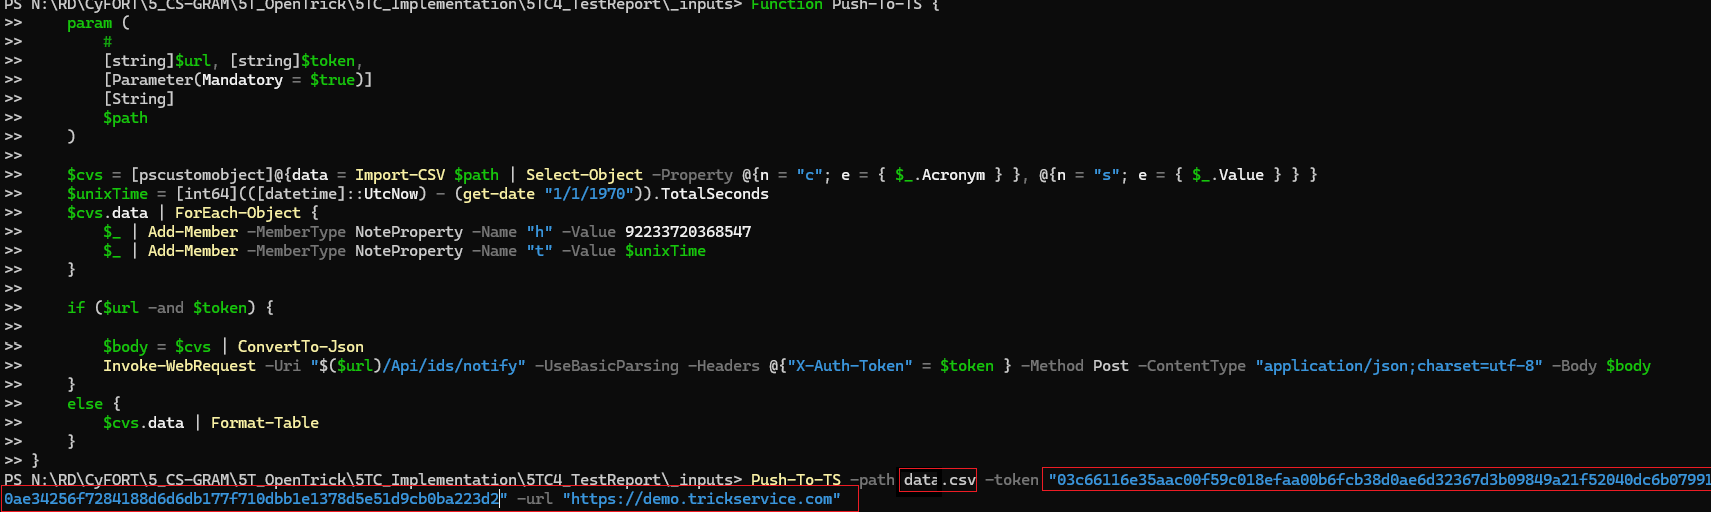
- Setup dynamic parameters for risk analysis. Use the script Push-To-TS in a power shell client to set dynamic parameters.
Refer [FIGURE] for setting dynamic parameters defined in a CSV file Example: data.csv.
All the analysis where the probe subscription is enabled will have the dynamic parameters set after running this script on command line. The script if run successfully will return
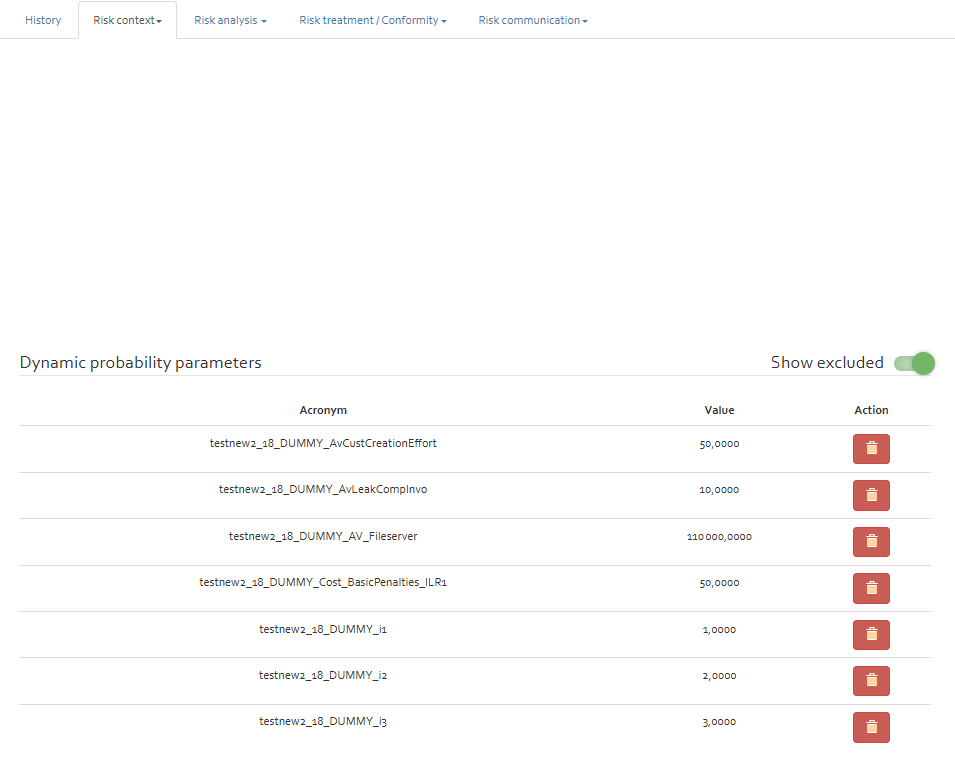
a status of 200. Once set these parameters are visible in "Risk context" as "Dynamic probability parameters" Refer [FIGURE] .
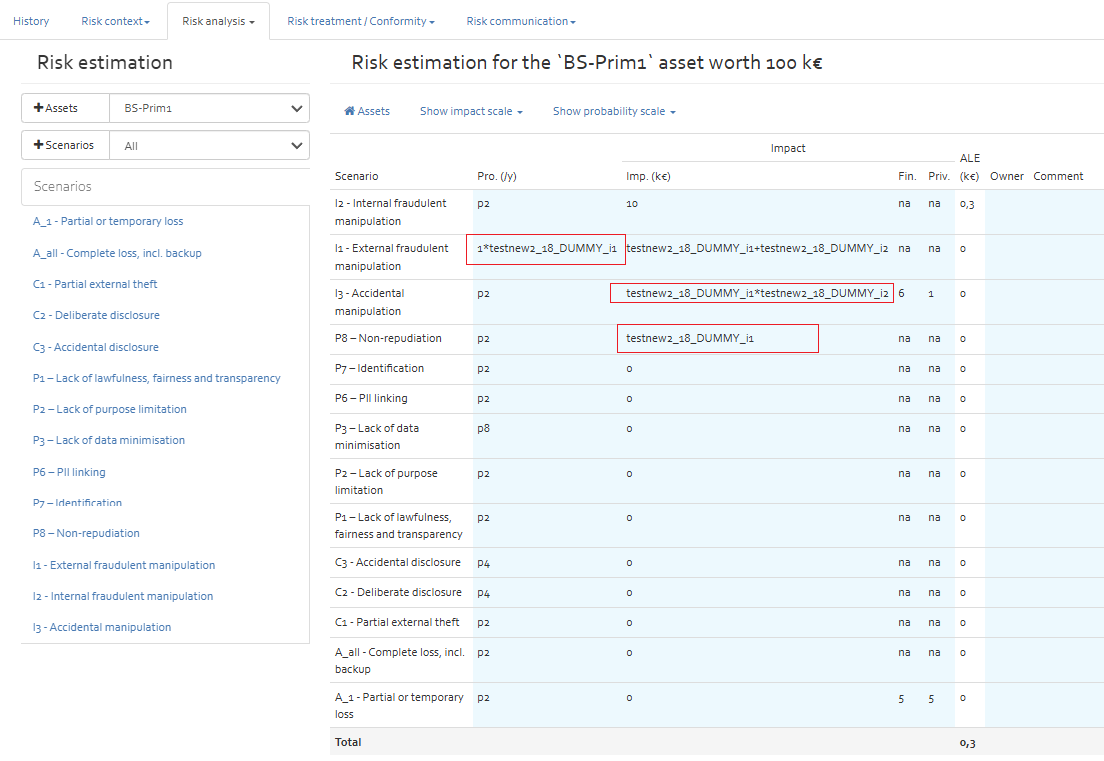
Please note that dynamic parameters are prefixed with the name of the probe, where any special characters in the probe name are replaced by underscores ("_"). Additionally, any special characters in the parameter name are also replaced by underscores to prevent issues with mathematical operators (e.g., "-") that could interfere with expression evaluation. - Setup impacts based on dynamic parameters. Once the dynamic parameters are set these parameters can be used as arithmetic expressions to define impacts for the given risk analysis Refer [FIGURE] .
Exclusion and reinclusion of dynamic parameters
- Exclusion:Dynamic parameters once added to risk analysis can be excluded from the analysis by pressing the trash button next to the parameter. These excluded parameters are moved to "Excluded dynamic parameters" section. If a parameter is in use (example an expression in the risk analysis) it cannot be excluded. A permanent exclusion of paramater can only happen if the risk analysis unsubscribes from the probe and doesnt subscribe again.
- Reinclusion:Dynamic parameters once excluded can be reincluded by pressing the redo button.
- Properties of Exclusion & Reinclusion:
- If an excluded parameter is added again by running the Push-To-TS script (whether with the same or modified value):
- It will not be automatically moved to the dynamic parameter list. Instead, it will remain in the excluded parameter list until it is manually restored.
- The value of parameter will be updated however.
- If the analysis is unsubscribed from the probe, the excluded parameters will no longer be available/visible in the analysis. Re-subscribing to the probe will show up the excluded list corresponding to the given probe.
- If an excluded parameter is added again by running the Push-To-TS script (whether with the same or modified value):
Maturity parameters
Only if you imported "Maturity" from the measures collection for the risk analysis:
Maximal efficiency rate per security maturity level
Finally, we can modify three tables regarding maturity level. The first maturity parameter table contains maximal efficiency rates associated with different security maturity levels. The following figure shows default values for these parameters.

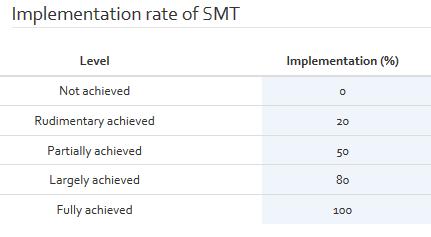
Implementation rate of SMT
The second maturity parameter table contains a scale for measuring the implementation rate of the different tasks in the different security maturity levels. The following figure shows the default values for these parameters.
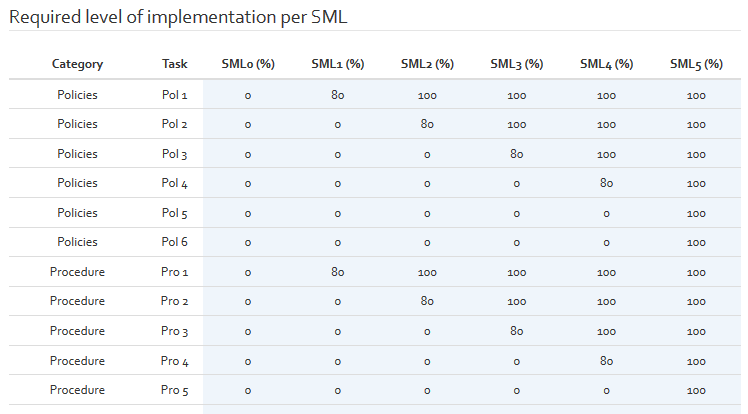
Required level of implementation per SML
The last maturity parameter table contains an overview on all tasks related to the different security maturity levels and indicates the needed implementation rate of the tasks to be compliant with a certain security maturity level. The following figures show default values for these parameters.
Risk analysis
Brainstorming
For identifying risks, OpenTRICK offers the possibility to perform a brainstorming on most common threats, vulnerabilities, and risk specificities. Based on the results of the brainstorming, it is easier to focus on domains where a high exposure level has been identified.
Following the basic principle of OpenTRICK, only table cells that are highlighted in blue are editable. Each section contains a table containing 6 columns which are described below.
| Column | Description | Modifiable |
|---|---|---|
| ID | Unique identification number of the threat, vulnerability, or risk | No |
| Name | Name of the threat, vulnerability, or risk | No |
| Acro | An acronym of the characteristic (only for threats) | No |
| Expo | The level of exposure to the threat, vulnerability, or risk; based on the MAGERIT scale | Yes |
| Owner | Column used to indicate the risk owner | Yes |
| Comment | A justification for the level of exposure that has been given | Yes |
| Hidden comment | A comment that will not be shown in the final report, but may be useful for the user | Yes |
The first sheet contains a description of the threats classified by source (Natural, Industrial environment, Internal error, etc.). The second sheet contains information about vulnerabilities which could be present on the assets of the organisation (Insufficient maintenance/faulty installation of storage media, Lack of periodic replacement schemes, Susceptibility to humidity, Dust, Soiling, etc.). The third sheet contains risk specificities, classifying risks by different types (Sources, Asset classes, Security aspects, Complexity, and Motive/cause).
The user should systematically go through the three lists and provide an accurate exposure level for each of the risk types, threats and vulnerabilities. Double-clicking in the “Expo” column will provide the user with a drop-down list of exposure levels. The meaning of the different levels is explained in the table below:
| Level | Description | Evaluation criteria |
|---|---|---|
| – – | Very Weak |
Treatment:
|
| – | Weak |
Treatment:
|
| N | Normal |
Treatment:
|
| + | Important |
Treatment:
|
| ++ | Very Important |
Treatment:
|
The user should then provide a comment within the “Comment” column that justifies the level of exposure. The user may also choose to provide a second comment in the “Hidden Comment” column which will not be displayed in the exported report. It is not mandatory for the user to fill in this column however, in certain cases it may be necessary to add more useful information.
Manage
The content of each section (“threats”, “vulnerabilities”, and “risks”) can be edited. In the upper right corner, an option is available to change their content (also see [Figure]).

Click the “Manage” button to open a pop-up where quick changes can be made directly in OpenTRICK. Each entry has three associated buttons:
- [−] Deletes only the current line;
- [−] Deletes the current line, and all lines starting with the same reference number;
For historical reasons, this button ignores trailing zeroes (
0) and periods (.). So, deleting5.0.0.with this button will also delete all references starting with5. - [+] Adds a new, empty line below the current line.
Risk assessment
Assets
The assets section contains a table listing all assets that are within the scope of the risk assessment. In the ribbon above the asset table, the user has the following options: Add, Edit, Select, Unselect, and Delete.
Adding an asset
If there are no assets in the table already, the only option available to the user will be “Add”. To add an asset to the list, click on the “Add” button which will open the box seen in the figure below.
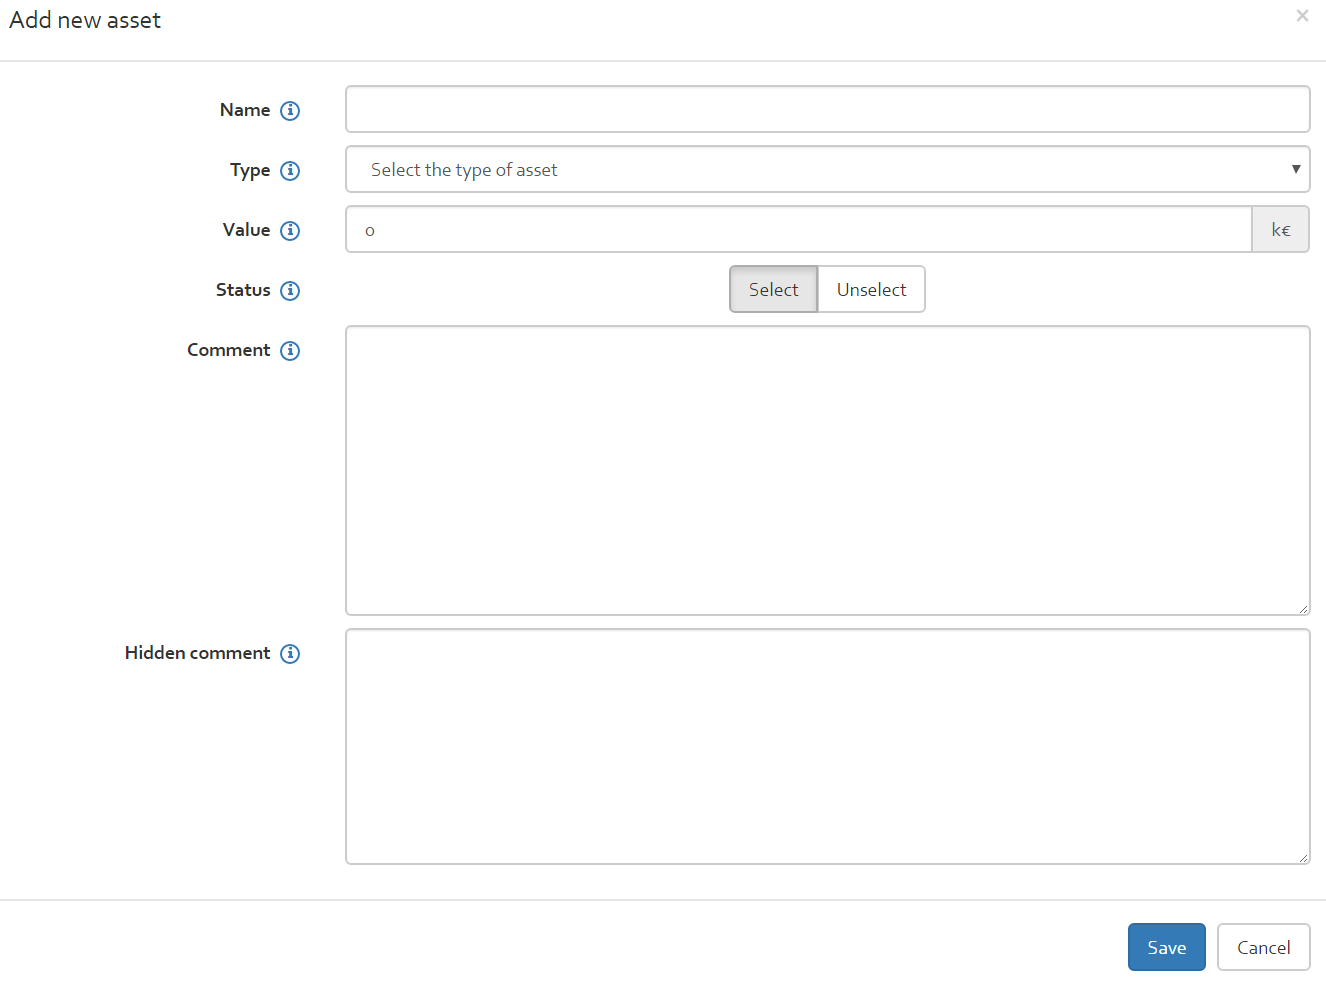
The following information related to each asset should be indicated when adding an asset:
- Name: the name of the asset;
- Type: select from a drop-down list one of the following asset types:
- Business process;
- Compliance;
- Financial;
- Hardware;
- Information;
- Immaterial Value;
- Network;
- Service;
- Human resources;
- IT system
- Value: The asset value in k€;
- ALEO: The value of "Annual Loss Expectancy Optimistic" in k€;
- ALE: The value of "Annual Loss Expectancy" in k€;
- ALEP: The value of "Annual Loss Expectancy Pessimistic" in k€;
- Status: Select or unselect an asset to be considered for the risk analysis;
- Comment: A comment regarding the asset e.g. a justification of its value, etc.;
- Hidden comment: A comment regarding the asset which will not be displayed in the final report.
Once all mandatory information is filled in (comments are not mandatory), click on the “Save” button, to add the asset to the asset list.
Editing an asset
Editing an asset can be done in two different ways:
- Double-click on the asset in the table to open the box indicated in [Figure]. The box will contain all the information that was previously entered and can be directly edited before re-saving using the “Save” button.
- Select the asset by ticking the box to the left-hand side of the required asset. The “Edit asset” option in the ribbon will now be highlighted in blue, allowing to click on it to open the information box.
Select and unselect
The “Select” and “Unselect” buttons are used to select which assets are to be included in the computation. Ticking the box next to an asset and then clicking the relevant “Select” or “Unselect” button will either include or exclude the asset from the risk analysis (it will not be displayed during risk estimation). If an asset in the list has a green background, it is included. If it has a white background, it is excluded from the computation. An orange background indicates that no asset value has been indicated (which is optional and not needed for risk computation).
Deleting an asset
To delete an asset, select the asset by ticking the box next to it on the left-hand side. Once the box is ticked, click the “delete” button in the ribbon to delete the asset from the list. All the assets in the list can be deleted together by ticking the box at the top of the far-left column to select all assets and then clicking “Delete”.
Scenarios
The scenarios table contains information regarding the different scenarios which will be considered for the risk analysis. By default, the table contains the following scenarios, shown in the figure below.

The table contains the following columns.
| Column | Description | Modifiable |
|---|---|---|
| ☐ | Ticking this box means the item in the row is selected, enabling the user to choose the various options from the ribbon menu above the table | No |
| # | Each scenario is given a unique sequence number starting from 1 | No |
| Name | The name of the scenario | Yes |
| Type | The security aspect that relates to the scenario, e.g. confidentiality, integrity or availability | Yes |
| ALEP (k€) | (Only for a quantitative risk analysis): The total Annual Loss Expectancy sum of the pessimistic risk estimation for the risk scenario in question. | No |
| ALE (k€) | (Only for a quantitative risk analysis): The total Annual Loss Expectancy sum of the pessimistic risk estimation for the risk scenario in question. | No |
| ALEO (k€) | (Only for a quantitative risk analysis): The total Annual Loss Expectancy sum of the optimistic risk estimation for the risk scenario in question. | No |
| Description | A brief description of the scenario | Yes |
Scenarios with ILR analysis enabled
For a risk analysis for which the ILR analysis is enabled the scenarios table looks as below where the scenarios are mapped to additional ILR Threat and Vulnerability IDs.

The different functionalities of risk scenarios are explained in the following sub-sections.
Adding a scenario
To add a scenario, click on the “Add” button which will open the box shown in [Figure].
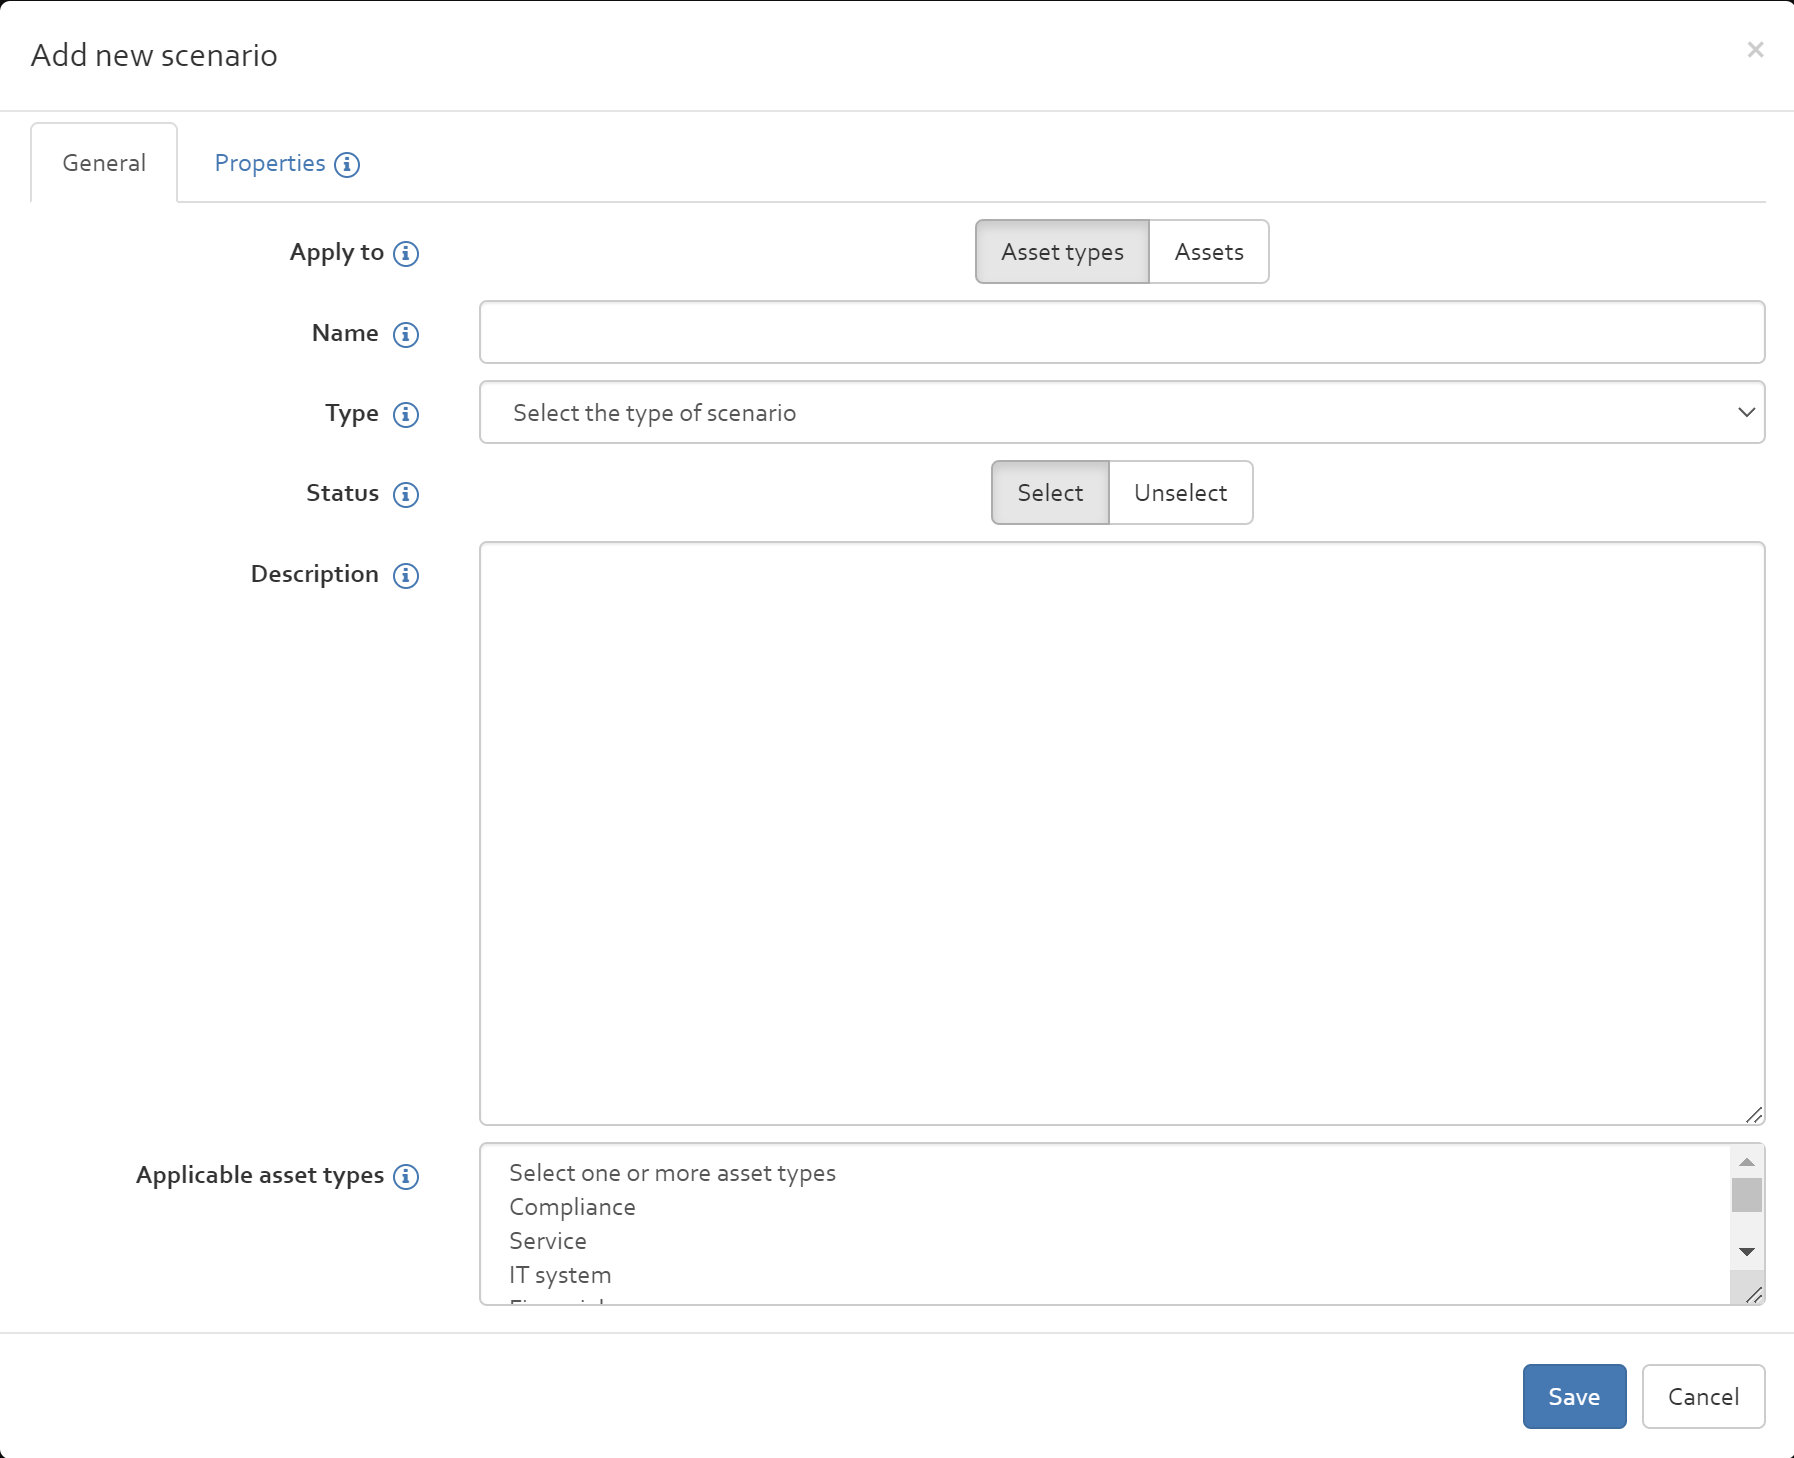
In this box, the following information should be entered:
- Apply to: You can choose if the risk scenario should be linked to an asset type or to a specific asset only.
- Name: The name of the scenario.
- Type: This drop down menu presents a list of different scenario types. Beside the risk types confidentiality, integrity, availability, exploitability and reliability, the list includes types coming from the CSSF circular. The CSSF types are enumerated in [Table] below.
- Status: This option allows you to indicate if the defined risk scenario should be considered during risk estimation.
- Description: A brief description of the scenario.
- Applicable asset types (The different asset types are described in [Section].) / Applicable Assets: Select to which assets/ type of assets the scenario applies to. This information dictates the asset estimation (cf. section “Risk estimation”).
In addition to the risk types of confidentiality, integrity, and availability, the CSSF categorises risk types are as indicated in the table below. All the risk types contained in the table below can be selected from the risk type drop down menu when adding a scenario.
| Type | Direct/Indirect | Name |
|---|---|---|
| D1-Strat | Direct | Strategic risks/commercial policy |
| D2-RH | Direct | Operational risks - Human resources |
| D3-Processus | Direct | Operational risks - Processes |
| D4-BCM | Direct | Operational risks - Continuity of operations |
| D5-Soustrait | Direct | Operational risks - Cascade outsourcing |
| D6-SI | Direct | Operational risks - Information systems |
| D6.1-Secu | Direct | Information security |
| D6.2-Dev | Direct | Acquisition, development and maintenance of systems |
| D6.3-Expl | Direct | Operating procedures |
| D6.4-Support | Direct | Technical support of information systems |
| D7-Aut | Direct | Other relevant risk categories |
| I1-Strat | Indirect | Strategic and governance risks |
| I10-Aut | Indirect | Financial risks |
| I2-Fin | Indirect | Legal and regulatory risks |
| I3-Leg | Indirect | Operational risks - Human resources |
| I4-RH | Indirect | Operational risks - Processes |
| I5-Processus | Indirect | Operational risks - Continuity of operations |
| I6-BCM | Indirect | Operational risks - Cascade outsourcing |
| I7-Soustrait | Indirect | Operational risks - Information systems |
| I8-SI | Indirect | Information security |
| I8.1-Secu | Indirect | Acquisition, development and maintenance of systems |
| I8.2-Dev | Indirect | Operating procedures |
| I8.3-Expl | Indirect | Technical support of information systems |
| I8.4-Support | Indirect | Risks related to a provision outside the financial sector |
| I9-Prest | Indirect | Other categories of relevant risks |
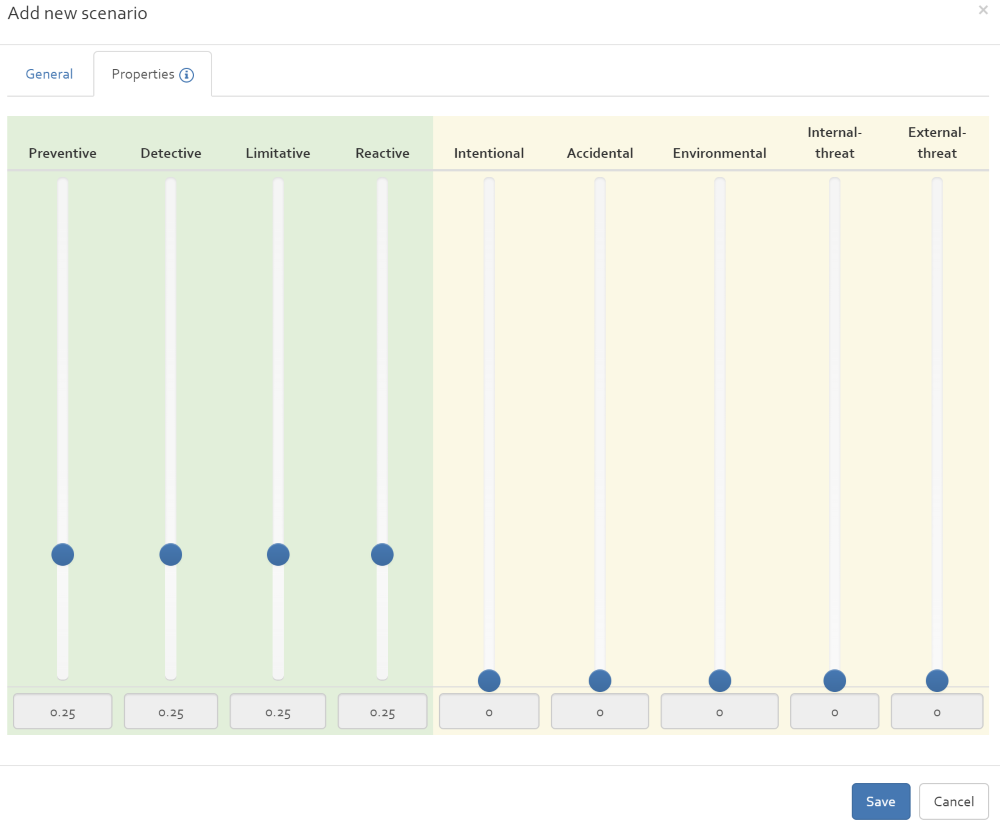
In addition, by clicking on tab "Properties" you can define charactristics of your scenario.
Edit / modify a scenario
By selecting a risk scenario and clicking on the “Edit” button, you can modify all information related to the risk scenario. See [Section] for the description of the different fields that can be edited.
Select / unselect a scenario
By selecting one or multiple risk scenarios and clicking on the “Select” or “Unselect” button, you can define if a risk scenario should be considered during the risk estimation.
Deleting a risk scenario
To delete a risk scenario, select the risk scenario by ticking the box next to it on the left-hand side. Once the box is ticked, click the “delete” button in the ribbon to delete the risk scenario from the list. All the risk scenarios in the list can be deleted together by ticking the box at the top of the far-left column to select all assets and then clicking “Delete”.
Risk estimation
The risk estimation page is divided into two sections. The first section contains
- a filter for selecting assets from the assets list,
- a filter for selecting a risk scenario from the risk scenario list,
- a button to add an additional asset to the asset list (“+Assets” button),
- a button for adding an additional risk scenario to the scenario list (“+Scenarios” button),
- a list of scenarios per selected asset / list of assets per selected risk scenario.
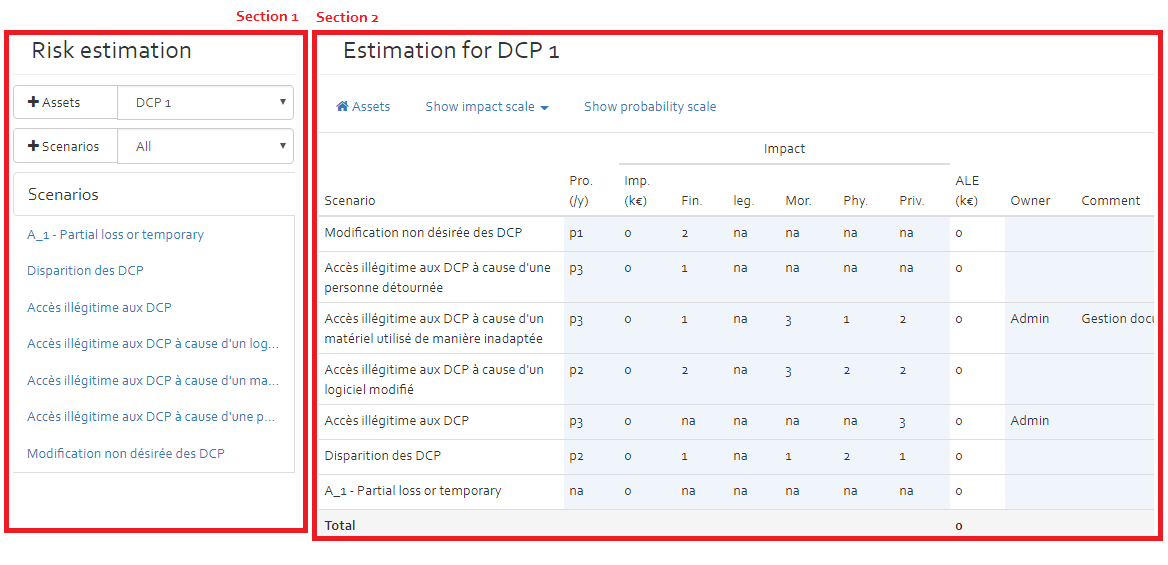
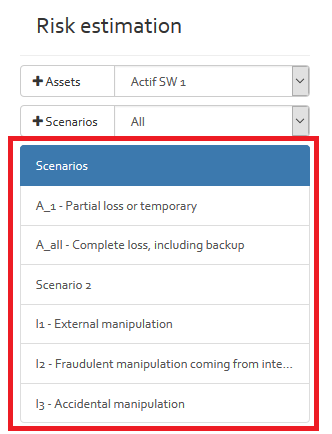
The second section is used for risk estimation purposes that are explained in the following paragraphs.If you select an asset in the asset filter, you get an overview of all applicable risk scenarios. You now have the possibility to enter or modify risk related information directly in this view (all table cells with a blue background colour).If you want to indicate more detailed information, you must select a specific risk scenario from scenarios list (see figure below). Once you have selected a specific risk scenario, you get a risk sheet (an asset linked to a specific risk scenario).
Risk estimation with ILR information
The risk estimation sheet additionally displays the ILR information as below:
- Threat probability This is computed from RAW probability using the Probability scales defined in "Risk context" -> "Parameters" -> "Labels of probability". Refer example [FIGURE]
- Vulnerability The vulnerability is defined by the user based on Vulnerability scaled defined in "Risk context" -> "Parameters" -> "ILR Vulnerability Scale". However in case the risk estimation is imported from excel this value is populated and it is the responsibility of the user to ensure the value lies within the "ILR Vulnerability Scale" range.
- Residual Vulnerability The residual vulnerability can be specified only if the response is other than "Accept". It can only be less than or equal to "Vulnerability" specified before.
- Risk The risk is computed using following formula:
Threat probability * MAX (CIA) * Vulnerability
Where:
MAX (CIA)Is the Maximum value of C (confidentiality),I(Integrity), A(Availability”) values defined for the asset in question and the maximum value of CIA is used here in this computation. The CIA of asset is computed using the CIA of asset if it is explicitly specified. If not explicitly specified the same is inherited from the CIA values of the parents. Refer asset dependency defined in section [SECTION] - Residual Risk Residual risk is computed as below:
Threat probability * MAX (CIA) * Residual Vulnerability
Where:
MAX (CIA)Is the Maximum value of C (confidentiality),I(Integrity), A(Availability”) values defined for the asset in question and the maximum value of CIA is used here in this computation. The CIA of asset is computed using the CIA of asset if it is explicitly specified. If not explicitly specified the same is inherited from the CIA values of the parents. Refer asset dependency defined in section [SECTION]
Risk sheet
The risk sheet (see figure below), allows the user to provide detailed information about a specific risk.
The risk sheet contains the following elements:
- The title of the risk sheet indicates the selected asset and risk scenario that represent the risk to analyse;
- Category: The category indicates what security dimension is impacted by the risk (availability, confidentiality, integrity);
- Risk ID: The user can indicate a risk ID to each risk. The risk ID must be unique.
- Owner: This text field allows to indicate a risk owner.
- Uncertainty computation: to indicate the level of certainty of the estimation of probability (only if the user enable the uncertainty).
- Risk estimation section: This section is used to indicate the probability and possible impacts of the risk to analyse. The user can indicate values for “RAW” estimation (risk level if no security measures are in place), “NET” estimation (current risk level with currently implemented security measures) and expected “EXP” estimation (risk level once the risk treatment plan has been implemented).
- Comment/argumentation: Used for justifying the “NET” risk estimation.
- Security measures: Used for indication the currently implemented security measures.
- Response: Dropdown list indicating options on how the identified risk will be treated (Accept, Reduce, Transfer, Avoid).
- Action plan: Used for listing actions to response to risk. With the “Add” button, you can add security measure from the existing measures collections (see [Section]). The action plan indicates form which collection the security measures come from, the reference of the security measure, the title, status, implementation rate, the implementation phase and the responsible person for implementing the security measure. The option “Show additional field” allows to unhide a text field where the user can indicate additional information for the action plan.
- Hidden comment: Text field to provide additional information concerning the risk.
Risk treatment / compliance
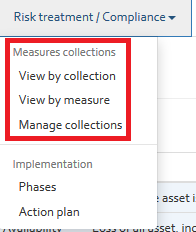
The Risk treatment / Compliance drop-down list includes two distinct sections:
- Measures collections
- Implementation
The following paragraphs describe the functionalities of both sections.
Measures collections
The measures collection section includes three elements:
- View by collection;
- View by measure;
- Manage collections.
The different elements are explained in the following sections.
View by collection
By clicking on the “View by collection” option, the user get as page having a dropdown list of all measure collections available for the current risk analysis. By selecting one of the collections, all security measures of the collection are shown in a table view.
The image below shows an excerpt of the ISO/IEC 27002 measure collection in OpenTRICK.
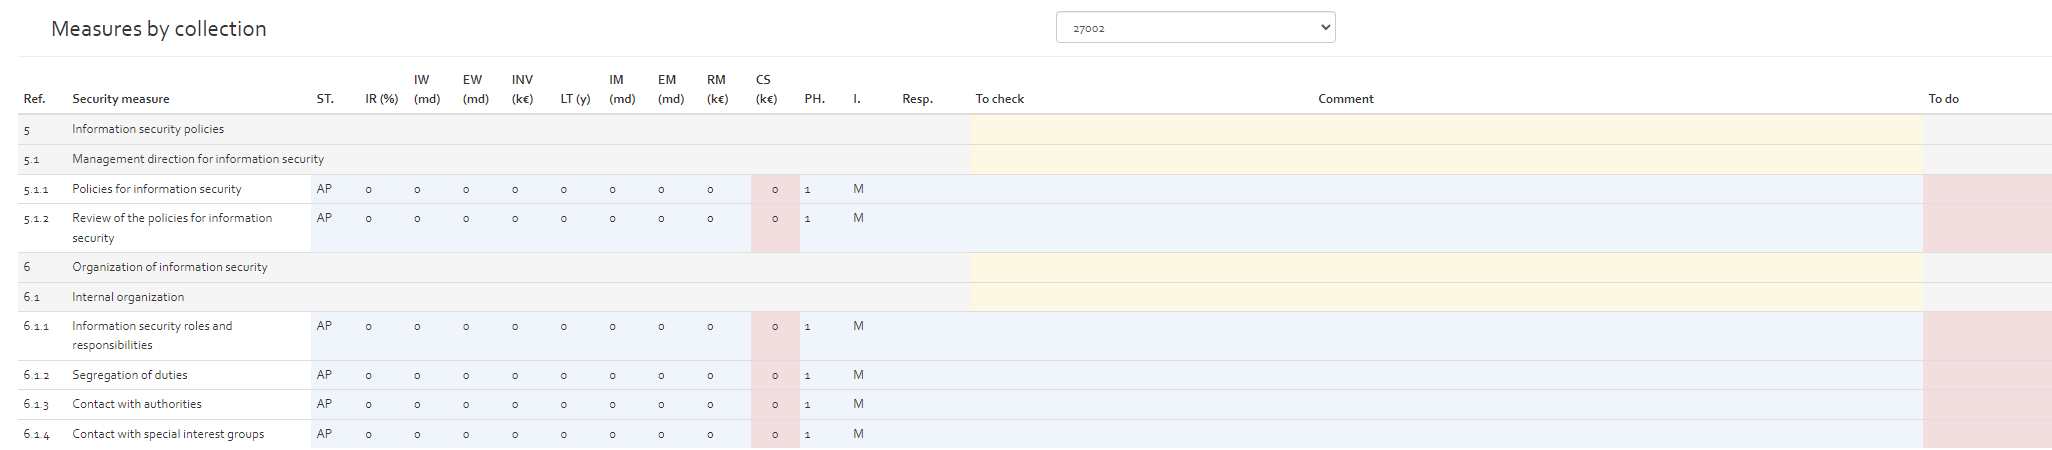
The security measures tables contain the following information:
| Column | Description | Modifiable |
|---|---|---|
| Reference (Ref.) | The reference number, as defined by the relative standard | No |
| Security measure | The title of the security measure | No |
| Status (ST.) |
Defines the status of applicability of the security measure. Here, the user can choose the following options from a drop-down list:
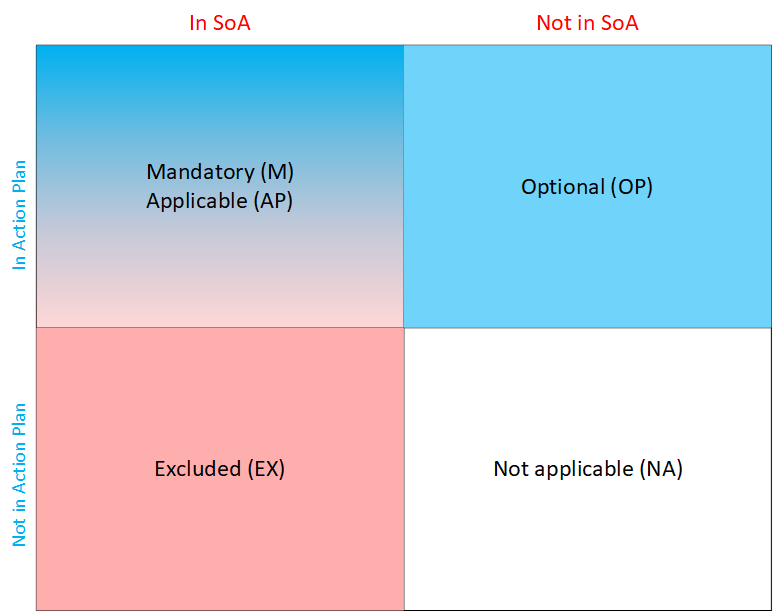
|
Yes |
| Implementation Rate (IR (%)) | The current implementation rate of the security measure. The user can enter a value between 0 and 100% | Yes |
| Internal Workload (IW (md)) | Internal workload in man-days needed to achieve 100% implementation rate | Yes |
| External workload (EW (md)) | External workload in man-days needed to achieve 100% implementation rate | Yes |
| Investment (INV (k€)) | Investment: the cost in k€ to achieve 100% implementation rate | Yes |
| Lifetime (LT (y)) | Lifetime of the security measure before it has to be re-implemented. If no value is indicated, the default value indicated in the various parameter section (see [Section]) is considered. | Yes |
| Internal Maintenance (IM (md)) | Yearly internal maintenance workload in man-days to keep the implementation rate to 100%. | Yes |
| External Maintenance (EM (md)) | Yearly external maintenance workload in man-days to keep the implementation rate to 100%. | Yes |
| Recurrent Maintenance (RM (k€)) | Yearly recurrent maintenance costs (e.g. licences) | Yes |
| Cost (CS (k€)) |
Cost: this is the annual cost in k€ of maintaining 100% implementation rate. The costs are computed with the following formula: CS = (IW * internal setup rate + EW * external setup rate + investment) / LT + IM * internal setup rate + EM * external setup rate + RI The internal and external setup rates are defined in [Section]. |
No |
| Phase (PH.) | The phase of the Risk Treatment Plan in which the action (To do) should be carried out | Yes |
| Importance (I.) | The importance of recommendation suggested in To do column which suggests the recommendations to achieve 100 % implementation rate. The importance can be classified as:
|
Yes |
| Responsible (Resp.) | Person responsible for the implementation of the actions defined in the “To do” column. | |
| To check | Text box where user can indicate what he has still to check to verify implementation status of security measure. | Yes |
| Comment | A justification of the information provided in the previous columns | Yes |
| To do | If the security measure is applicable and not already at 100% implementation rate, an action should be defined in this column that will result in the organisation achieving 100% implementation rate. | Yes |
Creating ticket by emails
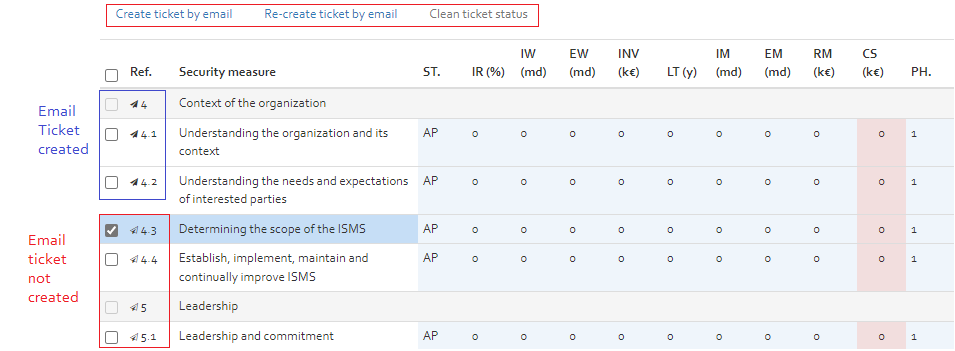
The measure by collection page (see [Figure]) provides the following intefaces for email ticket creation and updation:
- Before selecting one of the following options select one or more secutiry measure(s) collection for which the ticket needs to be created/modified.
- Create ticket by email: This option allows for creation of ticket(s) by email by using the email template defined in (see [Section]). Once an email ticket has been created the mail icon on the specified collection measure row changes to darker color indicating that the ticket has been already been created (see [Figure]).
- Re-create ticket by email: If an email ticket for a security measure collection has been created already the option to Create ticket by email gets disabled. However in this cases ticket could be recreated by selecting this option. Note a new ticketing email will be sent in this case.
- Clean ticket status: This option allows to clean the ticket created status for the selected collection measure(s). Once this option is selected the email sent icon is reverted to original state indicating that no ticket email was created.
Creating redmine tickets
The measure by collection page (see [Figure]) provides the following intefaces for redmine ticket creation and updation:
- Before selecting one of the following options select one or more secutiry measure(s) collection for which the ticket needs to be created/modified.
- Open Measure/task: This option allows for updating one or more selected measure(s)/task(s) in a single form dialog that opens. The user can modify the Implementation rate of the task from this interface.
- Create/update tasks: This option allows for creation or updation of a redmine ticket. The Todo column value is used as the subject of the created or updated ticket under the redmine project. Once a ticket has been created the icon of the specific collection measure changes to button and clicking the same opens up the the redmine ticket page.
- Link to Redmine: This option allows for linking of an existing redmine ticket with the selected collection measure. Choose the redmine ticket on one side and collection measure on other side of the window and click on the chain icon in middle for linking (see [Figure])
- Unlink from Redmine: This option allows for unlinking of an existing redmine ticket with the selected collection measure.

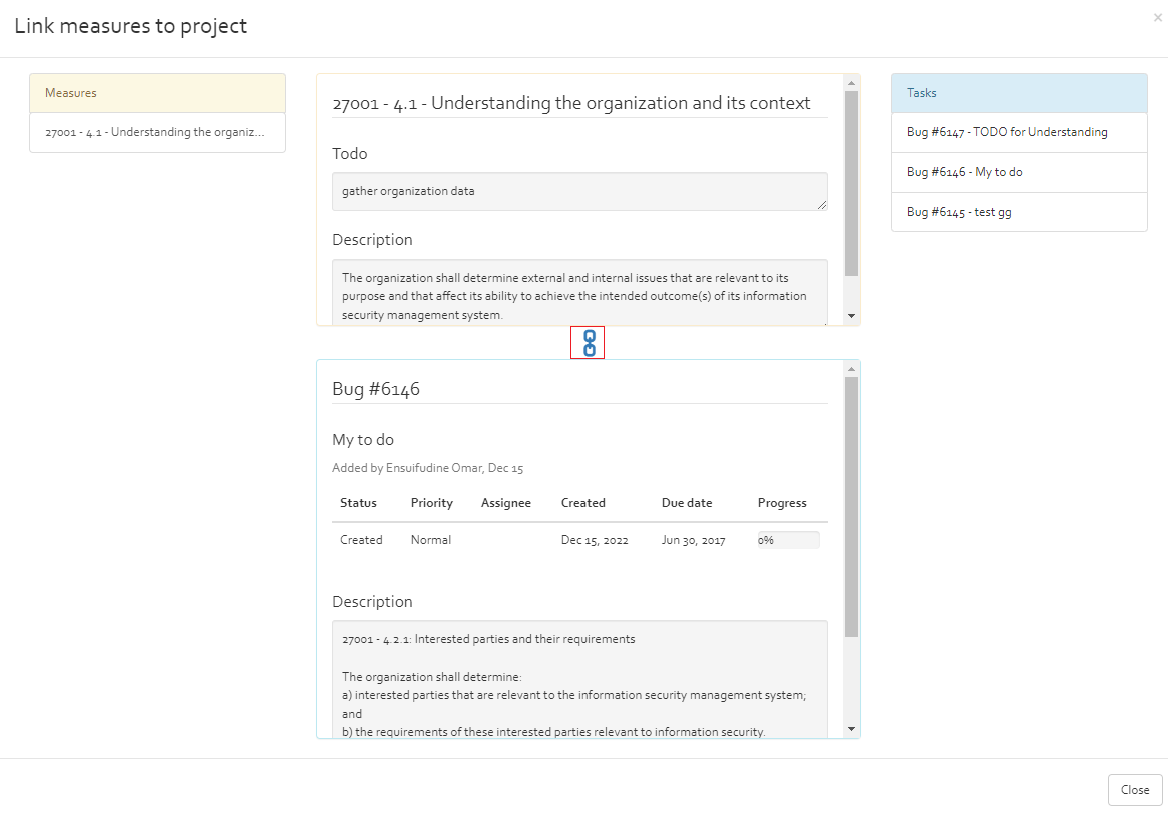
View by Measure
The “View by Measure” page consists of two areas. Area 1 represents the navigation pane, and Area 2 is the detailed view including the entry fields.
The navigation pane allows the user to select a standard and a chapter, as awell as a security measure for that standard.
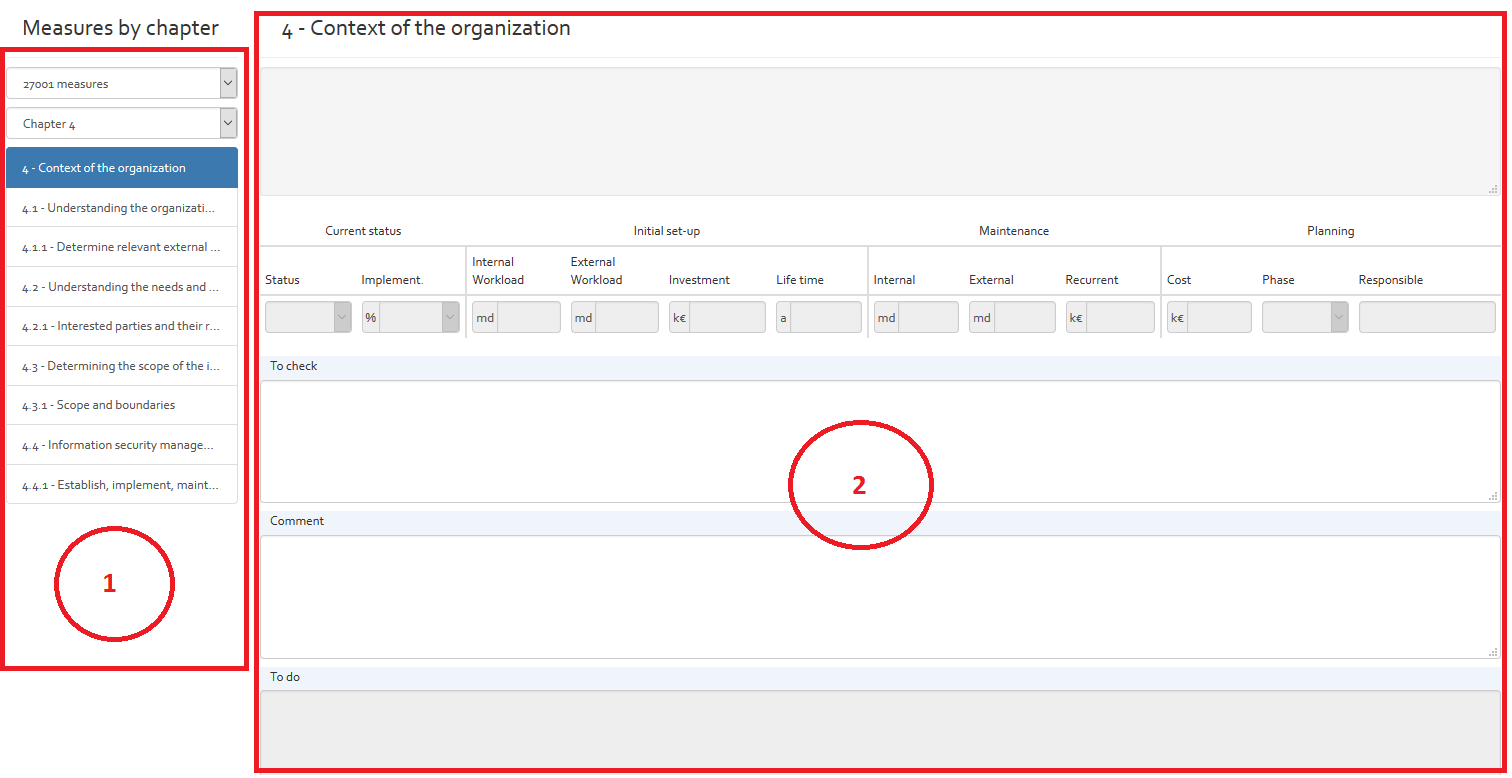
The detail view contains the following information and entry fields:
| Column | Description | Modifiable |
|---|---|---|
| Status |
Defines the status of applicability of the security measure. Here, the user can choose the following three options from a drop-down list:
|
Yes |
| Implement. (%) | The current implementation rate of the security measure. The user can enter a value between 0 and 100% | Yes |
| Internal Workload (md) | Internal workload in man-days needed to achieve 100% implementation rate | Yes |
| External Workload (md) | External workload in man-days needed to achieve 100% implementation rate | Yes |
| Investment (k€) | Investment: the cost in k€ to achieve 100% implementation rate | Yes |
| Life time (y) | Lifetime of the security measure before it has to be re-implemented. If no value is indicated, the default value indicated in the various parameter section (see [Section]). | Yes |
| Internal maintenance (md) | Yearly internal maintenance workload in man-days to keep the implementation rate to 100%. | Yes |
| External Maintenance (md) | Yearly external maintenance workload in man-days to keep the implementation rate to 100%. | Yes |
| Recurrent Maintenance (k€) | Yearly recurring maintenance costs (e.g. licences) | Yes |
| Cost (k€) |
Cost: this is the annual cost in k€ of maintaining 100% implementation rate. The costs are computed with the following formula: CS = (IW * internal setup rate + EW * external setup rate + investment) / LT + IM * internal setup rate + EM * external setup rate + RI The internal and external setup rate are defined in the various parameter section of OpenTRICK (see [Section]).
|
No |
| Phase | The phase of the Risk Treatment Plan in which the action (To do) should be carried out | Yes |
| Responsible | Person responsible for the implementation of the actions defined in the “To do” column. | Yes |
| To check | Text box where user can indicate what he has to verify the implementation status of security measure. | Yes |
| Comment | A justification of the information provided in the previous columns | Yes |
| To do | If the security measure is applicable and not already at 100% implementation rate, an action should be defined in this column that will result in the organisation achieving 100% implementation rate. | Yes |
Manage collections
The user is free to add further security measures collections from the knowledge base or remove measure collections if they are not needed in the current risk analysis. This can be done by clicking on the “Risk treatment / Compliance” drop-down list of the navigation bar and clicking on the “Manage collections” option under the “Measures collections” section.
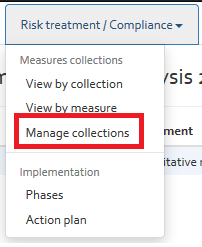
After this step, a new window appears, showing all measures collections included in the risk analysis.
Several functionalities exist:
- Import a security standard form the knowledge base (“Import from knowledge base” button, see section “Import a security measures collection from the knowledge base”).
- Import from a file (“Import from file" button).
- Create custom security measures (“Add” button, see section “Create a custom security measure”);
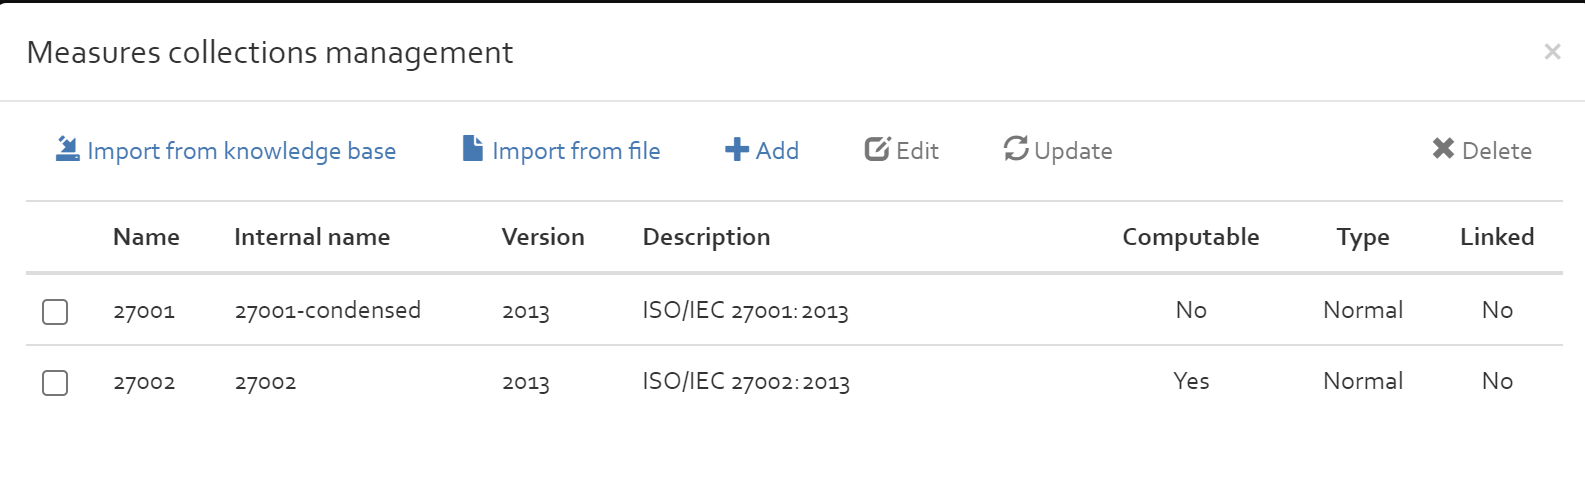
The user can delete a collection from the analysis by selecting the collection and clicking on “Delete” button. The “Edit” button can be used to edit the information of a custom security measures list (see section Create a custom security measure)
Import a security measures collection from the knowledge base
The user can add a new security measures collection from the knowledgebase by clicking on the “Import from knwledge base” button. In the new interface, the user can select a measures collection from the knowledge base and add it to the analysis by clicking on the “+” button.
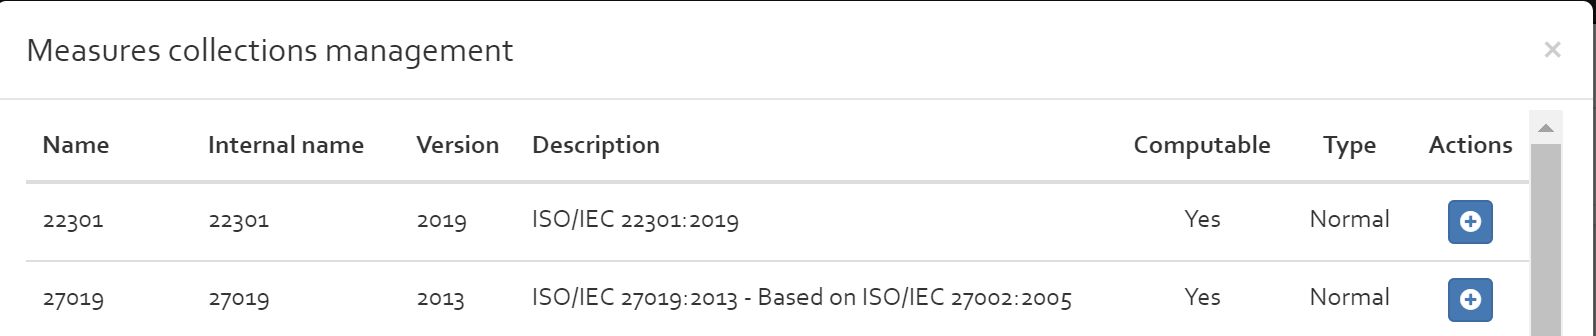
Create a custom security measure collection
By clicking on the “Add” button (see [Figure]), a new window will appear. Now the user can indicate:
- Type: Choose if the security measure of the security measure list should have influence on asset types (option “Normal”) or on specific assets (option “Asset”);
- Name: The name of the custom security measure list;
- Internal name: The real name of the custom security measure list;
- Computable: Select if the security measures to be included in the security measure list can reduce risks or not;
- Description: A description for the new custom security measure list.
After clicking on the “Save” button, the new security measure list will be added to the risk analysis.
Add security measure in custom security measure list
The following sections define how to add security measures to a custom security measures list. Section “Asset type related security measures” describes how to add a security measure to a security measure list that has influence on all risks of a specific asset type and section “Asset related security measures” (in the following)describes how to add a security measure to a security measure list that has influence on all risks of a specific asset.
How to define the type of a custom security measures collection is described in section “Create a custom security measure”.
Asset type related security measures
First the user should select the custom security measure list from the drop down list of the “Measures by collection” view. Next, the user can add, edit or delete a custom security measure.

To add a new custom security measure, the user should click on the “Add” button. A new form will be shown which consist of two tabs.
- The first tab “General” is used to provide general information of the new security measure to be added:
- A reference number for identifying the security measure;
- A level, title and description of the security measure.
- The second tab “Properties” is used to indicate the risk reduction factor of the new security measure to be added.

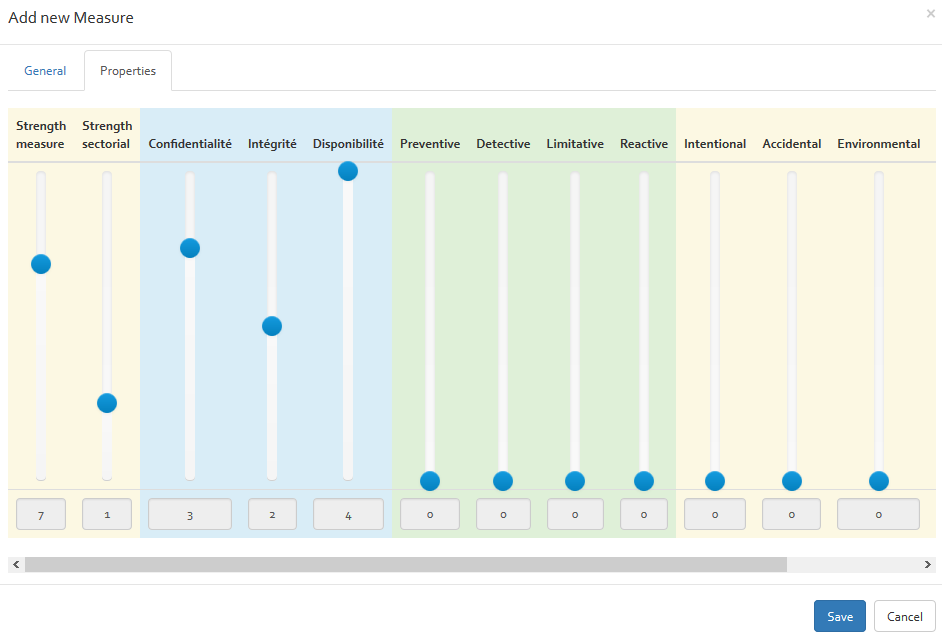
After providing all information, the user can add the new custom security measure by clicking on the “Save” button.
Asset related security measures
First the user should select the custom security measure list form the drop down list of the “Measures by collection” view. Next, the user can add, edit or delete a custom security measure.
To add a new custom security measure, the user should click on the “Add” button. A new form will be shown which consist of three tabs for a quantitative risk analyses and two tabs for qualitative risk analyses.
The General tab and the properties tab are the same as for the asset type related security measures (see section “Asset type related security measures”)
As the security measures should be linked to specific assets, the user can select the assets on which the custom security measure will have influence on, in the “Assets” tab. He can filter the assets by their type and select the asset by clicking on the asset in the list of assets. The selected assets will be shown on the “Selected assets” list.
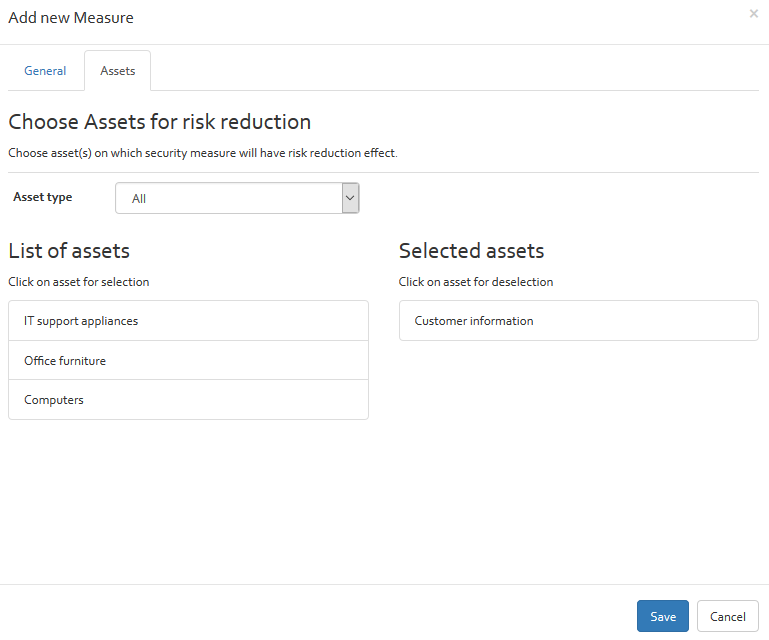
After providing all information, the user can add the new custom security measure by clicking on the “Save” button.
Implementation
Implementation phases
The “Phases” section gives the user the possibility to define implementation phases for the different security measures included in the action plan.
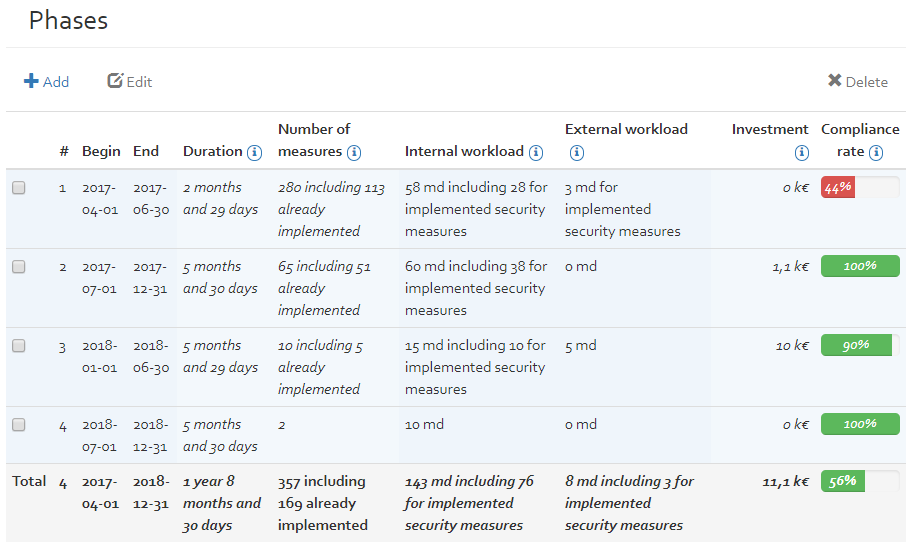
The columns contain the following value:
- Begin: The inclusive date when the phase begins.
- End: The inclusive date when the phase ends.
- Duration: The duration of the phase in calendar days.
- Number of measures: The number of applicable and measurable measures. Note that this number is for informational purposes only and might differ from indications on the action plan.
- Internal workload: The sum of the internal workload for all applicable and measurable measures. Note that this number is for informational purposes only and might differ from indications on the action plan.
- External workload: The sum of the external workload for all applicable and measurable measures. Note that this number is for informational purposes only and might differ from indications on the action plan.
- Investment: The sum of the investments for all applicable and measurable measures. Note that this number is for informational purposes only and might differ from indications on the action plan.
- Compliance rate: The percentage of measures that have reached the statement-of-applicability threshold (configured in [Section]) with respect to all applicable and measurable measures. Note that this number is for informational purposes only and might differ from indications on the action plan.
The user has the options to add, edit or delete implementation phases. These options are explained in the following paragraphs.
By clicking on the “Add” button, the user get a new window where he can define a start and end date of an implementation phase. By clicking on the “Save” button, the new implementation phase will be added to the list of implementation phases.
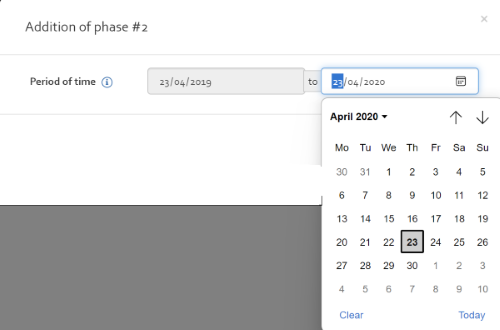
To modify the start or end date of an implementation phase, the user should double click on the date field or select the phase to modify and click on the edit button.
To delete an implementation phase, the user should select the implementation phase and click on the “Delete” button.
Action plan
The security measures to be implemented will be displayed in the “Action plan” section. For the computation of the action plan and of the security measures to be implemented see [Section].
A description of each column can be found in the table below.
| Column | Description | Modifiable |
|---|---|---|
| # | A unique reference number designated to each of the actions in the list. | No |
| Collection | This column references the security measures collection from where the clause relevant to the action is derived. | No |
| Reference | The reference number of the security measure. | No |
| To do | The action that should be performed to satisfy the requirements of the relevant security measure. | No |
| Number of Risks (NR) | The number of risks that are applied to the current measure in the given analysis (only for qualitative risk analysis). | No |
| Annual Loss Expectatny (ALE (k€)) | Annual Loss Expectancy (only for quantitative risk analysis) | No |
| Δ Annual loss expectatny (ΔALE (k€)) | Delta Annual Loss Expectancy (only for quantitative risk analysis) | No |
| Cost (CS (k€)) | The implementation costs of the security measure. | No |
| Return on Investment (ROI (k€)) | The Return On Investment value (only for quantitative risk analysis). | No |
| Internal workload (IW (md)) | The number of internal man-days needed to complete the action. | No |
| External workload (EW(md)) | The number of external man-days needed to complete the action. | No |
| Investment (INV (k€)) | The investment cost of completing the action. | No |
| Phase (PH.) | The phase of the risk treatment where the action will be carried out. | Yes |
| Importance (I.) | The importance of recommendation suggested in To do column which suggests the recommendations to achieve 100 % implementation rate. The importance can be classified as:
|
Yes |
The user also has the option of viewing the ALE value evolution for each individual asset in the table by clicking on the “Show assets” button (only for quantitative risk analyses).
With the “Compute” button, the user has the possibility to compute the action plan. After clicking on the “Compute” button, the user gets another window allowing him to indicate which security collection(s) he wants to take into consideration during computation. If no security collection is selected, all collections are by default taken into consideration (only for quantitative risk analyses).
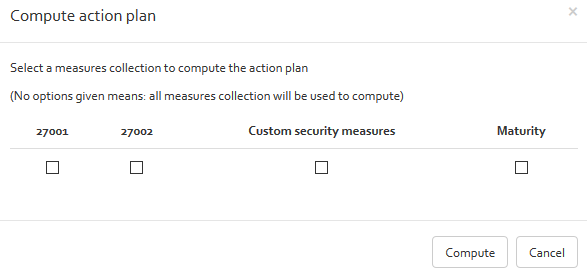
Risk communication
Statement of Applicability (SOA)
The “SOA” section enables users to see for each security measure coming from the annex of ISO 27001, which couple asset/threat has the best reduction of ALE.
The column “justification” allows the user to fill in some information regarding the measure and the asset/threat
The last column “Reference” enables the user to give a reference to a document or any other type of support in evidence of the status of the measure.
Action plan summary
The action plan summary contains a breakdown of the action plan; allowing the user to visualise the key aspects of the action plan. The information contained in this section is described in the table below.
Phase columns are generated depending on how many phases are intended to complete the risk treatment plan. The “Start (P0)” is based on the organisations current state, before any risk treatment has taken place.
| Phase characteristic | Description |
|---|---|
| Begin date | The date on which the phase will begin |
| End date | The expected completion date of the phase |
| Compliance … (%) | Compliance rate of ISO/IEC 27001 & ISO/IEC 27002 security measures. Computed based on the average implementation rate of the security measures from a security standard. |
| Non-compliant to … | Number of measures that are not compliant with ISO/IEC 27001 or ISO/IEC 27002 requirements. |
| Measures in phase (#) | The number of measures which will be treated during the phase |
| Implemented after (#)… | The number of measures already implemented |
| 1. Profitability (only for quantitative risk analyses) | |
| 1.1. ALE (k€)… at end | Annual Loss Expectancy in k€ at the end of the phase |
| 1.2. Risk reduction (k€/y) | The risk reduction in k€risk_reduction = ALE_previous_phase - ALE_current_phase |
| 1.3. Average yearly cost (k€/y) | Average yearly cost of phase |
| 1.4. ROSI (k€/y) | Return On Security InvestmentROSI = risk_reduction - annual_cost |
| 1.5. Relative ROSI | Relative Return On Security Investmentrelative_ROSI = ROSI / annual_cost |
| 2. Resource planning | |
| 2.1 Implementation costs | |
| 2.1.1. Internal workload (md) of phase | The total estimated internal workload in man-days needed for implementing the security measures planned to be implemented in the phase under consideration. |
| 2.1.2. External workload (md) of phase | The total estimated external workload in man-days needed for implementing the security measures planned to be implemented in the phase under consideration. |
| 2.1.3. Investment (k€) of phase | Total investments to be made during the phase under consideration. |
| Total implementation costs of phase | Total internal workload (md) of phase * Internal setup rate (€/md) + Total external workload (md) of phase * External setup rate (€/md) + Investment of phase |
| 2.2. Recurrent costs | |
| 2.2.1. Internal maintenance (md) of phase |
The internal maintenance effort in man-days to keep the implemented security measures effective.The total of internal maintenance in man-days for each security measure to be implemented in the phases that precede the phase under consideration. As the internal maintenance is always indicated as yearly maintenance effort, the “internal maintenance effort of phase”
is adjusted to the duration of the phase under consideration.Example: the internal maintenance of a security measure
is 1 md per year and the implementation phase under consideration has only a duration of half a year, then the “internal
maintenance effort of phase” is 0,5 md.
Maintenance efforts are only considered starting from the phase that follows the implementation phase.Example: if in
phase 1 we indicate an internal maintenance of 1 md, this will only appear in phase 2 as in phase 1, the security measure
will be implemented and only starting from phase 2, the security measure has to be maintained.
If the implementation rate is put to 100%, the internal maintenance will be taken into account starting from phase1.
|
| 2.2.2. External maintenance (md) of phase |
The external maintenance effort in man-days to keep the implemented security measures effective. The total of external maintenance in man-days for each security measure to be implemented in the phases that precede the phase under consideration. As the external maintenance is always indicated as yearly maintenance effort, the “external maintenance effort of phase”
is adjusted to the duration of the phase under consideration.Example: the external maintenance of a security measure
is 1 md per year and the implementation phase under consideration has only a duration of half a year, then the “external
maintenance effort of phase” is 0,5 md.
Maintenance efforts are only considered starting from the phase that follows the implementation phase.Example: if in
phase 1 we indicate an external maintenance of 1 md, this will only appear in phase 2 as in phase 1, the security measure
will be implemented and only starting from phase 2, the security measure has to be maintained.
If the implementation rate is put to 100%, the external maintenance will be taken into account starting from phase 1.
|
| 2.2.3. Recurrent investment (k€) of phase |
Recurrent investments to make in order to keep implemented security measures effective.The sum of the recurrent investments for each security measure to be implemented in the phases that precede the phase under consideration. As the recurrent investment is always indicated as yearly recurrent investment cost, the “recurrent investment of phase”
is adjusted to the duration of the phase under consideration (example: the recurrent investment of a security measure
is 1 k€ per year and the implementation phase under consideration has only a duration of half a year, then the “recurrent
investment of phase” is 0,5 k€.
Recurrent investment costs are only considered starting from the phase that follows the implementation phase (e.g. if
in phase 1 we indicate an recurrent investment of 1 k€, this will only appear in phase 2 as in phase 1, the security
measure will be implemented and only starting from phase 2, the security measure has to be maintained.
If the implementation rate is put to 100%, the recurrent investment will be taken into account starting from phase 1.
|
| Total recurrent costs (k€) of phase | The recurrent costs of all security measures included in the phase (including internal and external maintenance costs).Total_recurrent_costs_of_phase = internal_maintenance * internal_rate + external_maintenance * external_rate + recurrent_investment |
| Total cost (k€) of phase | Total cost of phase = Total implementation cost of phase (k€) + Total recurrent costs of phase (k€) |
Risk register
The risk register is specific to risk assessments which are conducted in the context of the CSSF risk analysis. Its purpose is to provide an overview of the most important risks (based on their potential impact) sorted by category.
The OpenTRICK risk register can be used to provide the following information to the CSSF:
- The 20 most important direct risks (based on their potential impact);
- The most important indirect risks (based on their potential impact);
- Other risks which have a net impact of ≥ 6 and a net probability ≥ 5.
Charts
Compliance by measures collection
The section “Compliance” graphically represents the level of conformance with the standards ISO 27001 & 27002 after the different implementation phases that have been defined.
A chapter with all not-applicable measures will appear on the chart without conformance value, mentioned with (NA).
Risk heat map (only for qualititative and mixed risk analysis)
The risk heat map provides an overview of the number of risks per risk level. This allows, based on the risk acceptance thresholds, to see the number of risks that are currently not acceptable.
[Figure] shows an example heat map. On the right hand-side, the risk acceptance thresholds are repeated for convenience (see [Section]). The left hand-side shows the heatmap table, each cell of which containing the number of risks that were specified for the given impact and probability level.

Below, the same heat map is displayed again, but this taking the evolution of risk into account. See [Figure] for an example. Each dot in the heatmap represents a risk with its net risk (the values specified in the “NET” row in [Section]). Arrows point to the new impact/probability levels (the values specified in the “EXP” row in [Section]). On the right hand-side, each risk can be individually shown/hidden by clicking on the respective name. For convenience, in the top right corner, you can also specify the number of risks you want to display (the top N are displayed in that case).
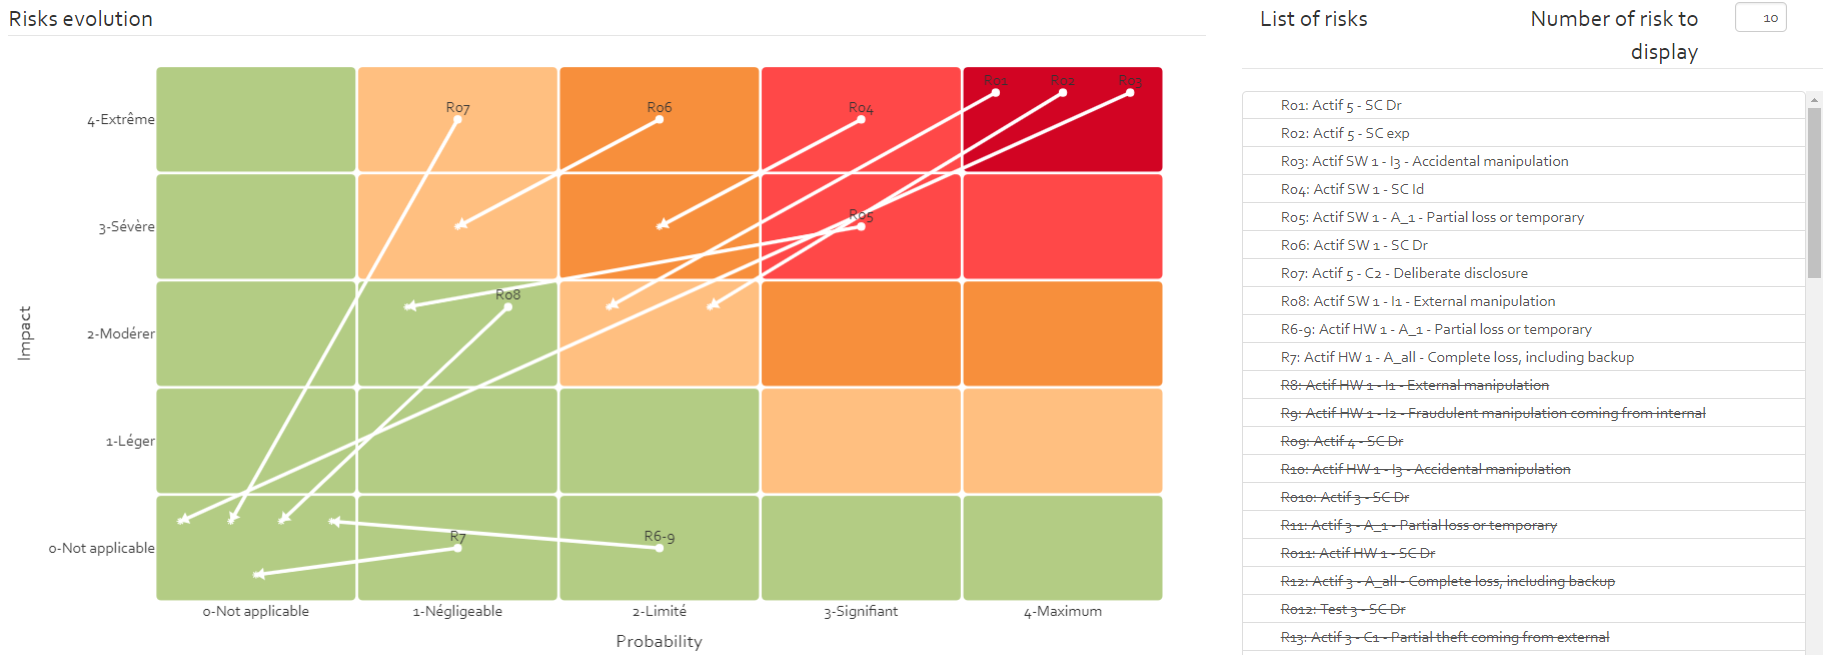
Risks by assets/asset types/scenarios/scenario types
This section shows the number of risks (for a qualitative risk analysis) that are available for each of the assets/asset types/scenarios/scenario types.
ALE by Asset/Asset Type (only for quantitative risk analyses)
The chart section “ALE by Asset & by Asset type” includes two graphical representations. The first one shows the different assets with their Annual Loss Expectancy (ALE) value. The assets are ordered by the ALE value (highest ALE on first position).
The second chart shows the ALE by asset type. All ALE of one type is summed up and the asset type with the highest sum of ALE is ordered on first position.
ALE by Scenario/Scenario Type (only for quantitative risk analyses)
The chart section “ALE by Scenario & Scenario type” includes two graphical representations. The first one shows the different risk scenarios with the sum of the ALE if the scenario occurs. The scenarios are ordered following the ALE sum knowing that the scenario with the highest ALE sum is represented on first position.
The second chart shows the ALE by scenario type. All ALE of one type of risk scenario is summed up and the scenario type with the highest sum is ordered on first position.
Evolution of profitability by action plan(only for quantitative and mixed risk analyses)
The chart “Evolution of profitability and ISO compliance” shows how profitable the different implementation phases of the risk treatment plan are and how the compliance rate with the international standards 27001 and 27002 evolves.
Budget by Action Plan (only for quantitative risk analyses)
The budget chart presents a chart containing the needed budget per implementation phase of the security measures.
Actions
More advanced options can be found in the “Actions” menu (gear icon) on the right-hand side of the analysis ribbon (highlighted in red in [Figure] below). Its menu items are described in greater detail in the following sections.

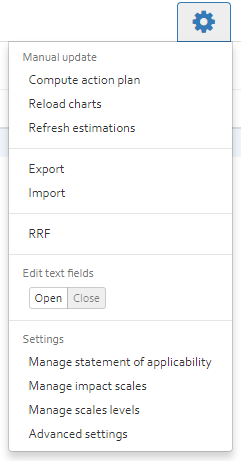
Manual update
Compute risk profile measures
The Risk Profile measures are computed based on following three preconditions:
- The measure should not have 100 % implementation rate.
- The measure should be applicable
- The RRF (see [Section]) is computed based on risk estimation and the applicable measures are those for which RRF >= RRF threshold .
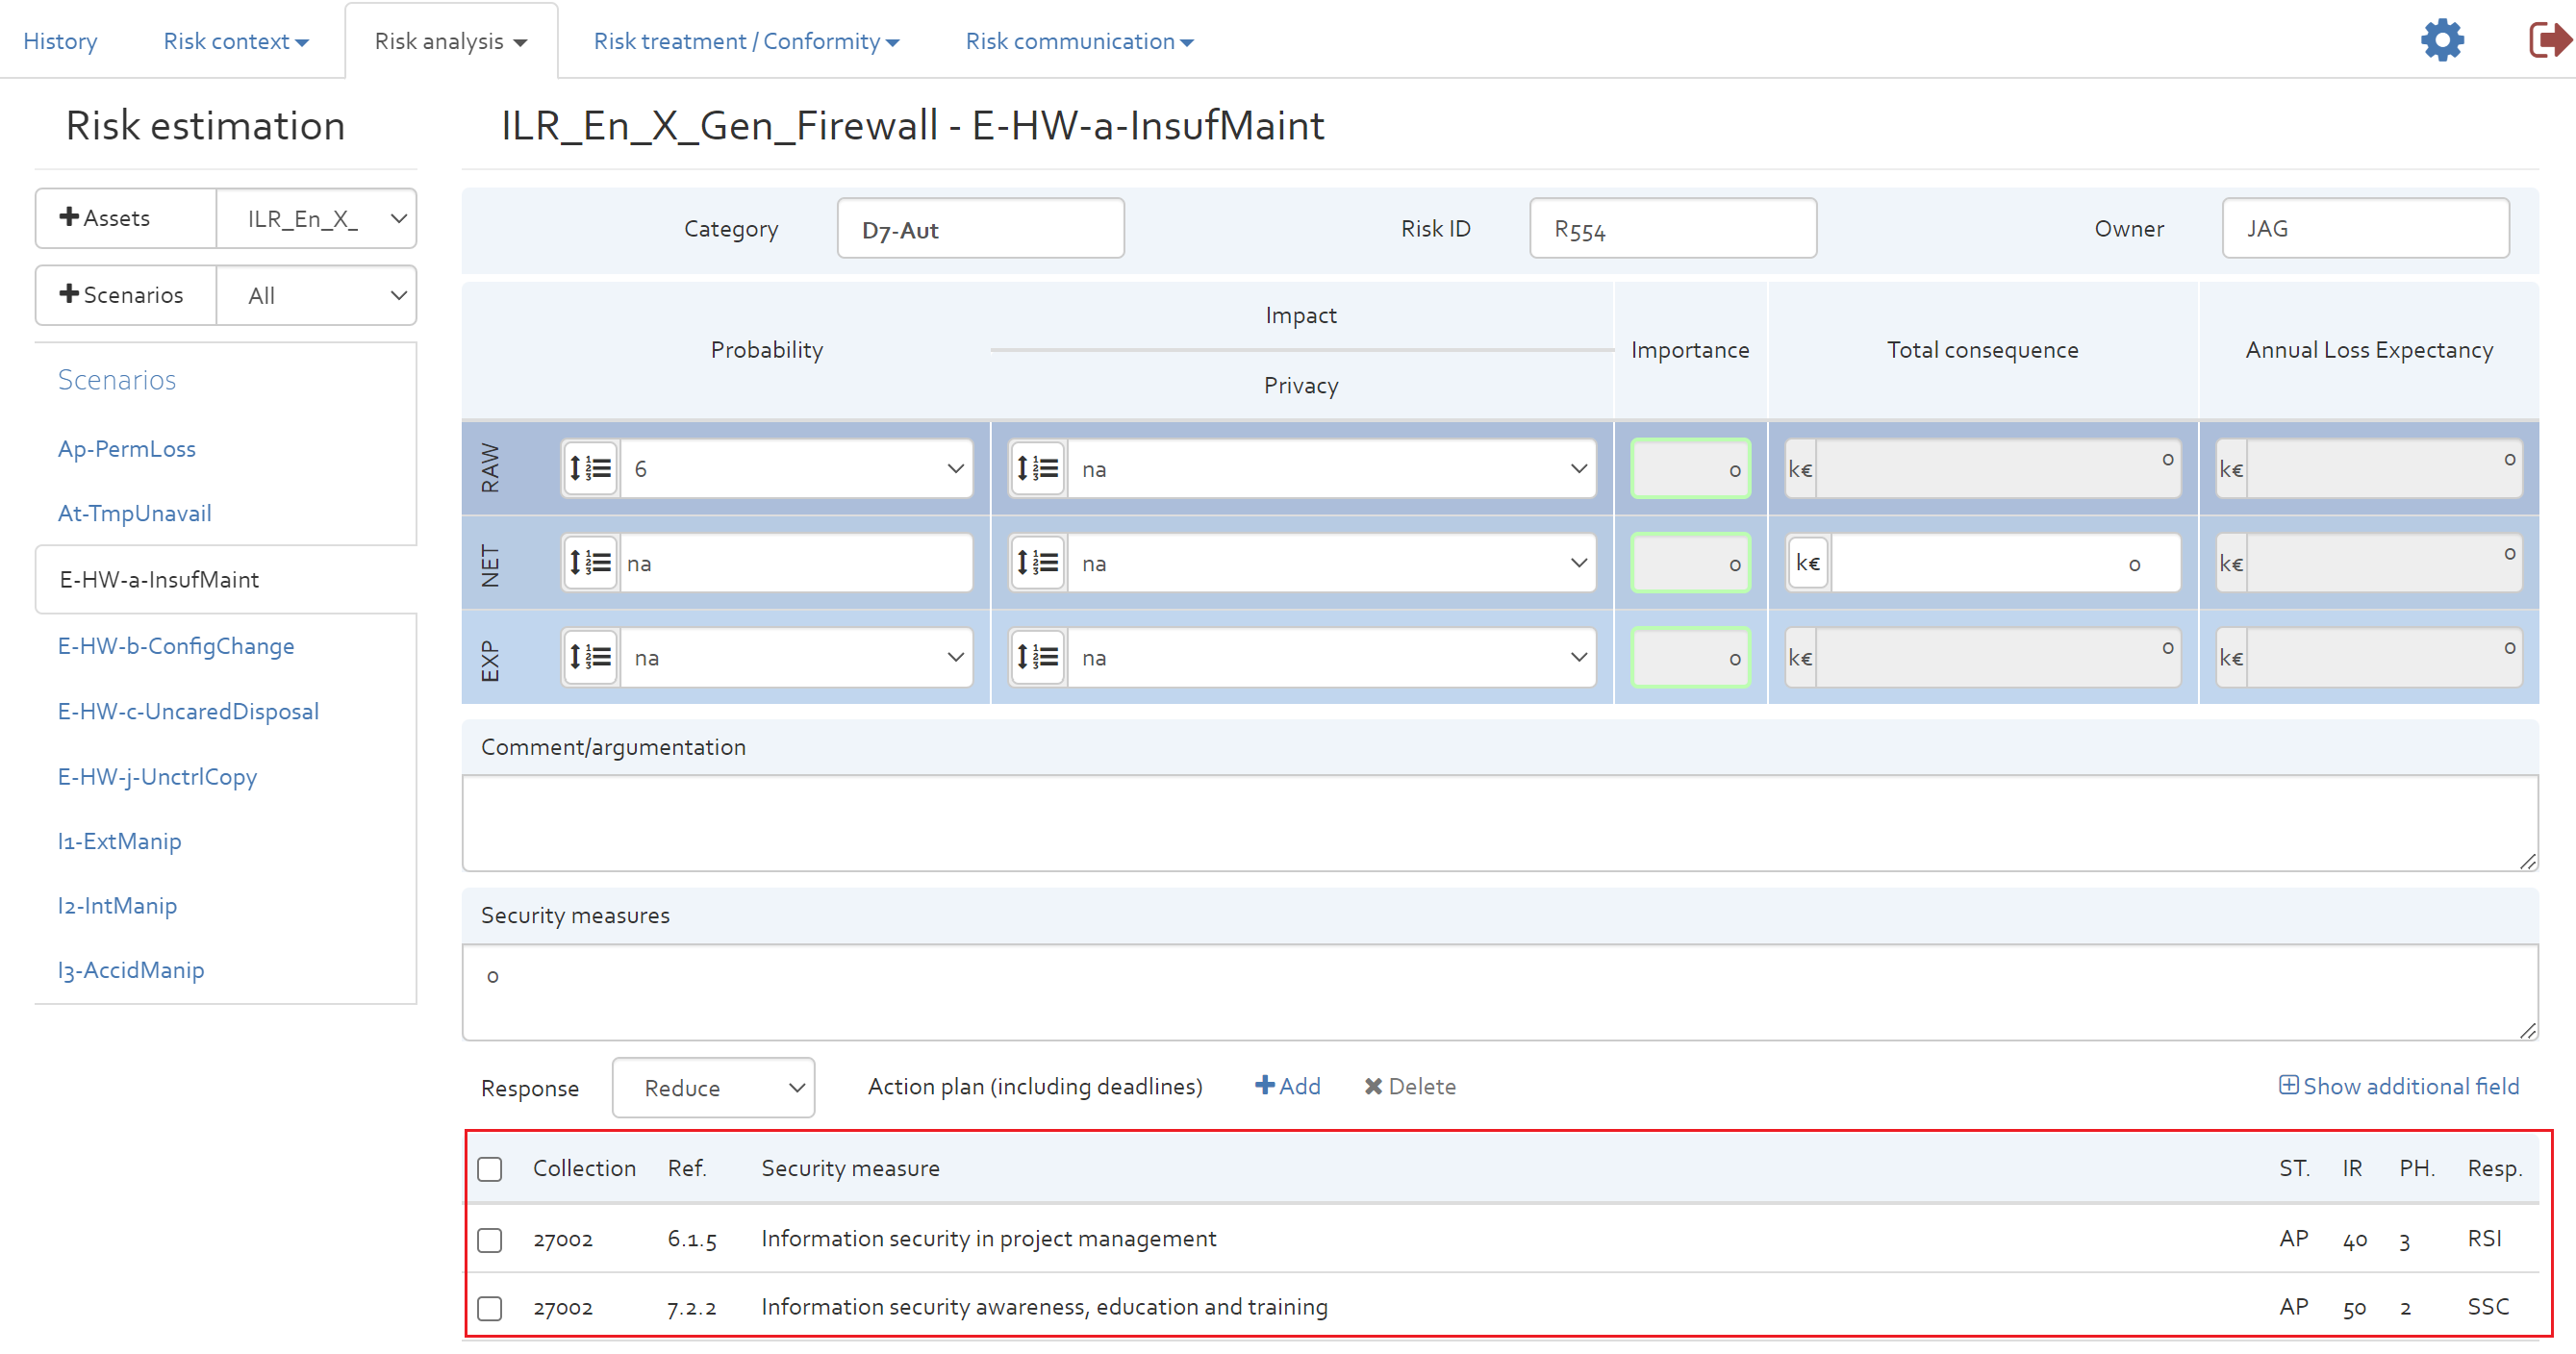
Once the action plan is computed further. The qualitative action plan gets generated which contains consolidated measures of all the risk scenarios. The column NR displays the number of risks for a particular measure and I. denotes the importance associated with the measure. Refer figure below for a generated sample Qualitative action plan
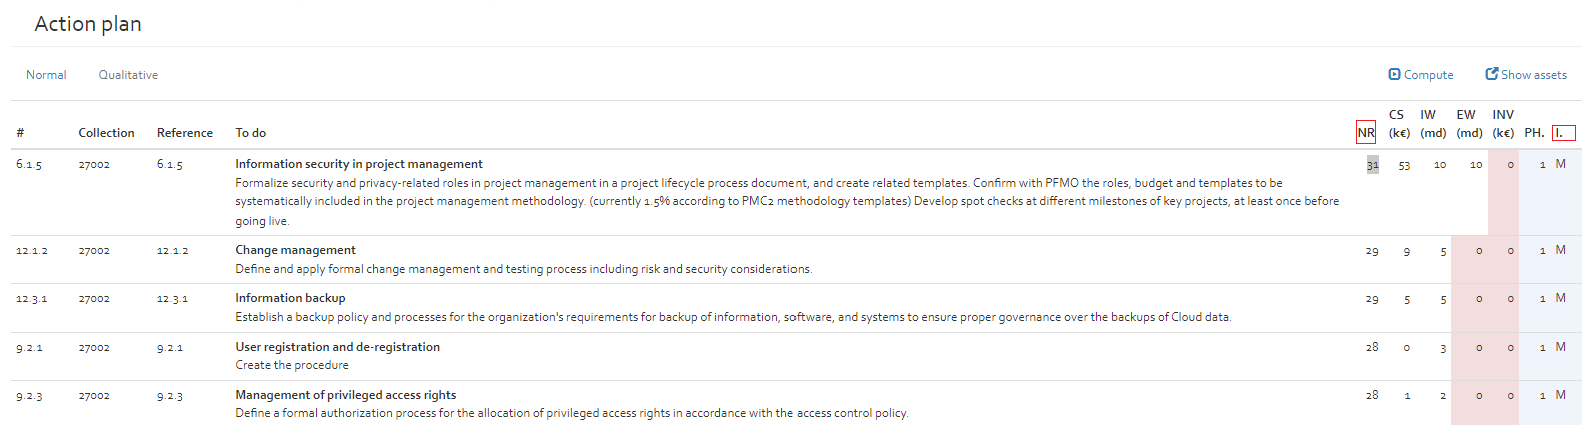
Compute action plan
Once the all information has been entered into the relative tables, this option allows the user to compute the action plan (see [Section]).
Reload charts
Refreshes all charts in the risk analysis. This option should only be used in case there is a failure in the automatic update of the charts.
Refresh estimations
The update estimation option will recompute all ALE. This option should only be used when the automatic computation of the ALE failed.
Export
Clicking on “Export” will open the centralised export interface, from where most of the data entered into OpenTRICK can be exported to portable formats.
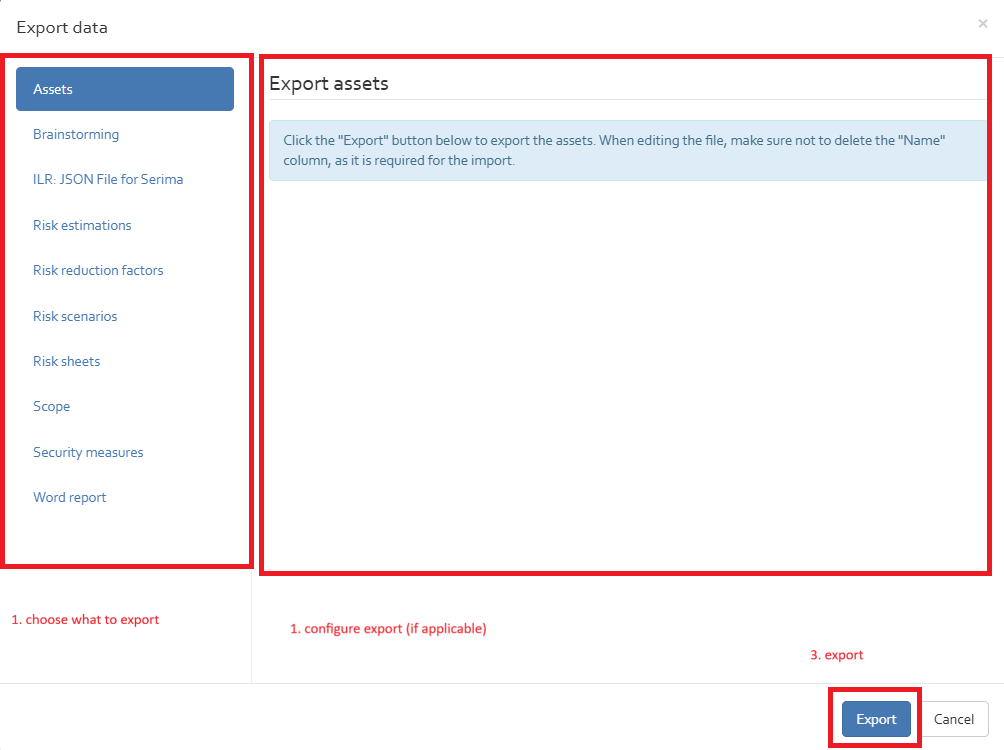
The interface is structured as follows: on the right-hand side, the user can choose what shall be exported. The left-hand side of the interface will then show configuration options (if applicable), which are explained in the sub-sections below. As a final step, the data can be exported via the “Export” button in the lower right corner. See [Figure] for an illustration.
Assets
You can export all assets used in the risk analysis as an Excel file by click on "Assets" and then "Export" button.
Brainstorming
Export all data from all sheets from the “Brainstorming” section (see [Section]) into a single Excel file (with three sheets). The structure of the Excel file is the same as the one in OpenTRICK.
ILR: JSON File for Serima
This option allows users to export a risk assessment file in an ILR compatible JSON format. This generated JSON file can be further imported to Serima platform thereby ensuring cross tool compatibility.
There are two mandatory inputs required to be provided during the import. Refer ([Figure]) below.
- JSON source file (Exported from Serima): The user requires to provide a path to the JSON file exported from Serima.
-
Mapping file: The user should provide here a path of (; separated) CSV file which maps OpenTRICK names to ILR names. It is important to note here that the mapping From
TrickService AssetName to corresponding Serima Asset name (defined by ILR) is a many to many mapping. The user can provide the name of an asset to be mapped to serima and can also provide a name of
a standard to be mapped in serima. Standard names may imply name of collection of measures used in OpenTRICK with corresponding name of Referentials or Recommendation Sets used in serima platform.
The schema of the CSV mapping file is as below:
Type: is ("ASSET" or "STD")
Name in Trick: [text]: Specifying name of asset/standard in OpenTRICK
Name in Monarc: [text: Specifying names of assets supported by ILR or name of standard in Serima
Example of mapping CSV file:
Type;Name in Trick;Name in Monarc
ASSET;Airconditioner;ILR_En_GAS_Airconditioner
ASSET;Airconditioner;ILR_En_Elec_Airconditioner
ASSET;ILR_En_X_Supply of natural gas;ILR_En_Gas_Supply of natural gas
ASSET;ILR_En_Y_Supply of natural gas;ILR_En_Gas_Supply of natural gas
STD;27002;ISO/IEC 27002 [2013]
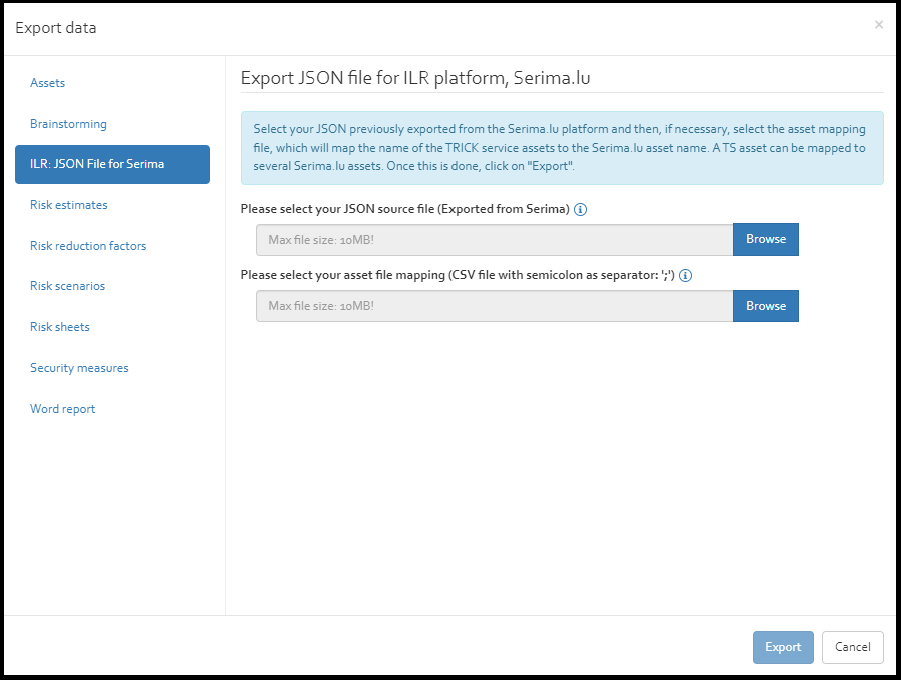
Steps for generating JSON File with Risk Treatment plan
In order to export the JSON file containing the risk management plan with appropriate information of the recommendations, security measures, statement of applicability the following process must be carried out before exporting the JSON file from OpenTRICK:
- Enable ILR analysis: Enable ILR analysis from advanced settings)
Refer [Figure] for enabling ILR analysis.
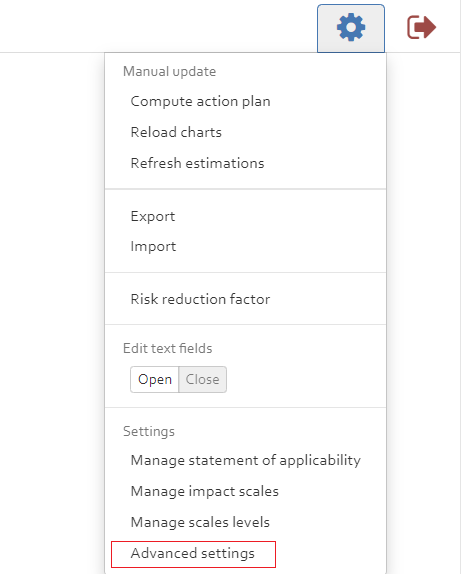
Settings: Advanced 
Settings: Enable ILR analysis - Manage Statement of applicability: Apply the statement of applicability for various security standards Refer ( [Section])
- Fine tune the RRF threshold: The RRF threshold determines which security measures need to be implemented in the action plan for a given risk scenario. This threshold needs to be fine tuned before exporing risk analysis. Refer ( [Section])
- Manage SOA scale Mapping parameters: Fine tune the SOA scale mapping parameters from the Parameters settings.
The SOA scale Mapping parameters classify the level of compliance of a security measure based on the implementation rate of a security measure.
Refer ( [Section])
Alternately refer example of SOA scale shown below.
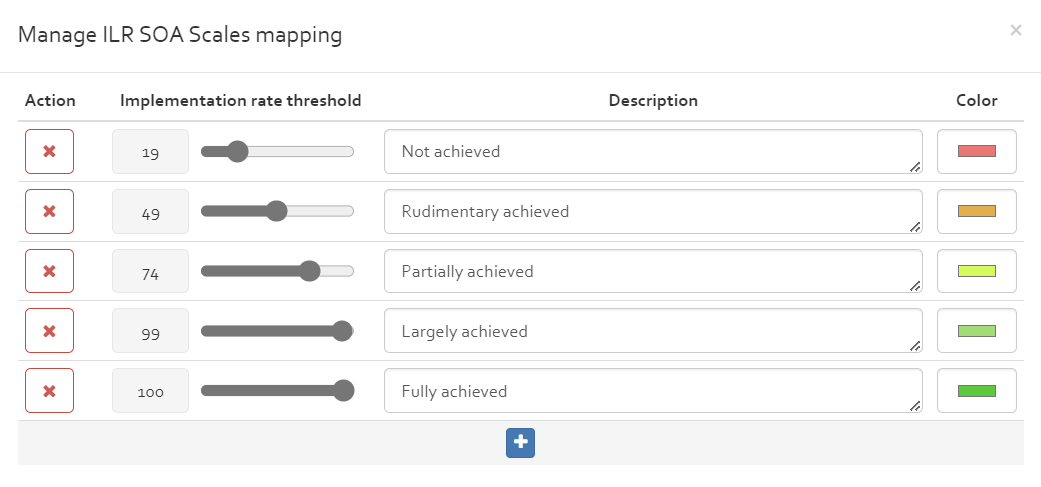
Parameters: Possible SoA scale mapping - Edit Importance and Todo in Measures collection: Verify that the recommendations as defined by 'To do' column and their Importance as defined by 'I' column of the security measures for the applicable collections (for the applicable measures not having 100 % implementation rate) are uptodate. Refer ([Section])
- Compute risk profile measures: After completing the above steps generate the risk profile measures Refer ([Section]). The associated measures with risk scenario can be further viewed in Risk Estimation sheet.
- Generate Template JSON file from serima platform: Export a Template JSON file from Serima platform from an analysis where the knowledge base contains Security measures and Recommendations along with other information of ILR defined risks and assets and this template file is further used for exporting ILR compatible JSON from OpenTRICK.
- Generate JSON file from OpenTRICK: [SECTION]
Risk estimations
By clicking on “Export”, you will get an Excel spreadsheet that contains all likelihood and impact estimations for all assets and scenarios.
- The Risk Estimation exported file contains the following Sheets in addition to all sheets present in the Template excel file:
- Assets This sheet lists all the assets in "Assets" table with corresponding information available in Risk analysis.
- Risk estimation This sheet captures all the risk estimation information for all assets with corresponding scenarios in "Risk_estimation" table.
- AssetTypes This sheet captures all the supported asset types in "AssetTypes" table.
- Scenarios This sheet captures all the available scenario in "Scenarios" table.
- ScenarioTypes This sheet captures all the available scenario types in "ScenarioTypes" table.
- Dependency This sheet captures the asset dependency matrix. This sheet is exported only if ILR analysis is enabled. Refer [SECTION]
- Probability This sheet captures the Probability scale of the risk analysis. This sheet is exported only if ILR analysis is enabled.
Asset dependency
Asset dependency matrix is a square matrix of size n x m where n is the number of assets where m <= n. The matrix value 1 indicates that the asset in the row is dependent on the asset specified in the column. A positive value in matrix between 0 to 1 indicates the probability of dependency between the assets. The matrix is asymmetric. The matrix is exported in the Dependency sheet of the exported file. The matrix is exported only if ILR analysis is enabled. This dependency matrix can also be imported using DRAW tool and then synchronized with OpenTRICK. For details refer Draw documentation.
- The C(confidentiality),I (Integrity),A(Availability) values of an asset are computed using Dependency Graph of the asset if the asset CIA values are not explicitly specified.
The rules for computation of inherited CIA values of an asset is as below:
- If asset has CIA value explicitly specified then the same is considered as CIA value of the asset.
- If the asset doesn't have CIA value explicitly specified then the value of CIA is inherited from that of parent provided the parent is selected.
- If the asset doesn't have CIA value explicitly specified then the value of CIA is inherited from the grand parent if the parent is not selected.
- If Asset and its parent do not have explicit CIA value specified the value of asset node is inherited from the grand parent if there is a single parent.
- In case of multiple parents the asset node has CIA which is the maximum of the selected parent(s).
NOTE: This propogation of CIA value from multiple parents to child is not aligned with Monarc where Monarc creates multiple child nodes having different CIA values under the different parent nodes. Open OpenTRICK on the other hand has a single asset instance which accounts for the difference. Refer example [Figure] for a basic example.
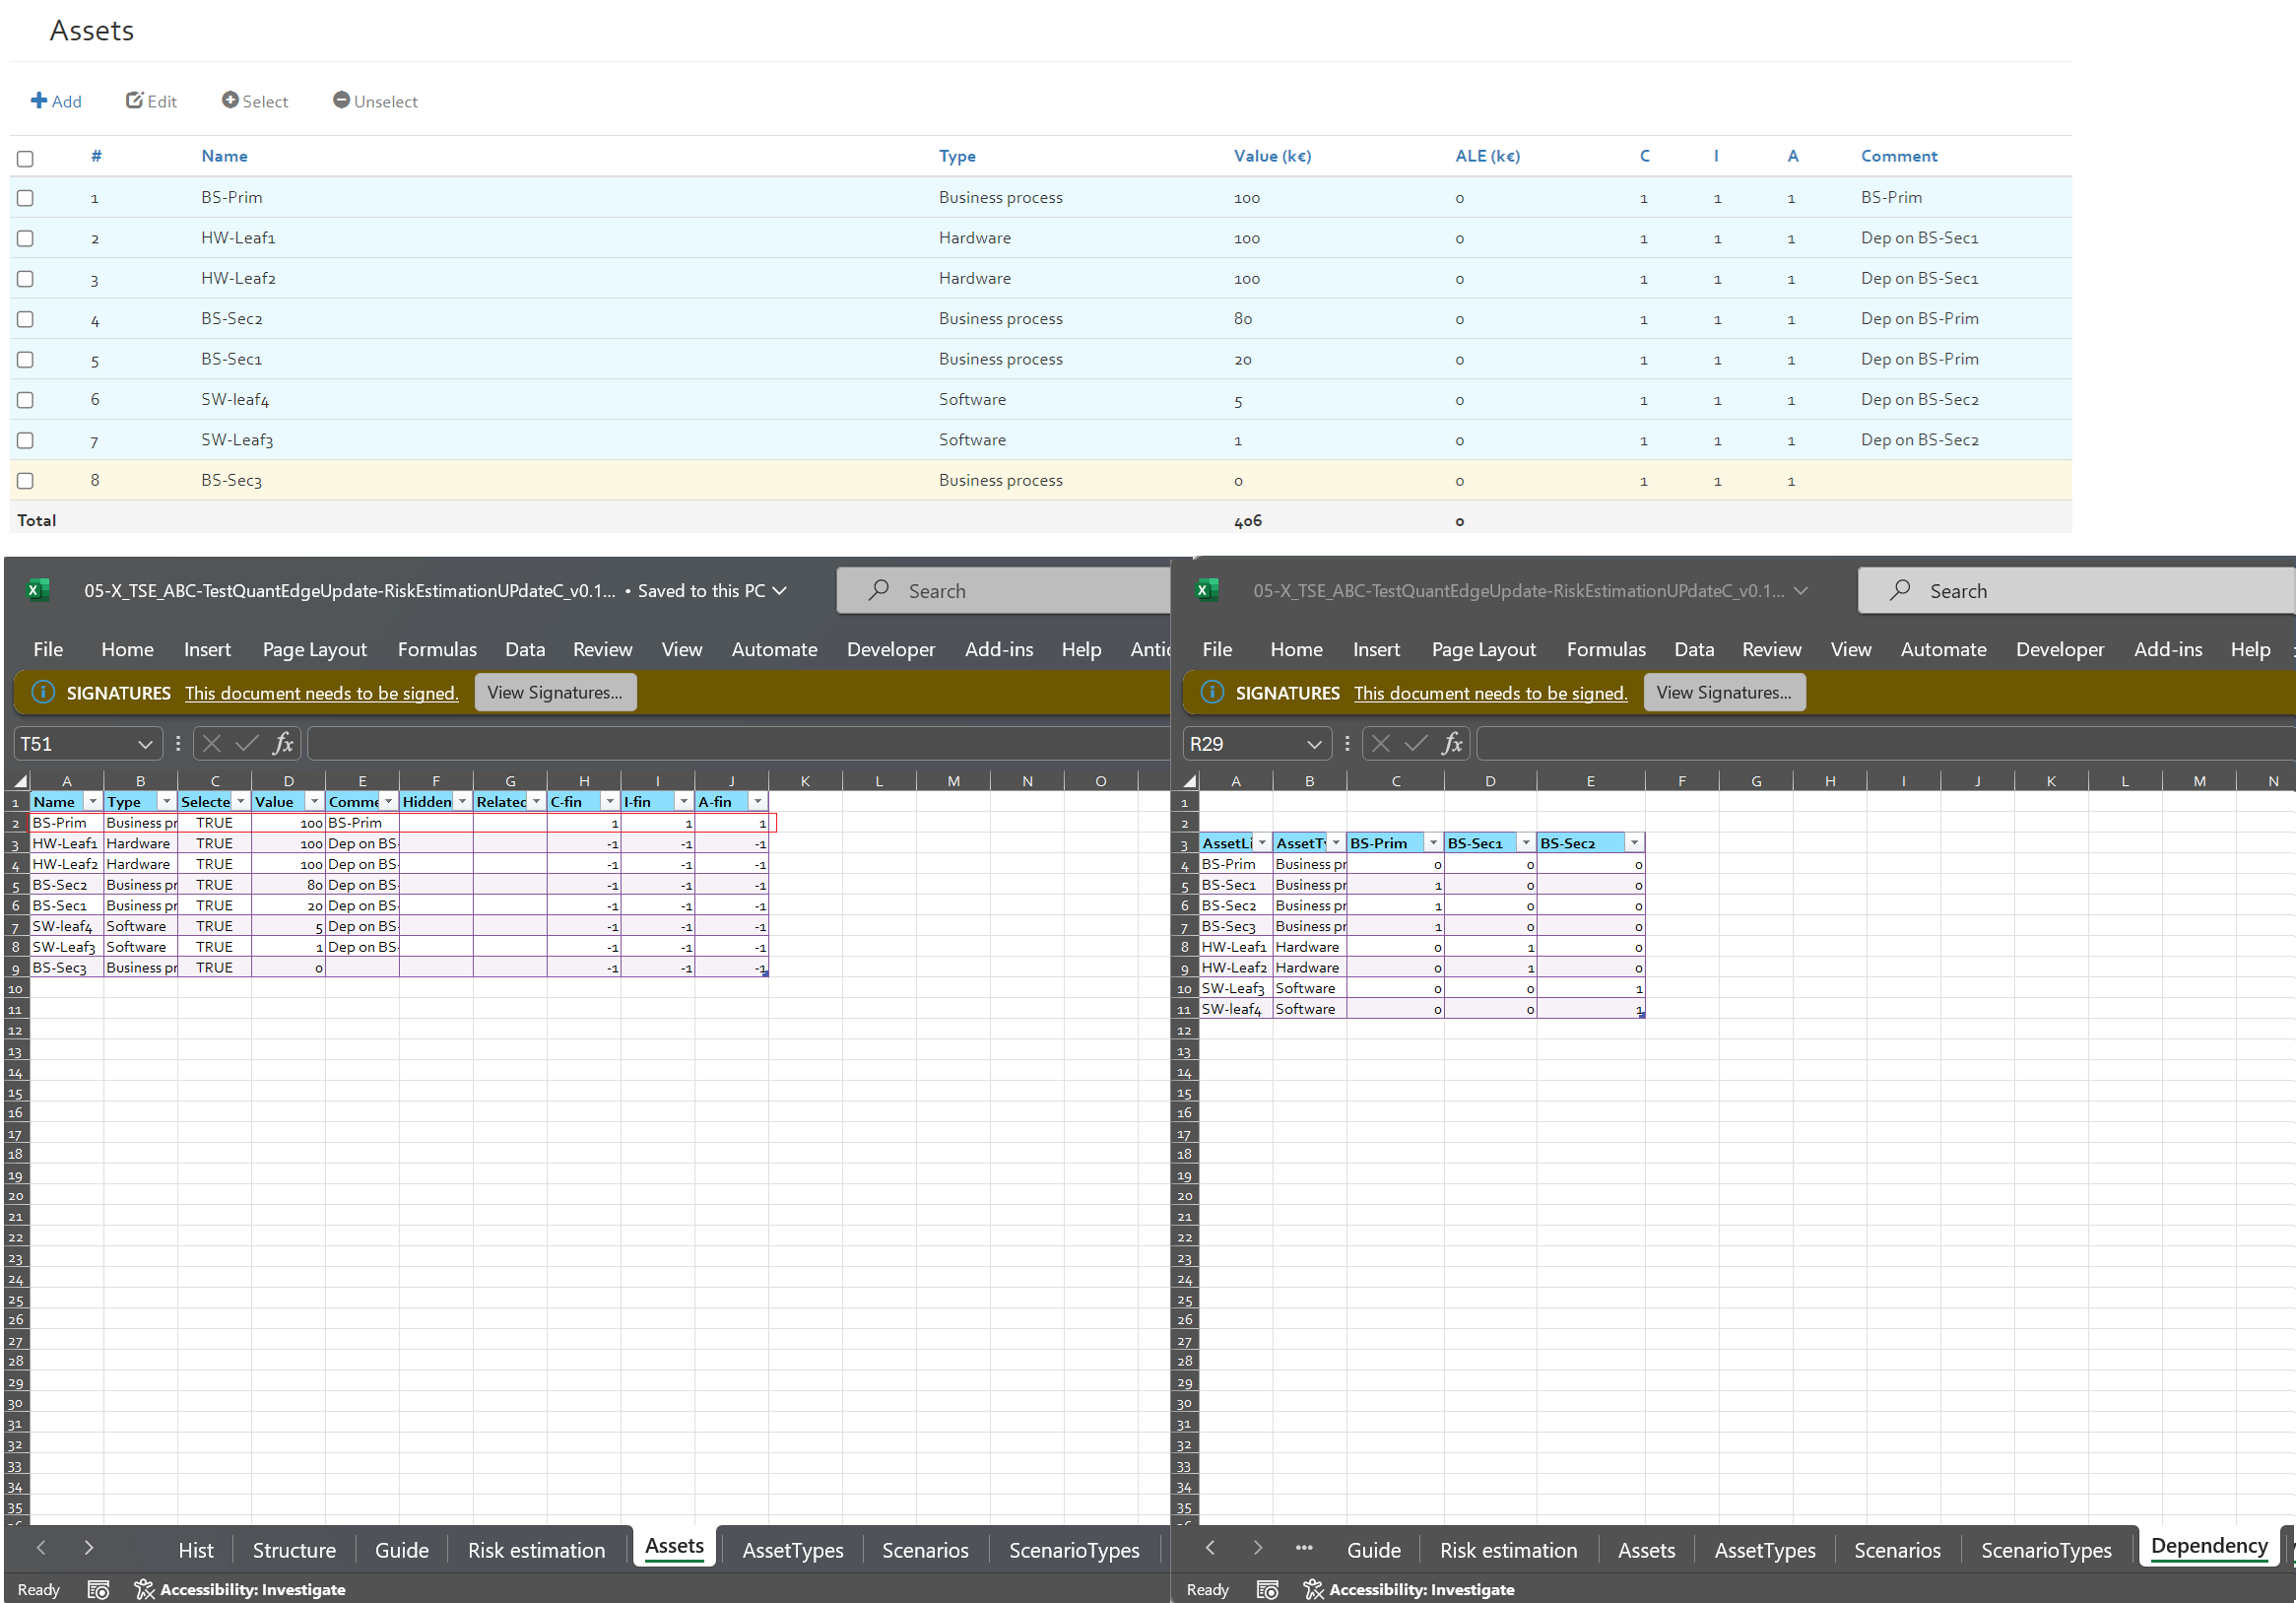
In contrast to the risk sheet, this spreadsheet can be imported back into OpenTRICK.
Export risk estimation with-additional columns
Given that ILR analysis is enabled the tool allows the user to add additional columns to the risk estimation
exported file. The input can be provided using a dedicated CSV file in the file selection input box as below:
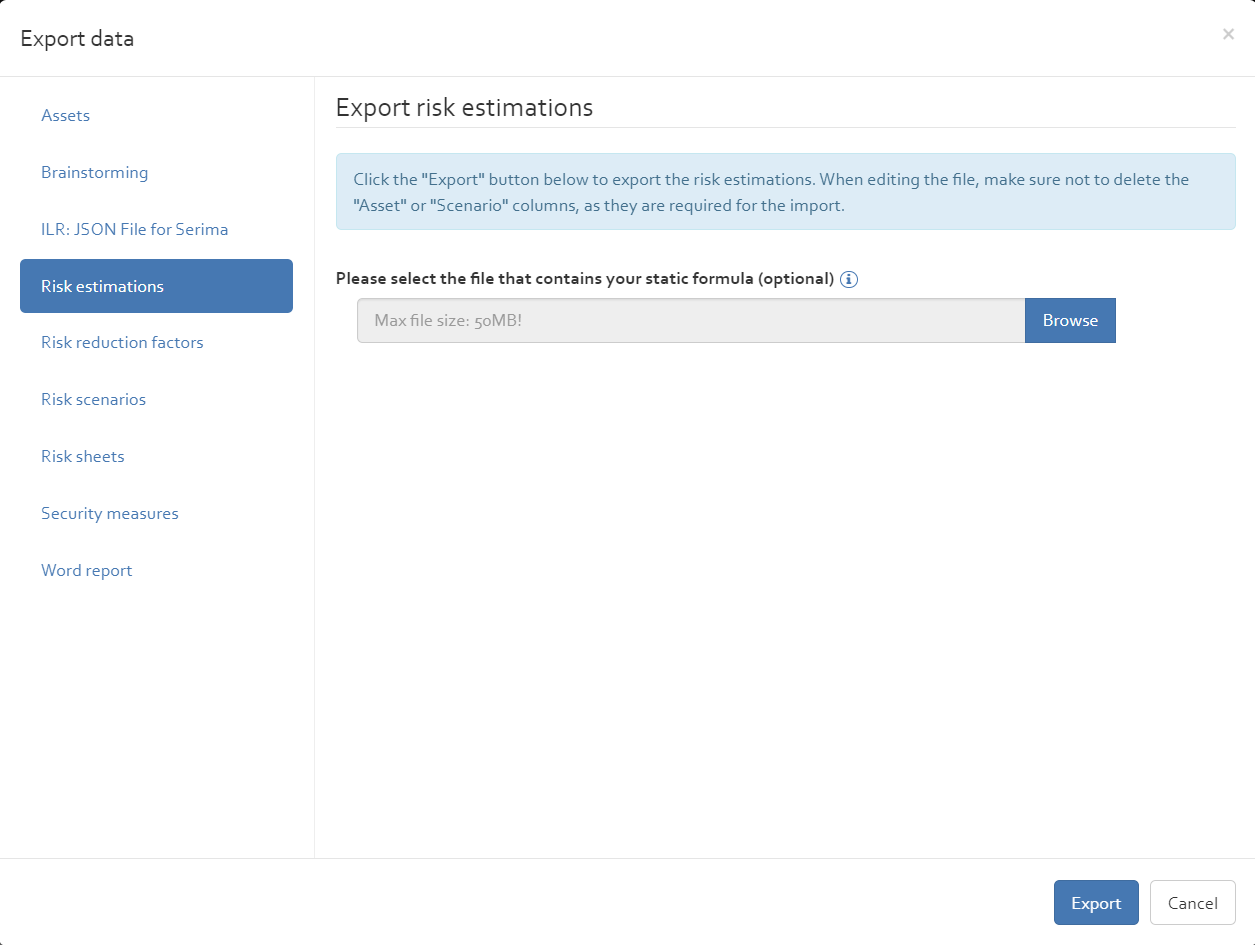
Example of one such input CSV file could be:
Relative Name; VLOOKUP(Risk_estimation[@[Asset]];Assets[#All];7;0)
The above file if provided will additionally add three columns 'Relative Name', 'Label Th.'' and 'Pr' in the exported risk estimation using
the values in Tables 'Assets' and 'Probabilty' in the Risk Estimation file.
Label Th.;Risk_estimation[@Scenario]
Pr;VLOOKUP(Risk_estimation[@[RAW Probability]];Probabilty[#All];3;0)
NOTE: This feature is only available when the Enable ILR analysis is Set in Manage analysis settings.
Risk reduction factors
This option allows to export all RRF values of the different standards in Microsoft Excel format. This allows the user to modify more fast several RRF values. With the help of the Import option, the user can reimport and overwrite the RRF values again.
Risk registers
Click the "Export" button to export the risk register. The exported file is meant for compliance/documentation purposes, and cannot be imported back into OpenTRICK. If you want to re-import changes, consider exporting the risk estimations directly, instead.
Risk scenarios
The user can have list of scenarios in the risk analysis by clicking on "Export" button.
Risk sheets
This allows you to export a register of all the risks encoded in OpenTRICK. It is a summary of all of the risk estimations, arranged visually.
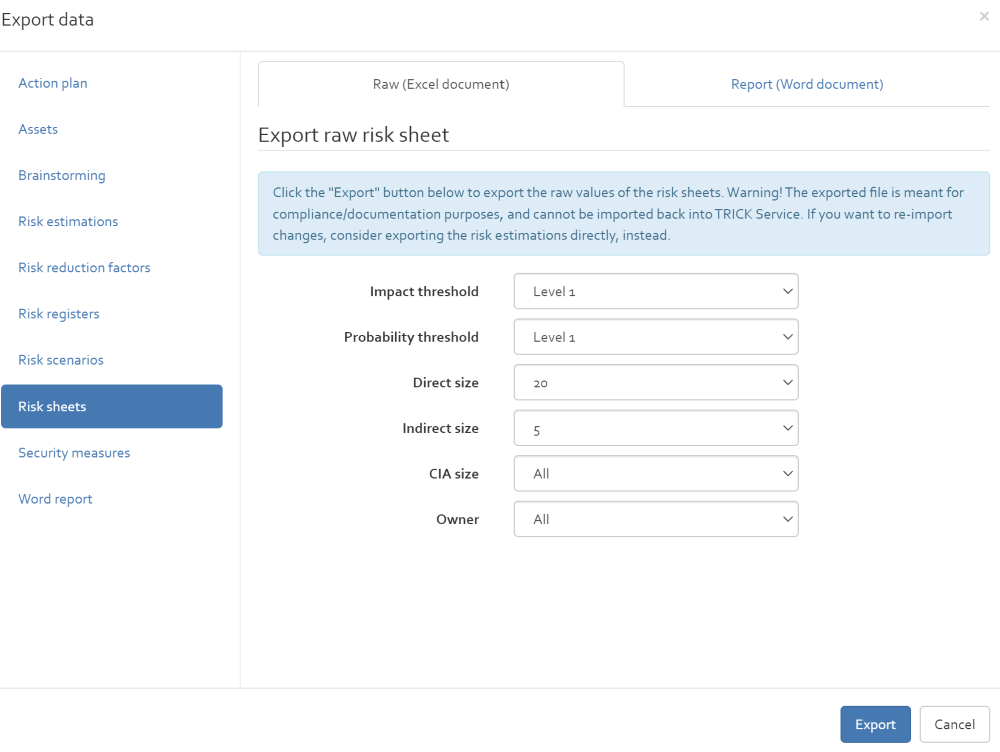
The risk sheet can exported in two formats: as a Word report (for printing) or as an Excel file (for manipulation). The following options can be configured:
- Risk sheets format: (Only for Word report) Whether the risk sheet should meet with the CSSF requirements.
- Impact/Probability threshold: These options remove risk analysis that have the Impact/Probability less than these values from the exported report. In other words, if a risk has a lower impact/probability, it will be omitted in the export.
- Direct size: The number of most important “direct” (in the CSSF sense) risks that shall be exported. In other words, this value (e.g. 20) allows the user to have a list of the risks (e.g. 20) that have direct effect to the risk analysis. All other risks will be omitted. Select “All” to disable the filter.
- Indirect size: The number of most important “indirect” (in the CSSF sense) risks that shall be exported. All other risks will be omitted. Select “All” to disable the filter.
- CIA size: The number of most important "confidentiality/integrity/availablity" risks that shall be exported. All other risks will be omitted. Select “All” to disable the filter.
- Owner: A filter for only exporting those risks that are associated to the selected owner. Select “All” to disable the filter.
Scope
Exports Scope of the risk analysis as an excel file. This scope can be viewed in Risk context->Scope tab
Security measures
Exports all security measures from the selected measure collections as an Excel sheet. Multiple standards can be selected using the SHIFT and CTRL keys on the keyboard.
Word report
By clicking on “Export”, the user will get a structured risk analysis report including all data of selected the risk analysis. The report is a word file including macros for the creation of charts & tables.
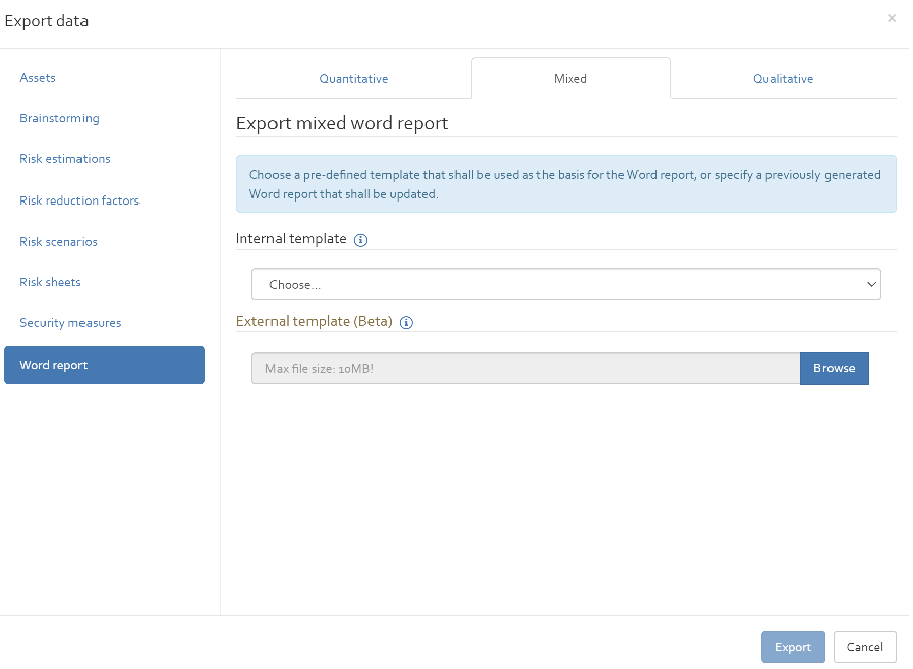
When exporting a report, you will be asked to select the template to use. The list features all templates deployed by default in OpenTRICK, and the templates that have been manually uploaded for the related customer (see [Section]). For mixed reports use bookmarks in the word template to set which aspects of the report are to be exported in "qualitative" and which are to be exported in "quantitative".
You can also upload a previously exported report that gets automatically updated (even if styling or content changes have been made to the document).
Word report using external template
The word report can be generated using an external template as well. The external template if used can contain the following bookmarks as placeholders for TS reporting data:
| Bookmark Category | Bookmark Name | Description |
|---|---|---|
| Common | TS_RISK | Table of Risk exposure estimation |
| Common | TS_SCENARIO | Table of Considered risk scenarios. |
| Common | TS_SCOPE | Table for general considerations on the target of the risk analysis. |
| Common | TS_THREAT | Table for threat exposure estimation. |
| Common | TS_VULNERABILITY | Table of list of vulnerabilities and its exposure level. |
| Common | TS_CURRENTSECURITYLEVEL | No |
| Common | TS_LISTCOLLECTION | List of security frameworks |
| Common | TS_MEASURESCOLLECTION | Table of measures collection |
| Common | TS_DEPENDENCYGRAPH | Exported Dependency Graph PNG from DRAW (see Export to OpenTRICK section in DRAW) |
| Mixed | TS_HY_ADDITIONALCOLLECTION | Additional Collection |
| Qualitative | TS_QL_ACTIONPLAN | Table of Qualitative Risk treatment plan |
| Qualitative | TS_QL_ADDITIONALCOLLECTION | Qualitative Addtional Collection |
| Qualitative | TS_QL_ASSESSMENT | Annual Loss Expectancy of assets |
| Qualitative | TS_QL_ASSET | Table of List of assets considered in the risk analysis. |
| Qualitative | TS_QL_ASSETNOTSELECTED | Table of List of assets not considered in the risk analysis. |
| Qualitative | TS_QL_IMPACT | Table of Impact scale. |
| Qualitative | TS_QL_IMPACTLIST | Table of list of Impact List |
| Qualitative | TS_QL_PHASE | Risk treatment plan implementation phases |
| Qualitative | TS_QL_PROBA | Table of Probability scale |
| Qualitative | TS_QL_SUMMARY | Characteristics of implementation phases |
| Qualitative | TS_QT_ACTIONPLAN | Qualitative Risk treatment plan. |
| Qualitative | TS_RISKACCEPTANCE | Qualitative Risk acceptance |
| Qualitative | TS_RISKHEATMAP | Risk heat map |
| Qualitative | TS_RISKHEATMAPSUMMARY | Summary of Risk heat map |
| Qualitative Charts | TS_CHARTRISKBYASSET | Chart of risks by assets |
| Qualitative Charts | TS_CHARTRISKBYASSETTYPE | Chart of risks by asset types |
| Qualitative Charts | TS_CHARTRISKBYSCENARIO | Chart of risk by Risk scenario |
| Qualitative Charts | TS_CHARTRISKBYSCENARIOTYPE | Chart of risk by scenario type |
| Qualitative Charts | TS_QL_CHARTCOMPLIANCE27001 | ISO/IEC 27001 compliance levels during the different implementation phases. |
| Qualitative Charts | TS_QL_CHARTCOMPLIANCE27002 | ISO/IEC 27002 compliance levels during the different implementation phases. |
| Quantitative | TS_QT_ADDITIONALCOLLECTION | Additional Collection |
| Quantitative | TS_QT_ASSESSMENT | Quantitative assessement |
| Quantitative | TS_QT_ASSET | List of assets considered in the risk analysis |
| Quantitative | TS_QT_ASSETNOTSELECTED | List of assets not considered in the risk analysis. |
| Quantitative | TS_QT_IMPACT | Quantitative impact |
| Quantitative | TS_QT_IMPACTLIST | Quantitative impact list |
| Quantitative | TS_QT_PHASE | Risk treatment plan phases |
| Quantitative | TS_QT_PROBA | Probability Scale |
| Quantitative | TS_QT_SUMMARY | Summary of treatment plan |
| Quantitative Charts | TS_CHARTALEBYASSET | Chart of Annual Loss Expectancy by assets |
| Quantitative Charts | TS_CHARTALEBYASSETTYPE | Chart of Annual Loss Expectancy by asset type |
| Quantitative Charts | TS_CHARTALEBYSCENARIO | Annual Loss Expectancy by Risk scenario. |
| Quantitative Charts | TS_CHARTALEBYSCENARIOTYPE | Annual Loss Expectancy by scenario type |
| Quantitative Charts | TS_CHARTRENTABILITY | Chart Rent ability |
| Quantitative Charts | TS_QT_CHARTCOMPLIANCE27001 | ISO/IEC 27001 compliance levels during the different implementation phases. |
| Quantitative Charts | TS_QT_CHARTCOMPLIANCE27002 | ISO/IEC 27002 compliance levels during the different implementation phases. |
| Table Styles | TableTS | OpenTRICK Table |
Import
Clicking on “Import” will open the centralised import interface, from where data can be imported back (again) into OpenTRICK.
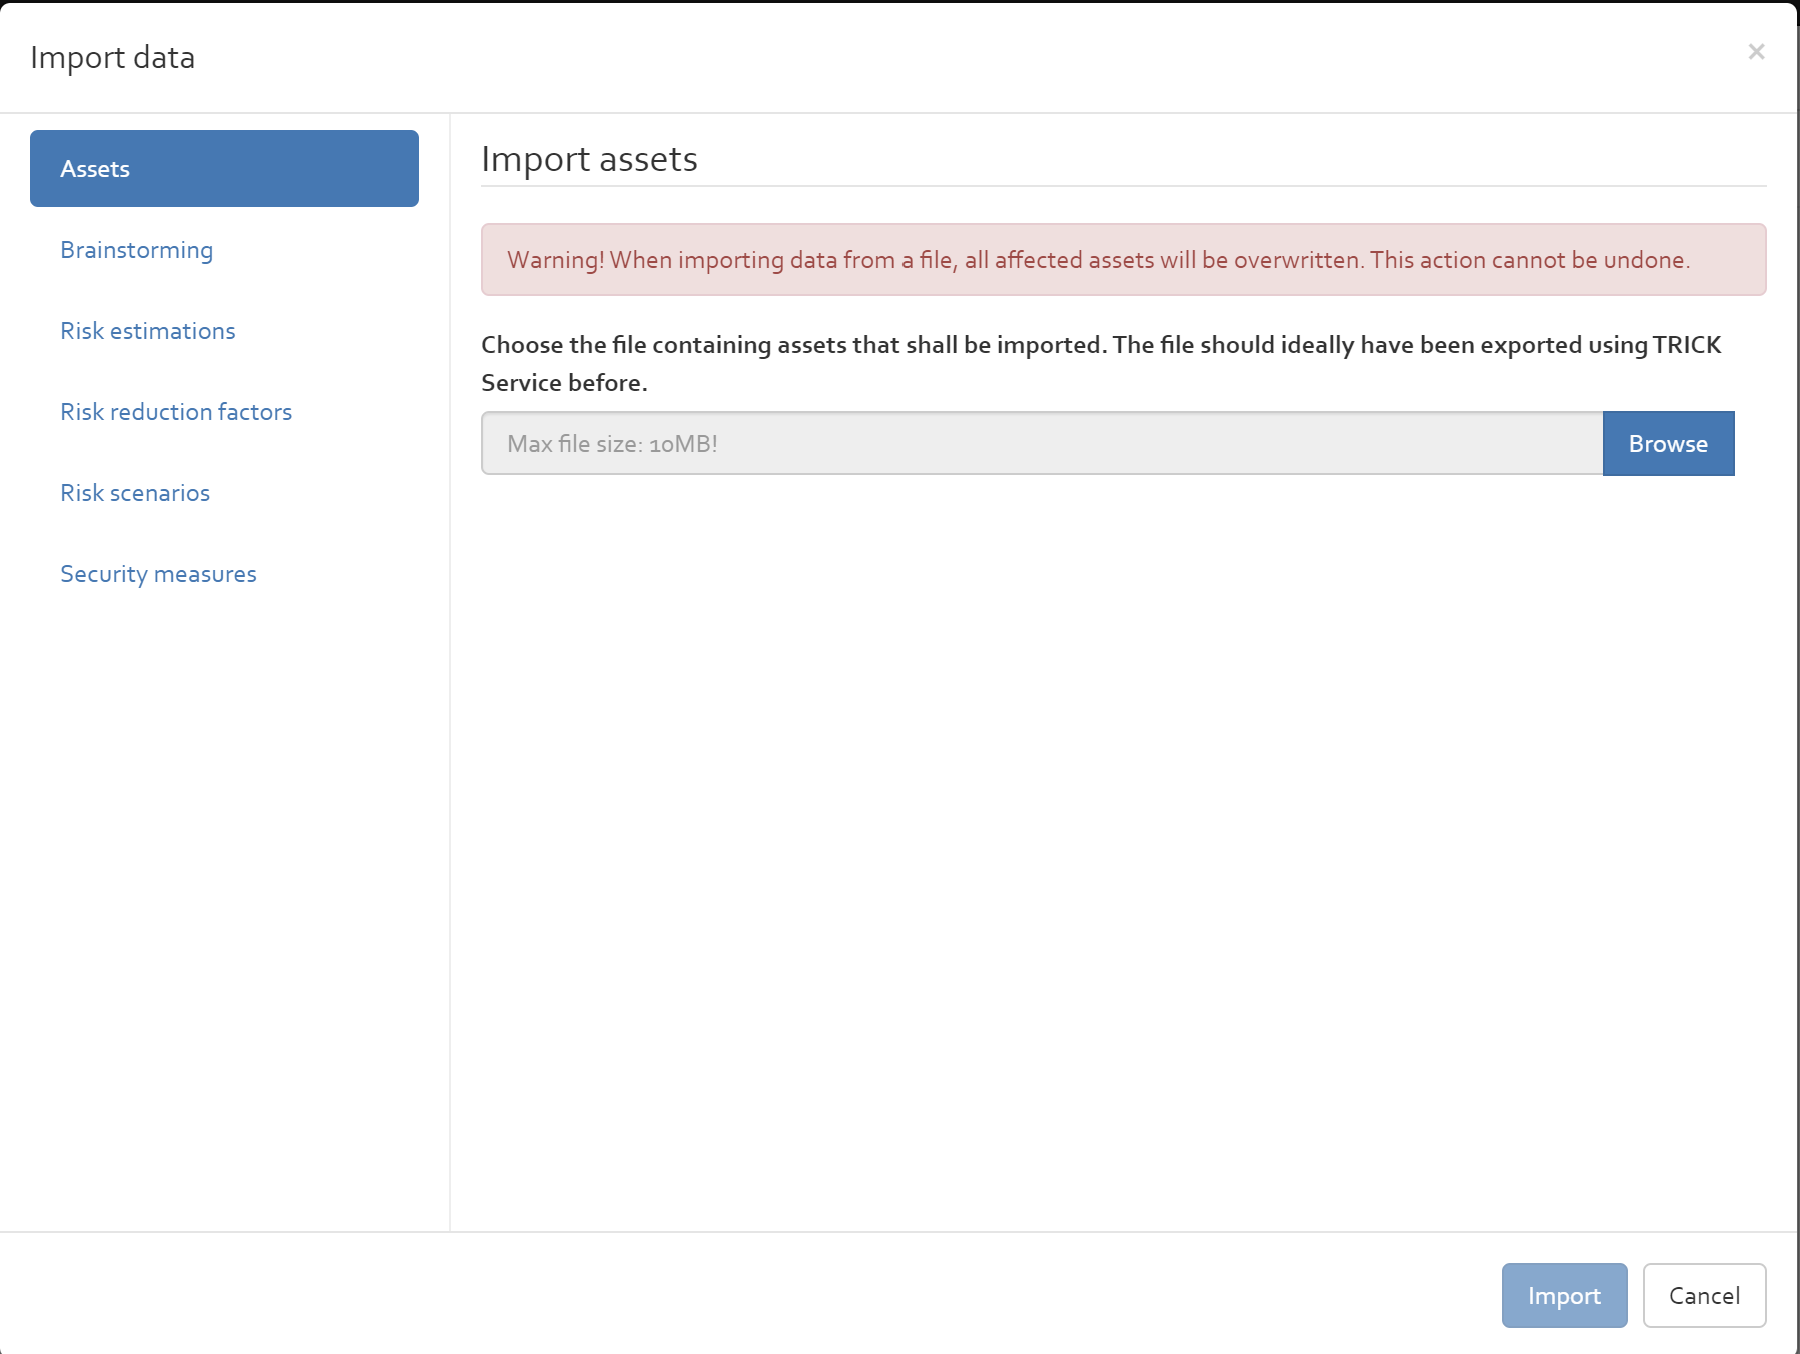
The interface is structured as follows: on the right-hand side, the user can choose what shall be imported. The left-hand side of the interface will then show configuration options (if applicable) and a possibility to select the import file. The options are explained in the sub-sections below. As a final step, the data can be imported via the “Import” button in the lower right corner. See [Figure] for an illustration.
Assets
The user can import assets that have been exported previously using OpenTRICK.
Brainstorming
Importing brainsorming can be done using two modes:
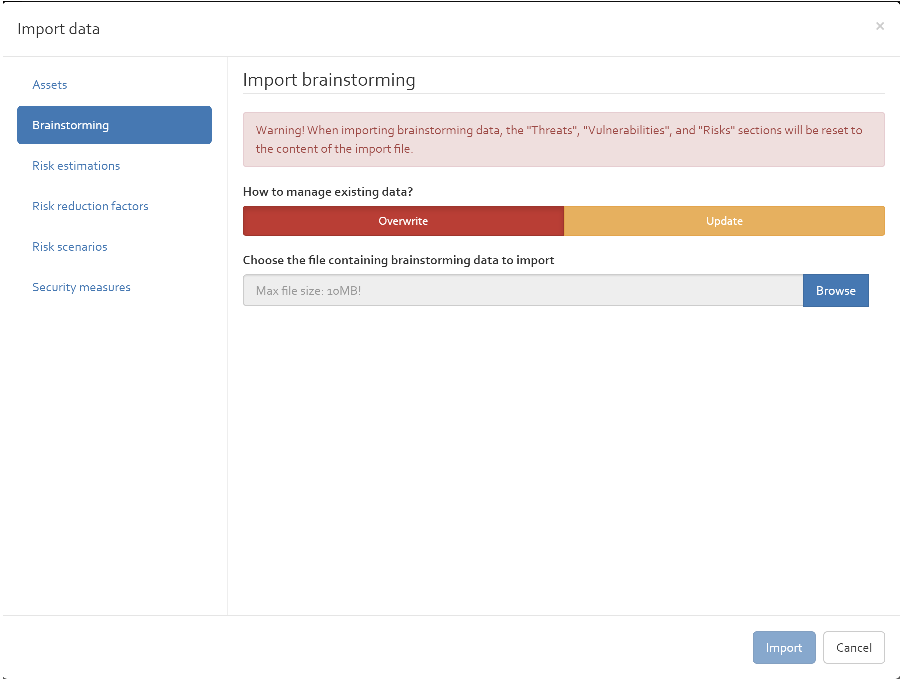
Risk estimations
Imports back previously exported risk estimations from an Excel spreadsheet. The format of the file is the same than the one exported by OpenTRICK ([Section]). Instead of starting from a raw file, consider exporting a file, adapting it, and importing it.
Risk reduction factors
The RRF values can be imported either from a previously exported file, or from the knowledge database (i.e., from another analysis). In either case, the RRF values will be replaced by those in the file/analysis for the selected standards.
In the first case, the file must match the format of the file exported by OpenTRICK ([Section]). The RRF values for all standards contained in the file will be imported. When a standard is missing in the file, the related RRF values will remain unchanged in the analysis.
In the second case, the user must select a risk analysis profile, or an analysis of a customer. In a seconds step, the user must select all standards for which he wishes to import the RRF values; multiple standards can be selected using the SHIFT or CTRL keys on the keyboard. When a standard is not selected, the related RRF values will remain unchanged in the analysis.
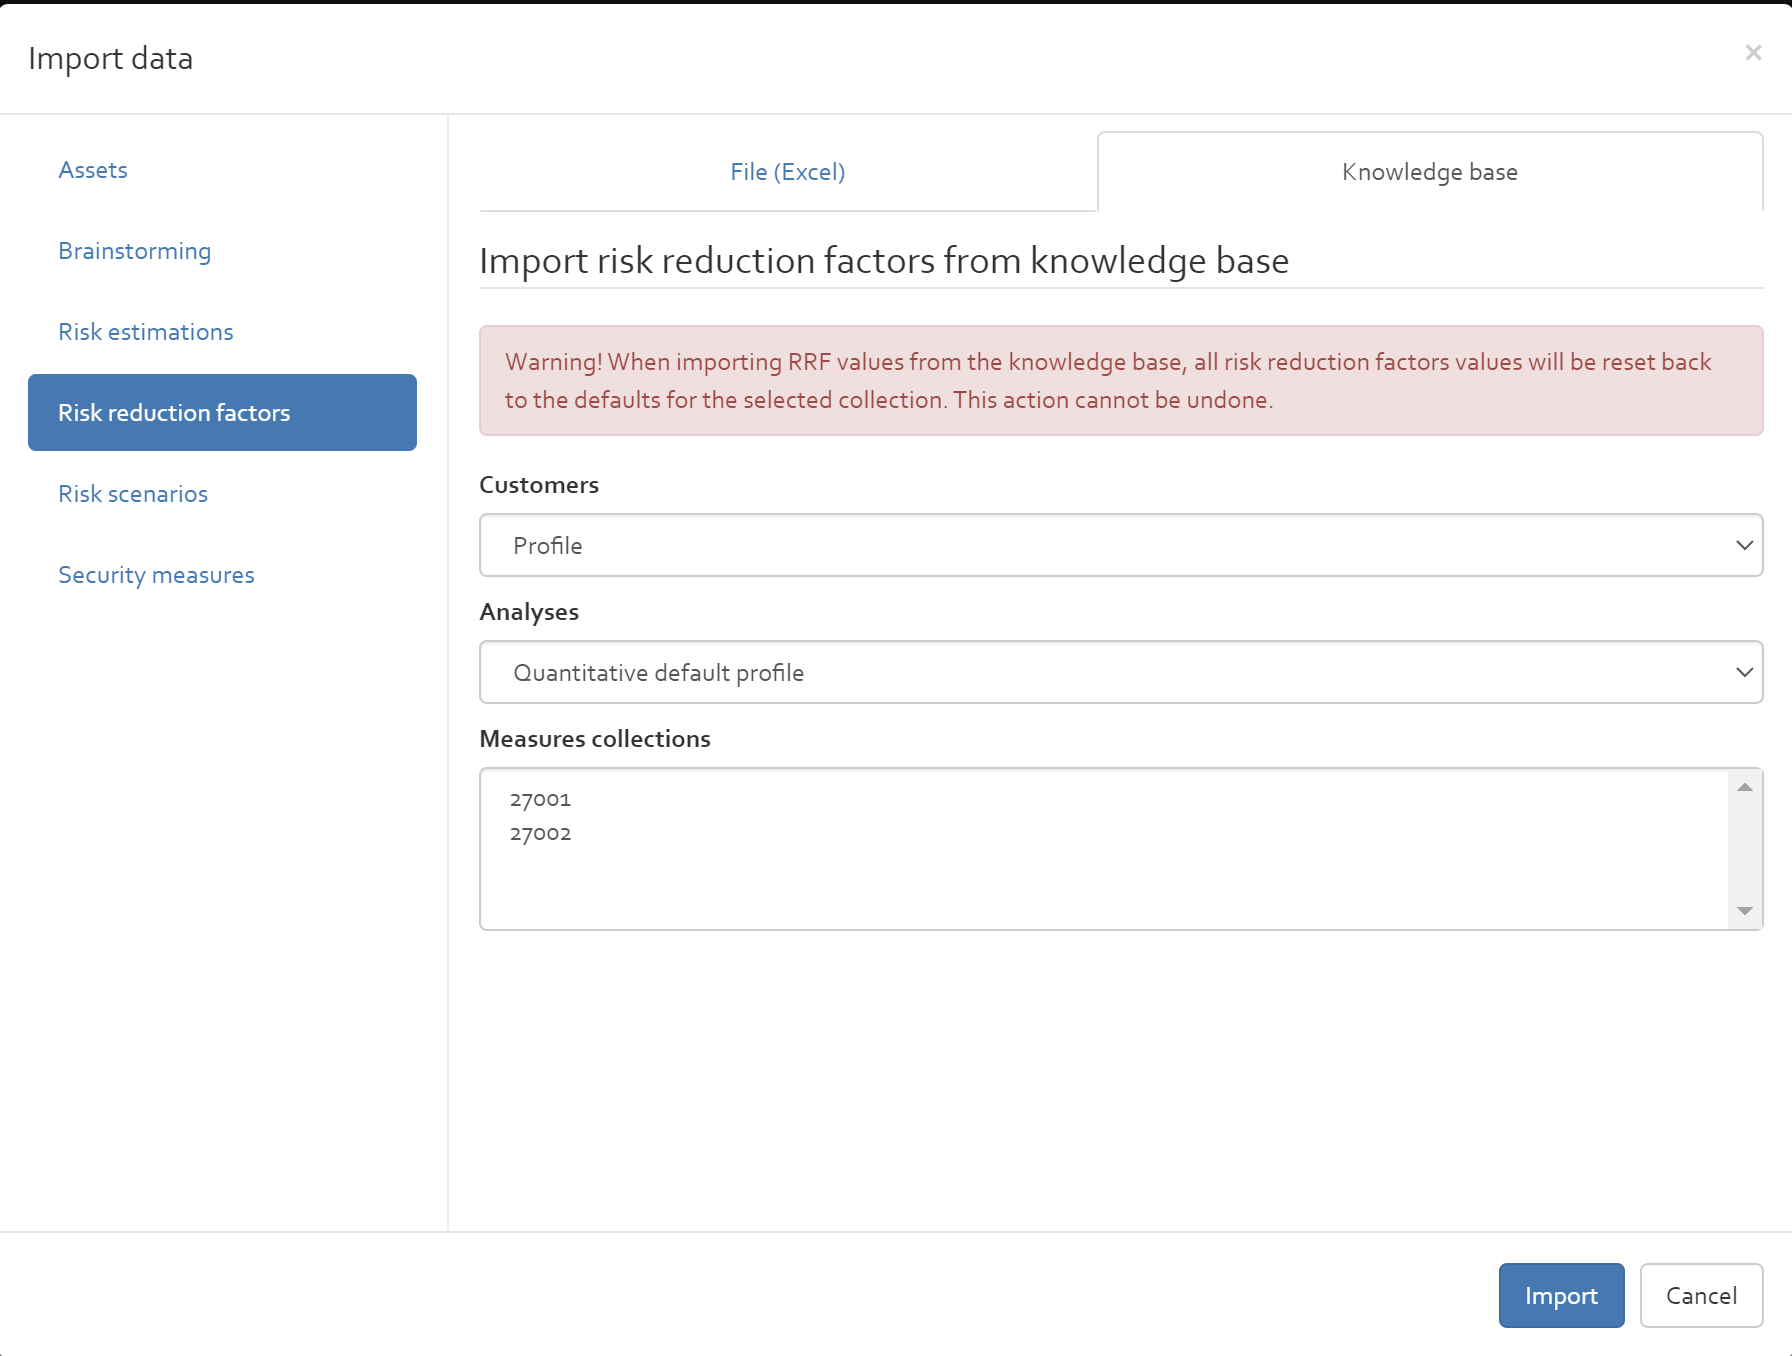
Risk scenarios
Imports back previously exported risk scenarios from an Excel sheet produced by OpenTRICK that can be edited manually before being imported.Scope
Imports scope of the risk analysis which can be viewed under Risk context->Scope. There are two modes to import a scope:
- Overwrite:Clears all data from the sheets in OpenTRICK, and replaces it with the data contained in the provided Excel file. It is strongly recommended to use a previously exported file as a template for import.
- Update: If this mode is selected the import of a brainstorming excel sheet will not erase the existing values before the import. When this option is selected the values that have the same description are overwritten.
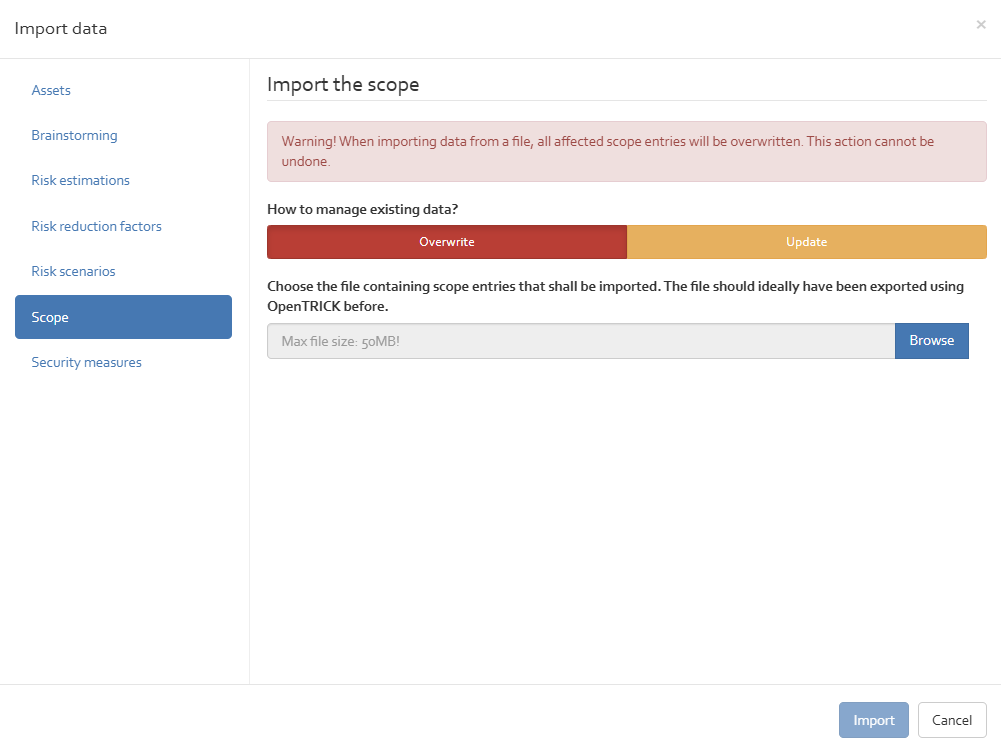
Security measures
Imports back previously exported security measures from an Excel spreadsheet. The format of the file is the same than the one exported by OpenTRICK ([Section]). Instead of starting from a raw file, consider exporting a file, adapting it, and importing it.
Risk reduction factor (only for quantitative risk analyses)
The open RRF option opens the Risk Reduction Factor view where the user can define the risk specificities for the different risk scenarios and the influence of the security measures on risks of the current risk analysis.
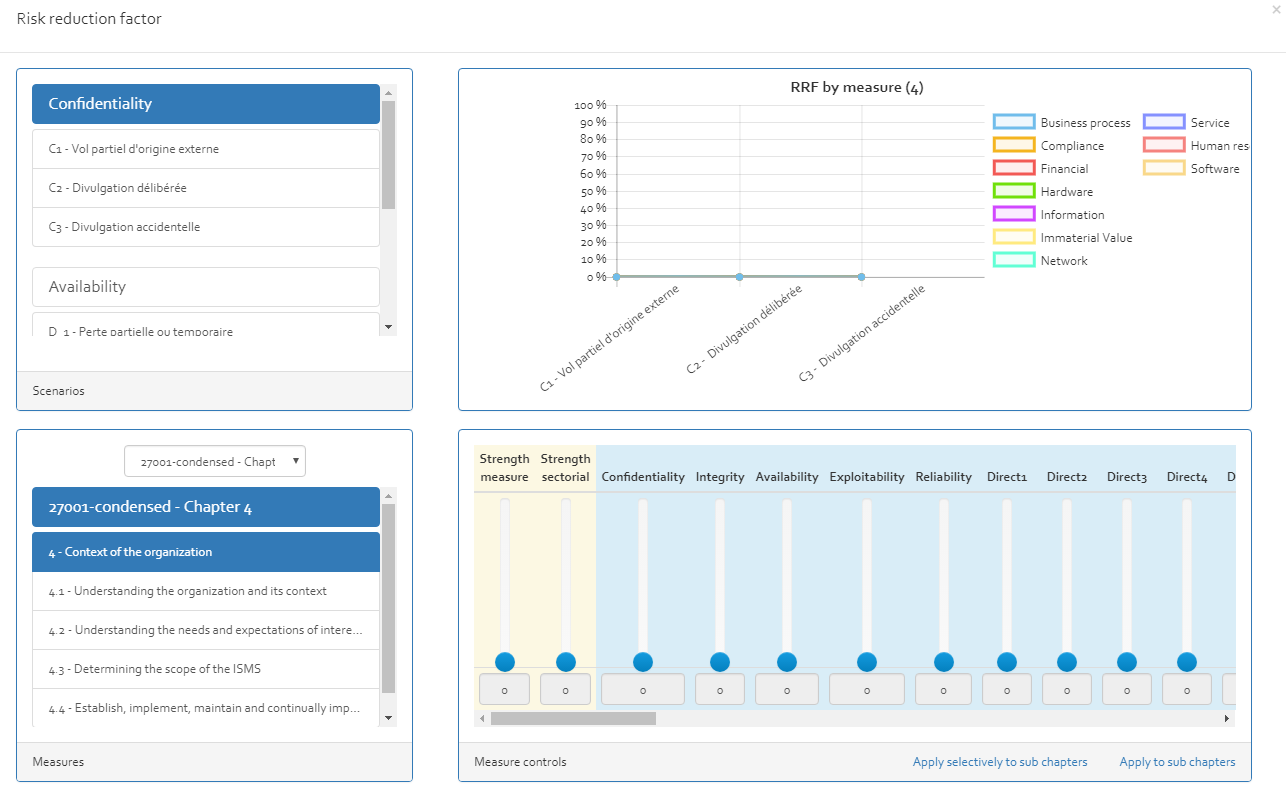
Edit text fields
You can choose between “open” or “close” edit modes to open or close all text fields of the selected risk analysis.
Settings
Manage statement of applicability
Shows a pop-up which permits the user to enable/disable the statement of applicability for the several security standards. If the statement of applicability is disabled for all standards, it will be hidden throughout the risk analysis. See ([Figure], [Figure]) showing how to enable SoA for a specific standard.

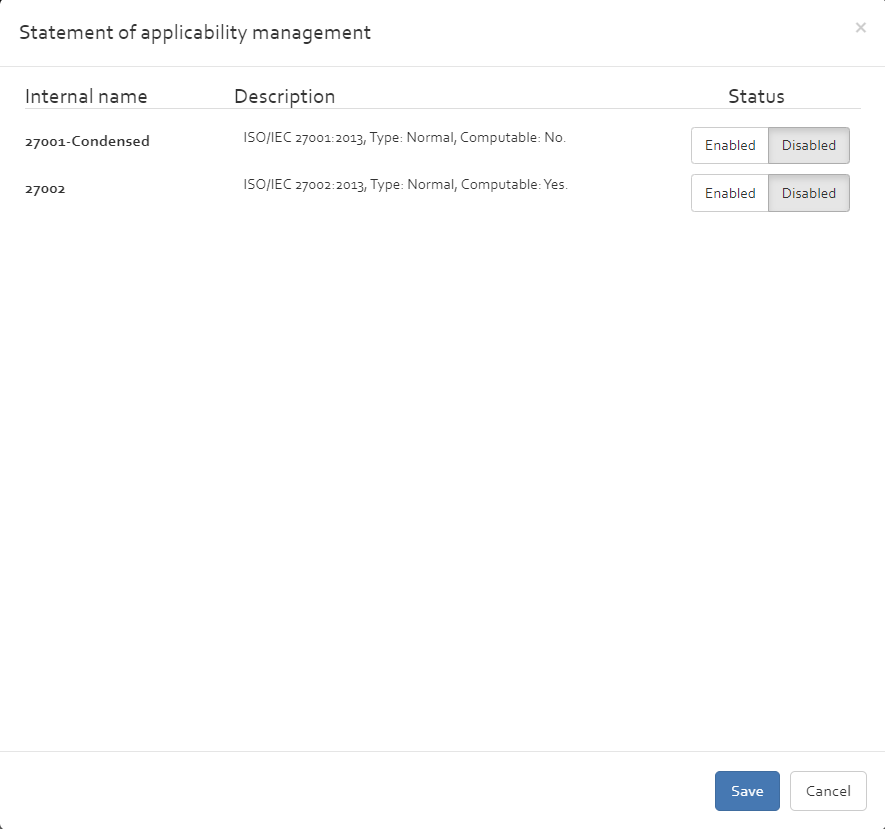
Manage impact scales
Shows a pop-up (see [Figure]) that allows the user to select all the impact scales (quantitative and qualitative) that shall be available in the risk analysis.
If only the quantitative impact is included, then the analysis type will turn into “quantitative”, and all qualitative-related options will be removed.
If only quantitative impact scales are included, then the analysis type will turn into “qualititative”, and all quantitative-related options will be removed.
If both qualitative and quantitative impact scales are included, then the analysis type will turn into “mixed”, and all options will be available in the risk analysis.
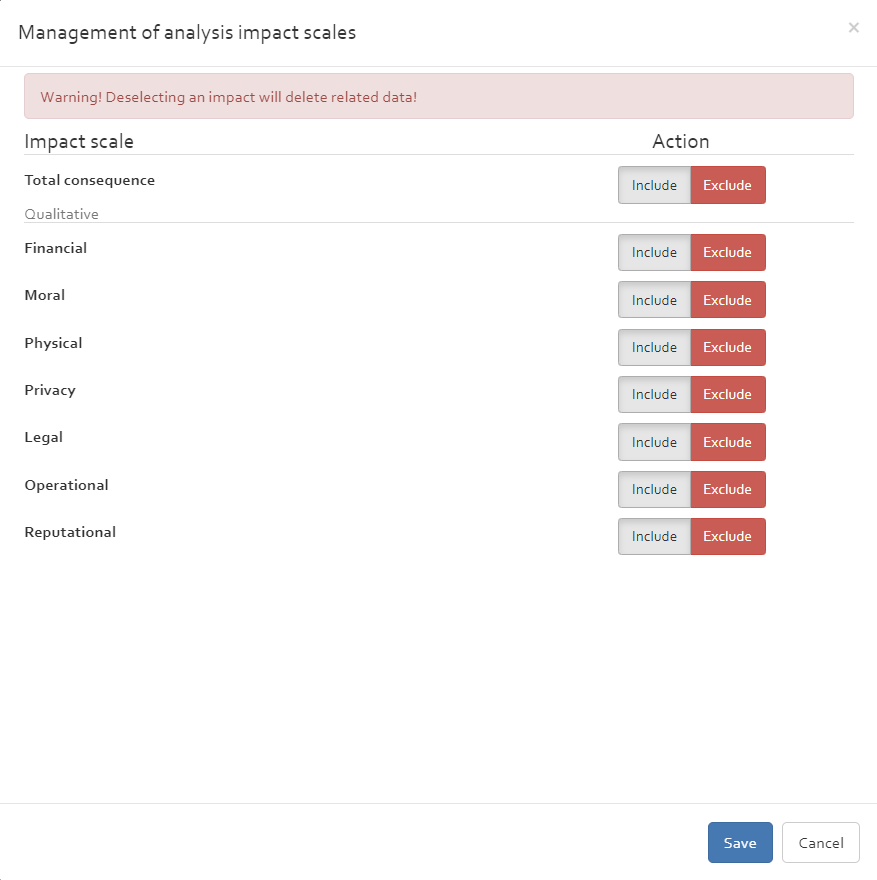
Manage scale levels
Shows a pop-up (see [Figure]) where the user can change the impact and probability scales.The dialog features two columns: the left hand-side displays the currently defined levels in the risk analysis (in the example: 3). The right hand-side contains the new levels. Click the “+” button to add an additional level to the scale. Drag an old level from the left and drop it onto a level on the right. All levels dropped onto a new level will be replaced by the latter. It is also possible to drop multiple levels from left into a single level on right reducing the levels. However when doing so consistency must be maintained else the outcome may not be predictable. Additionally levels on the right can be deleted reducing the number of scales.

Advanced settings
Opens a dialog where advanced options can be shown or hidden for the risk analysis:
- Show raw estimation: shows the RAW risk estimations in the risk sheets ( [Section]).
- Enable ILR analysis: Enables the Risk analysis with ILR compatibility. The analysis can be exported in ILR compatible JSON format and further imported in Serima platform ( [Section]).
- Show hidden comments: displays the “hidden comment” in the risk sheets ( [Section]). This field was used in old OpenTRICK versions, and is hidden by default in more recent releases.
- Show dynamic analysis: enables the use of dynamic parameters in the risk analysis for the sake of real-time risk monitoring.
- Display excluded dynamic parameters: enables viewing and in turn re-inclusion of the excluded dynamic parameters from a risk analysis
- Include qualitative impacts into quantitative report: whether to include risk assessments for qualitative impacts in a quantitative report.
Close analysis
By clicking on the Exit symbol, the current risk analysis will be closed and the user will be redirected to [Section]. This option allows the user to close the current analysis without logging out of the application.

Annex A – OpenTRICK user roles
The following table resumes the different access rights of the different user roles available in OpenTRICK. To see and modify the user’s roles, please refer to [Section].
| Page | Group | Action | User | Consultant | Administrator | Supervisor | Comment |
|---|---|---|---|---|---|---|---|
| Any | Main Menu | Home | x | x | x | x | |
| Any | Main Menu | Knowledge base | x | x | x | ||
| Any | Main Menu | Analysis | x | x | x | x | |
| Any | Main Menu | Import | x | x | x | x | |
| Any | Main Menu | Profile | x | x | x | x | |
| Any | Main Menu | Administration | x | x | |||
| Any | Main Menu | Runtime | x | ||||
| Any | Main Menu | Logout | x | x | x | x | |
| Knowledge Base | Customers | View | x | x | x | ||
| Knowledge Base | Customers | Add | x | x | x | ||
| Knowledge Base | Customers | Edit | x | x | x | ||
| Knowledge Base | Customers | Delete | x | x | x | ||
| Knowledge Base | Language | View | x | x | x | ||
| Knowledge Base | Language | Add | x | x | x | ||
| Knowledge Base | Language | Edit | x | x | x | ||
| Knowledge Base | Language | Delete | x | x | x | ||
| Knowledge Base | Standards | View | x | x | x | ||
| Knowledge Base | Standards | Edit | x | x | x | ||
| Knowledge Base | Standards | Show Measure | x | x | x | ||
| Knowledge Base | Standards | Get import template | x | x | x | ||
| Knowledge Base | Standards | Import standard | x | x | x | ||
| Knowledge Base | Standards - Show Measures | View | x | x | x | ||
| Knowledge Base | Standards - Show Measures | Change language | x | x | x | ||
| Knowledge Base | Standards - Show Measures | Add | x | x | x | ||
| Knowledge Base | Standards - Show Measures | Edit | x | x | x | ||
| Knowledge Base | Standards - Show Measures | Delete | x | x | x | ||
| Knowledge Base | Analysis profiles | View | x | x | x | ||
| Knowledge Base | Analysis profiles | Open Analysis | x | x | x | ||
| Knowledge Base | Analysis profiles | Set as default | x | x | x | ||
| Knowledge Base | Analysis profiles | Edit Info | x | x | x | ||
| Knowledge Base | Analysis profiles | Delete | x | x | x | ||
| Admin | Status | View | x | x | |||
| Admin | Status | Install | x | x | |||
| Admin | User | View | x | x | |||
| Admin | User | Edit | x | x | |||
| Admin | User | Delete | x | x | |||
| Admin | Customers | View | x | x | |||
| Admin | Customers | Edit | x | x | |||
| Admin | Customers | Manage Users | x | x | |||
| Admin | Customers | Delete | x | x | |||
| Admin | All Analyses | View | x | x | |||
| Admin | All Analyses | Manage Access Rights | x | x | |||
| Analysis | All Analyses | View | x | x | x | x | Only analyses enabled for the current user |
| Analysis | All Analyses | New | x | x | x | x | General: To create, at least 1 customer needs to be present, and 1 language and profile.
Advanced: only analyses enabled for the current user with Read Right |
| Analysis | All Analyses | Open | x | x | x | x | Only analyses enabled for the current user with Read Right |
| Analysis | All Analyses | Manage Access Rights | x | x | x | x | Only analyses enabled for the current user + user has to be Owner or have All Right |
| Analysis | All Analyses | New Version | x | x | x | x | Only analyses enabled for the current user with Modify Right |
| Analysis | All Analyses | Edit | x | x | x | x | Only analyses enabled for the current user with Modify Right |
| Analysis | All Analyses | Profile | x | x | x | x | Only analyses enabled for the current user with Modify Right |
| Analysis | All Analyses | Export | x | x | x | x | Only analyses enabled for the current user with Export Right |
| Analysis | All Analyses | Export Report | x | x | x | x | Only analyses enabled for the current user Export Right |
| Analysis | All Analyses | Delete | x | x | x | x | Only analyses enabled for the current user with DELETE right |
| Analysis | Analysis | View | x | x | x | x | User has to have Read access on analysis |
| Analysis | Analysis | Export | x | x | x | x | User has to have Export access on analysis |
| Analysis | Analysis | Modify | x | x | x | x | User has to have Modify access on analysis |
| Analysis | Analysis | compute action plan | x | x | x | x | User has to have calculate action plan access on analysis |
| Analysis | Analysis | compute risk register | x | x | x | x | User has to have calculate risk register access on analysis |
| Analysis | Analysis | delete | x | x | x | x | User has to have delete access on analysis |
| Analysis | Analysis | all | x | x | x | x | User has to have all access on analysis |
Annex B – API
OpenTRICK includes an HTTP/ReST API for providing external risk input to risk analyses, making them thus dynamic. External input is available as named parameters in a risk assessment, more precisely, in the “probability” field of every risk assessment.
Use
Before the API can be accessed, a dedicated “probe” needs to be created and enabled via the Administration interface (see [Section] for details). By default, the newly created probe does not have access to any risk analysis. In the risk analysis overview, click on “Manage probe subscriptions” (see [Section]) and select the probe you wish to subscribe to. Every risk analysis that is subscribed to a probe, gets automatically updated when the probe reports to the OpenTRICK API. Put differently, when a probe updates dynamic parameters via the API, all risk analyses that have subscribed to this probe will update their corresponding copies of the dynamic parameters to the given values. If you wish that dynamic parameters should no longer be updated for a certain risk analysis, unsubscribe from the respective probe via the “Manage probe subscriptions” interface (see [Section]).
HTTP requests
API calls are made using secured HTTPS requests to OpenTRICK. If OpenTRICK is running on e.g.
https://trickservice.itrust.lu, then the API calls should be made (usually via POST) to
https://trickservice.itrust.lu/Api/<method_name>, where the available method names are listed below.Every HTTP request must have the following HTTP headers set:
Accept: application/json;charset=UTF-8
Content-Type: application/json;charset=UTF-8
X-Auth-Token: <api_token>
Above,
<api_token> should be replaced by the API token that is displayed in the probe administration ( [Section]). It is this token that is responsible for the authentication.The actual HTTP request body must be encoded
in JSON. See the sections below for more details.
Methods
The OpenTRICK exposes methods which can be accessed using a HTTP client as described below. Parameters are passed to the API in the HTTP request body in JSON format (using the “application/json;charset=utf-8” encoding).The supported methods are explained in the following subsections.
Setting dynamic parameters
This method defines a new dynamic parameter that can be used in risk assessments.This method is called with HTTP “POST”
and is available at
/Api/ids/set.The expected parameters are of the form
{ "data": [
 { "c": <category>, "t": <time>, "v": <value> },
 ...
] }
for arbitrarily many elements. The placeholders are to be replaced according to the table below.
| Placeholder | JSON data type | Description |
|---|---|---|
| <category> | String | The name of the dynamic parameter to create/update. |
| <time> | Integer | The timestamp when the parameter shall obtain the value. In most cases this value is
now(). The timestamp is expressed as the number of seconds since 1 January 1970, 00:00:00 UTC (often called “UNIX timestamp”).
|
| <value> | Floating point | The ‘value’ of the parameter as a floating point number at the specified <timestamp>. |
Each line defines a parameter which has the given value starting from the given time and until the next timestamp for which a value was defined. For instance, if the API receives two requests that define (c=demo, t=0, v=5) and (c=demo, t=3600, v=10), then the parameter “demo” has the value 5 between 12:00am and 1:00am, and the value 10 starting from 1:00am.
Reporting probe notifications
This method accepts notifications (alerts) from external sources (such as intrusion detection systems) from which TRICK
Service computes a risk level (from 0 to 1) that is available as a dynamic parameter in risk assessments. Each alert will
raise the risk level: the higher the severity (see below), the higher the risk level will be raised. The risk level will
slowly decrease with time (in an exponential fashion) again: the half-life (see below) of the alert affects how fast it
will decrease.This method is called with HTTP “POST” and is available at
/Api/ids/notify. The expected parameters are of the form
{ "data": [
 { "c": <category>, "t": <time>, "h": <halflife>, "s": <severity>, "n": <number> },
 ...
] }
for arbitrarily many elements. The placeholders are to be replaced according to the table below.
| Placeholder | JSON data type | Description |
|---|---|---|
| <category> | String | The name of the dynamic parameter to create/update. |
| <time> | Integer | The timestamp when the alert was raised. In most cases this value is
now(). The timestamp is expressed as the number of seconds since 1 January 1970, 00:00:00 UTC (often called “UNIX timestamp”).
|
| <halflife> | Floating point | The time after which the risk level shall have decreased to half of its value again. Must be positive and non-zero. |
| <severity> | Floating point | The severity of the alert. Ranges from 0 (not important at all) to 1 (very important). Setting the severity to zero is equivalent to not notifying about the alert at all. Setting the severity to 1 will also raise the risk level to 1. |
| <number> | Integer | The number of alerts that have the properties specified above. This can be used to regroup alerts of the same kind; in general, ‘number’ is set to 1. |
Annex C – Glossary
The table below provides a description of some of the terms used in this document.
| Term | Description |
|---|---|
| ALE | Projected annual loss of money due to threats |
| Asset | Goods (physical, human, information…) having some value for the company |
| MAGERIT | Method of risk analysis with two immediate objectives: to study the risks affecting a specific information system and its environment; and recommend appropriate actions to be adopted to detect, prevent, reduce or control the investigated risks. |
| Threat | Action (a virus deleting data, a fire destroying the company’s premises, human malevolence deleting data...) which may impact an organisation’s assets. |
| Measures | Implemented security means to avoid threats or to reduce the risks |
| Threat probability | Probability of risk occurrence, for one year |
| ISMS | Information Security Management System (defined in ISO/IEC 27001) |
The table below lists the acronyms relevant to the current document.
| Symbol | Explanation |
|---|---|
| ALE | Annual Loss Expectancy |
| ALEO | Annual Loss Expectancy Optimistic |
| ALEP | Annual Loss Expectancy Pessimistic |
| AP | Applicable |
| API | Application programming interface |
| CS | Cost |
| CSSF | Commission de Surveillance du Secteur Financier |
| EW | External Workload |
| HW | Hardware |
| IEC | International Electrotechnical Commission |
| INV | Investment |
| IR | Implementation Rate |
| ISMS | Information Security Management System (defined in ISO/IEC 27001) |
| ISO | International Organization for Standardization |
| IV | Immaterial Value |
| IW | Internal Workload |
| LH | Likelihood |
| LT | Lifetime |
| MT | Maintenance |
| NA | Non-applicable |
| Portable Document Format | |
| RA | Risk Assessment |
| ROI | Return On Investment |
| ROSI | Return On Security Investment |
| ReST | Representational State Transfer |
| RRF | Risk Reduction Factor |
| SME | Small and Medium Enterprise |
| SML | Security Maturity Level |
| SMT | Security Maturity Task |
| SOA | Statement of Applicability |
| ST | Status |
| SW | Software |
| TRICK | Tool for Risk management of an ISMS based on a Central Knowledge base |
| RAR | Risk Analysis Report |
Annex D – Changelog
What's new in OpenTRICK 2.18
- Import (Refer [Section]) of scope and export (Refer [Section]) of scope.
- Enable copying asset dependency while creating a new analysis from parts of existing Risk analysis (Refer [Section]).
- Enable viewing and reinclusion of excluded dynamic parameters from a risk analysis (Refer [Section]).
- Dynamic parameters exclusion and reinclusion (Refer [Section]).
- Security improvement around connectivity with DRAW.
- Bug fixes around RRF sheet export, creation of analysis from existing analysis.
- Improve ticket creation by email: Add support for JSON format.
What's new in OpenTRICK 2.17
- Display of ILR Threat and Vulnerabilities in Scenario sheet. Refer [Section].
- Support of CIA computation based on asset dependencies. Refer [Section]
- Risk estimation view with additional ILR information. Refer [Section]
- Bug fixes and updation of Framework library.
What's new in OpenTRICK 2.16
- Support of customized excel templates for customers [Section]
- Support for adding excel formula computing columns in risk estimations [Section]
- Performance fixes: Slow save and update of risk analysis
What's new in OpenTRICK 2.15
- Admin feature for creating and managing customer email ticketing system()
- Bug fix around reset password
- New user is no longer blocked by default
- Changes around Word Export of word report ()
- Export analysis in JSON format. Refer ()
What's new in OpenTRICK 2.14
- Bug Fixes:
- "Measures collections > View by collection" does not display the top line when opening.
- Incomplete (export/import) of RRF: For 27701, the import stops at: item 9.4.2.1.
- Improved the risk assessment export file with an improved formatting.
- Updated word template
- Fixed Slow performance of app.trick.-service.lu and trickservice.itrust.com.
- Forbidding the user from specifying multiple versions of the same measure collection in a given analysis. The reason for prohibiting is due to the technical limitation of the tool.
- Brainstorming import allows differential import. Refer ()
- Central export interface improved.
- Added a new property to OpenTRICK database.
- Enhanced error and warning messages
What's new in OpenTRICK 2.13
- A free-to-use (ftu) OpenTRICK version deployed.
What's new in OpenTRICK 2.12
- ATENA logo available across all versions.
- Formatting of exported analysis report improvised.
- Removed "Banded" from export.
- Exported word report modified for representing probability with greater precision in the paramater table.
- Mixing qualitative and quantitative in word reports ()
- Fixed error in word export document related to impact
- Fixed synchronization of draw and OpenTRICK assets
- OpenTRICK to Redmine synchronization enabled
What's new in OpenTRICK 2.11
- Central export interface: all im-/export features can now be found in a central place.
- Import/export risk estimations from/to an Excel file.
- Renaming an analysis now also renames all versions.
- Fixed bug which caused an import of the brainstorming to fail under certain conditions.
- Fixed bug where asset name could not be renamed if only the capitalisation of the name changed.
- Fixed bug where measures could not be changed in the knowledge base.
- Fixed bug which prevented measures from being selected in the risk estimation UI.
- API: added support for exporting dynamic risk analysis
- API: also exporting the "selected" flag of assets
What's new in OpenTRICK 2.10
- Re-arranged menu bar in analyses overview.
- Quantitative reports now optionally include qualitative assessments, as well. They can be enabled in the Advanced settings.
- Exported reports are now automatically delected after 30 days (configurable).
- Removed the possibility to specify both start and end date for a phase.
- "Add" or "Create" buttons are no longer greyed out when an item in the list below is selected.
- The security measures view remembers the size of the text boxes when switching measures.
- Minor bug fixes.
What's new in OpenTRICK 2.9
- Users can upload their own templates which serve as base for the risk analysis report.
- Added functionality to import and export the collection of measures to/from an Excel file.
- Fixed a rare bug causing the phase dates not to be applied correctly.
What's new in OpenTRICK 2.8
- Risk heat map (for qualitative and mixed risk analyses):
- When counter measures are specified, the evolution of the risk is also shown in the heat map.
- User guide:
- The OpenTRICK User Guide is now accessible from OpenTRICK itself.
- Brainstorming:
- Import/export of “threats”, “vulnerabilities”, and “risks” sheets from/to an Excel file.
- The reference number of each row can now edited and set to an arbitrary (but unique) string value.
- Renamed “threats” to “risks”, “risk specificities” to “threats”.
- Analysis access rights:
- Only users who have already access to the related customer, are displayed in the interface (for confidentiality/privacy reasons).
- Invite users who do not have access to the customer, and give appropriate access rights, by typing their e-mail address.
- Broadcast center:
- Real-time notifications (only for modern browsers)
- Administrators can broadcast a message to all users of the platform.
- Estimations:
- More consistent display of impact level/value/label in risk estimation interface.
Annex E – Frequently Asked Questions
How to start using OpenTRICK and create first risk analysis
Create a new account
The first screen after the user installs the application is as below where a new account needs to be created.
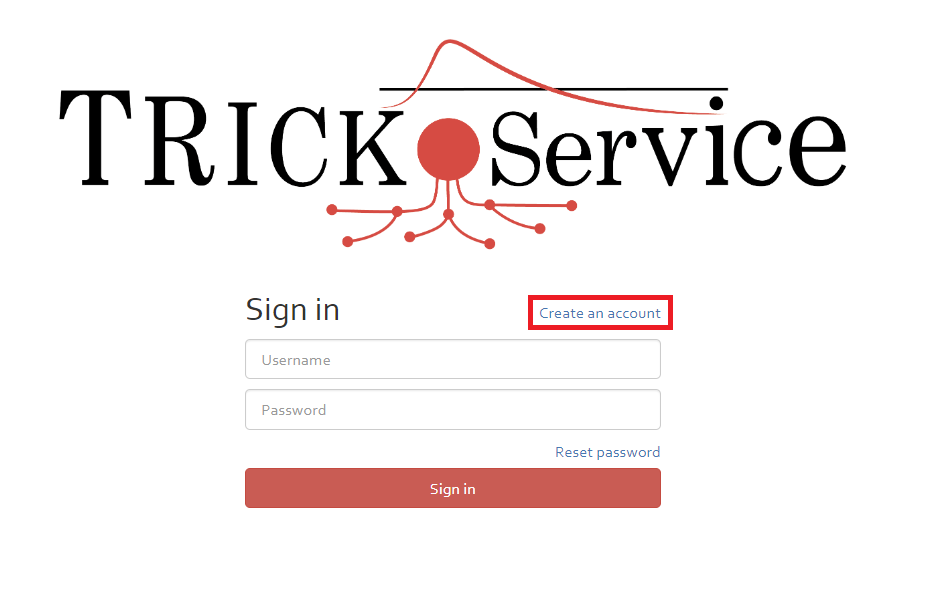
Setup the account details and the password information in screen below.
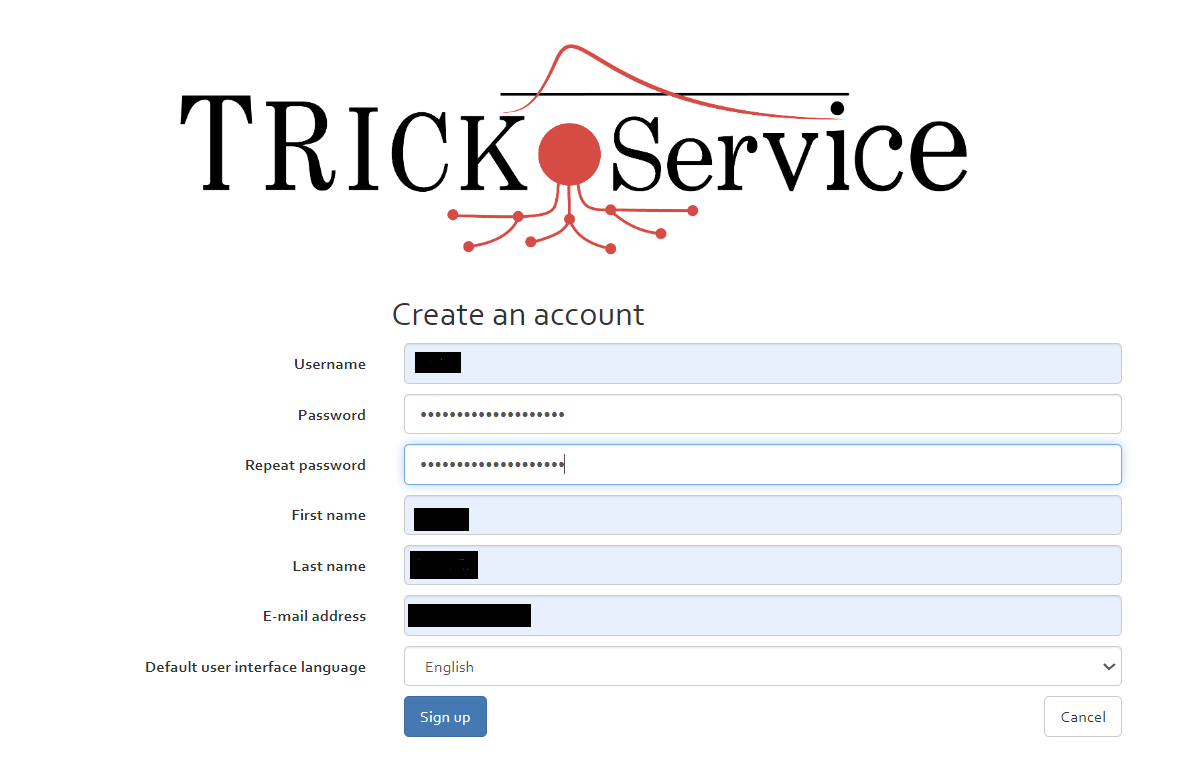
Install OpenTRICK
Before proceeding further the OpenTRICK needs to be installed and initialized. Follow the Administration menu and install OpenTRICK.

Create a new Risk Analysis from default profile
Prerequisite for creating a new risk analsis is existence of customer/company for which the Risk analysis is to be created.
Create a new customer
Select the menu "Knowledge base" and within it the Tab "Customers". Add a new customer as shown in screen below. Once the customer is added the same must be displayed in customer list.
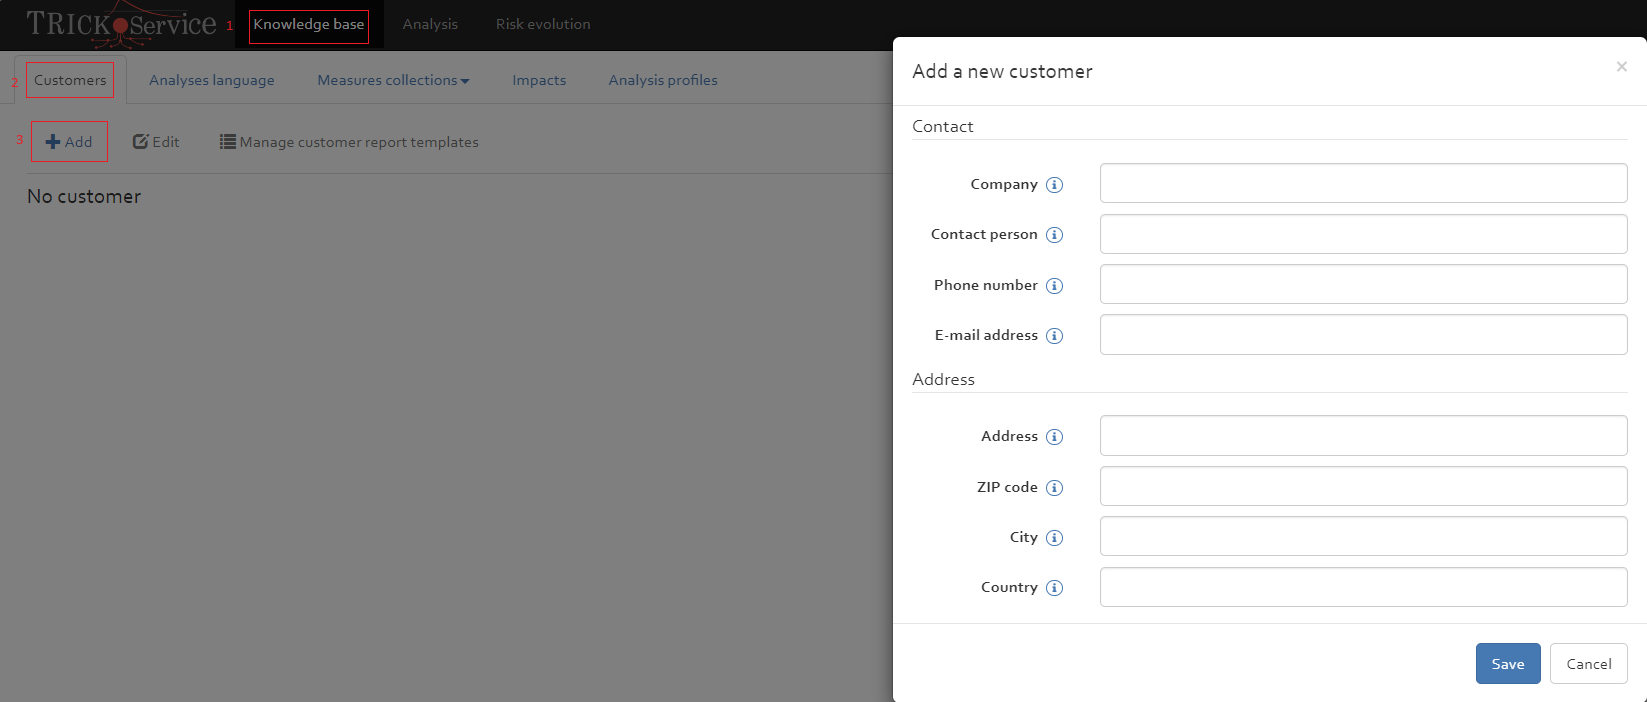
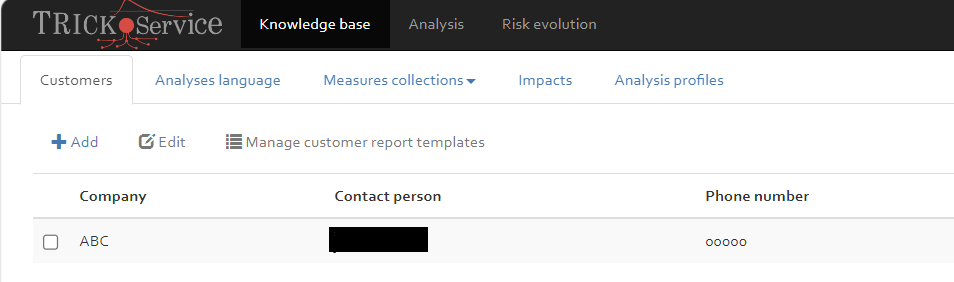
Create analysis
Refer Create a new risk analysis for creating a new risk analysis.
-
Note that the default profiles available for creating a new risk analysis are:
- Quantitatve default profile
- Qualitative default profile
How to create a Risk Analysis from an existing Risk analysis
Once a risk analysis is created, a new risk analysis can be created from it by using the same Risk Analyis or parts of it. Refer Create a risk analysis by taking parts of it.
How to share analysis with another user
Often, an analysis needs to be shared with multiple people who have different access rights. If someone cannot view the analysis, it is likely because they do not have the necessary access permissions. Refer Manage access rights and Inviting new users
How to upgrade the measure collection to a new version of standard
Preliminary Steps
Import security standard
In order to import a security standard into OpenTRICK, a file with a special format has to be provided. A template for such a file can be obtained directly in OpenTRICK, see [Figure] Alternatively, another standard can also be exported, and the obtained file manipulated accordingly.
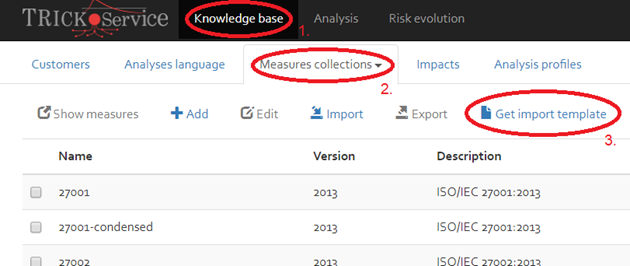
Back-up
As for any task that involves the manipulation of a lot of data, it is highly recommended to create a new version of the analysis that shall be migrated. It will serve as a back-up in case something goes wrong.

Upgrade risk analysis to use new standard
The migration consists of the following steps
- exporting the data for the old standard [Section]
- upgrading to the new standard in the risk analysis (structure only) [Section]
- exporting a template for the new standard (structure only) [Section]
- copying the values from the first export file to the second one in Excel [Section]
- importing the second file back into the analysis [Section]
Note that due to technical limitations, it is not possible at the moment to reference multiple versions of the same standard in the same risk analysis. Therefore, when adding a new version of a standard to the risk analysis, the old version must be removed first.
Exporting the data for the old standard
To export the estimations for a security standard, open the Advanced Menu (see Export menu) and click “Export”. In the export interface, choose “Security Measures” and select the old standard, then export. The exported Excel file contains all cost and workload estimations that have been entered into OpenTRICK.
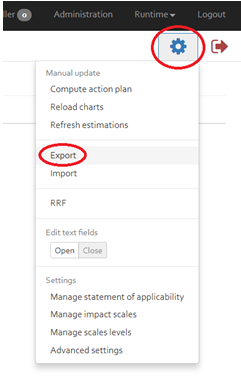
Upgrading to the new standard in the risk analysis (structure only)
If the new version of the standard has been imported into the knowledge base,
then it can be added to the risk analysis.
Inside a risk analysis, click “Manage collections”, see Figure below.
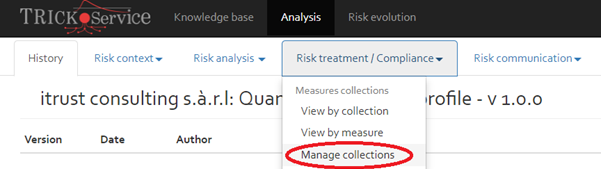
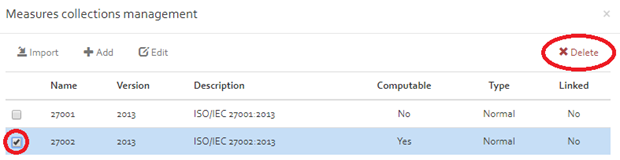
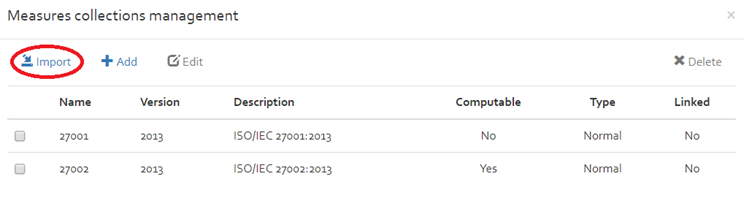
Exporting a template for the new standard (structure only)
The migration will be done manually in Excel by copying values from an export file to an import file. The import file (or a template thereof) can be obtained by repeating the steps in ([Section]), but this time for the new standard.
Copying the values from the first export file to the second one in Excel
When all steps have been carried out, the data can be migrated. At this point ensure the following:
- The risk analysis should reference the new standard, but not the old one
- Ensure to have an export file that contains all estimations for the old standard
- Ensure to have an export file for the new standard, which only contains empty and default values.
- Add a new column to the left of column A in [OLD].
- Copy the column A from [NEW] to the newly added column in [OLD].
- In [NEW], go through each line. Three cases can occur:
- The cells in columns A and B match: in that case, do nothing
- The content of the cell in A does not occur in the entire column B: in that case, move down all rows of columns BCDEF… by one row, starting from the current row (see [Figure]).
- The content of the cell in B does not occur in the entire column A: in that case, move down all rows of column A by one row, starting from the current row (see [Figure]).
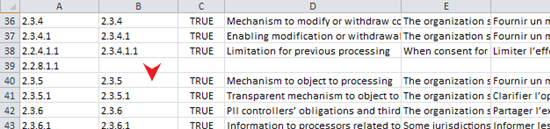
Move down columns BCDEF… by one, starting from row 39, to match column A. 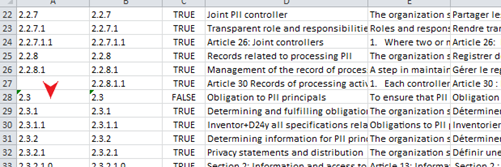
Move down column A by one, starting from row 27, to match column B. - Go through all rows RA that have an empty cell in column A; those represent the IDs present in the old standard, but no longer in the new one.
- Check if the security measure has obtained a different ID in the new standard, in which case there is a corresponding empty cell in some row RB in column B.
- If yes, move the remaining cells on row RA (columns CDEF…) to the corresponding new row RB.
- In any case, delete the row RA.
- Go through all rows that have an empty cell in column B; those represent the IDs present in the new standard, but not yet in the old one
- Insert default data into the cells in columns CDEF… This default data can for example be copied from [NEW].
- Copy the content (that is, the ID) from the cell in column A to the cell in column B.
- Copy the entire table from [OLD] to [NEW].
- Save [NEW]. The changes in [OLD] can be discarded
Importing the second file back into the analysis
Once the manual migration is done, the [NEW] file can be imported into OpenTRICK. Open the import interface (see [Figure]), select “Measures”, pick the [NEW] file and upload it to OpenTRICK.
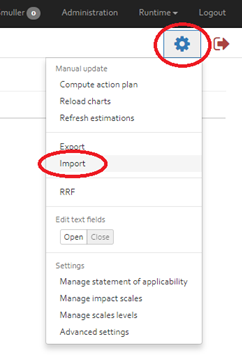
How to update an analysis profile
Refer [SECTION] which details the process how to update an analysis profile to be reused for creating new analysis later. Also refer [SECTION] to understand the analysis profile view.
How to show the ILR data
TODO after the code changes in place.
How to create ILR compatible JSON file
- In order to generate ILR compatible JSON file, follow the steps below configuring the risk analysis parameters and then generating the JSON file.
How to debug an internal error
Encountering an internal error could be difficult to resolve and may require to debug the tool, however in certain cases it is useful to check the generated logs for any helpful tips. Select "Administration" and then the "Logs" Tab to access the application logs to see a possible diagnosis.


How to rename Asset from TRICK Interface
Refer section [SECTION] for performing editing or renaming operations on an asset using the TRICK interface
How to rename Asset and Scenario from Excel
The best way to handle this is making changes to asset name in the OpenTRICK interface so that the corresponding scenarios are applied to the renamed assets. However there may be situaions when the change is needed to be made in excel instead and further the analysis is imported to OpenTRICK.
- Export the Risk estimation sheet from TRICK interface:Refer section Export risk estimation
- Rename Assets in "Assets" sheet in exported risk estimation file: In the exported excel file add a column in Asset sheet in excel called OldName. Copy over ALL the old names to new name column. This will keep track of the changes done. Later rename the "Name" column refer [FIGURE] In this example all asset names having a substring "_PRO_" need to be changed to corresponding substring "_PROCESS_".
- Rename Assets in "Scenarios" sheet in exported risk estimation file: Similarly rename the "Asset" column after backing up names of assets in "OldAsset" name column.
- Import Assets in OpenTRICK:It is essential to first import the Assets ONLY in OpenTRICK before importing the updated Risk estimation. Use the Risk estimation workbook modified in previsiou step to import only assets first in OpenTRICK. Refer [SECTION]
- Import Risk Estimation in OpenTRICK:refer [SECTION]
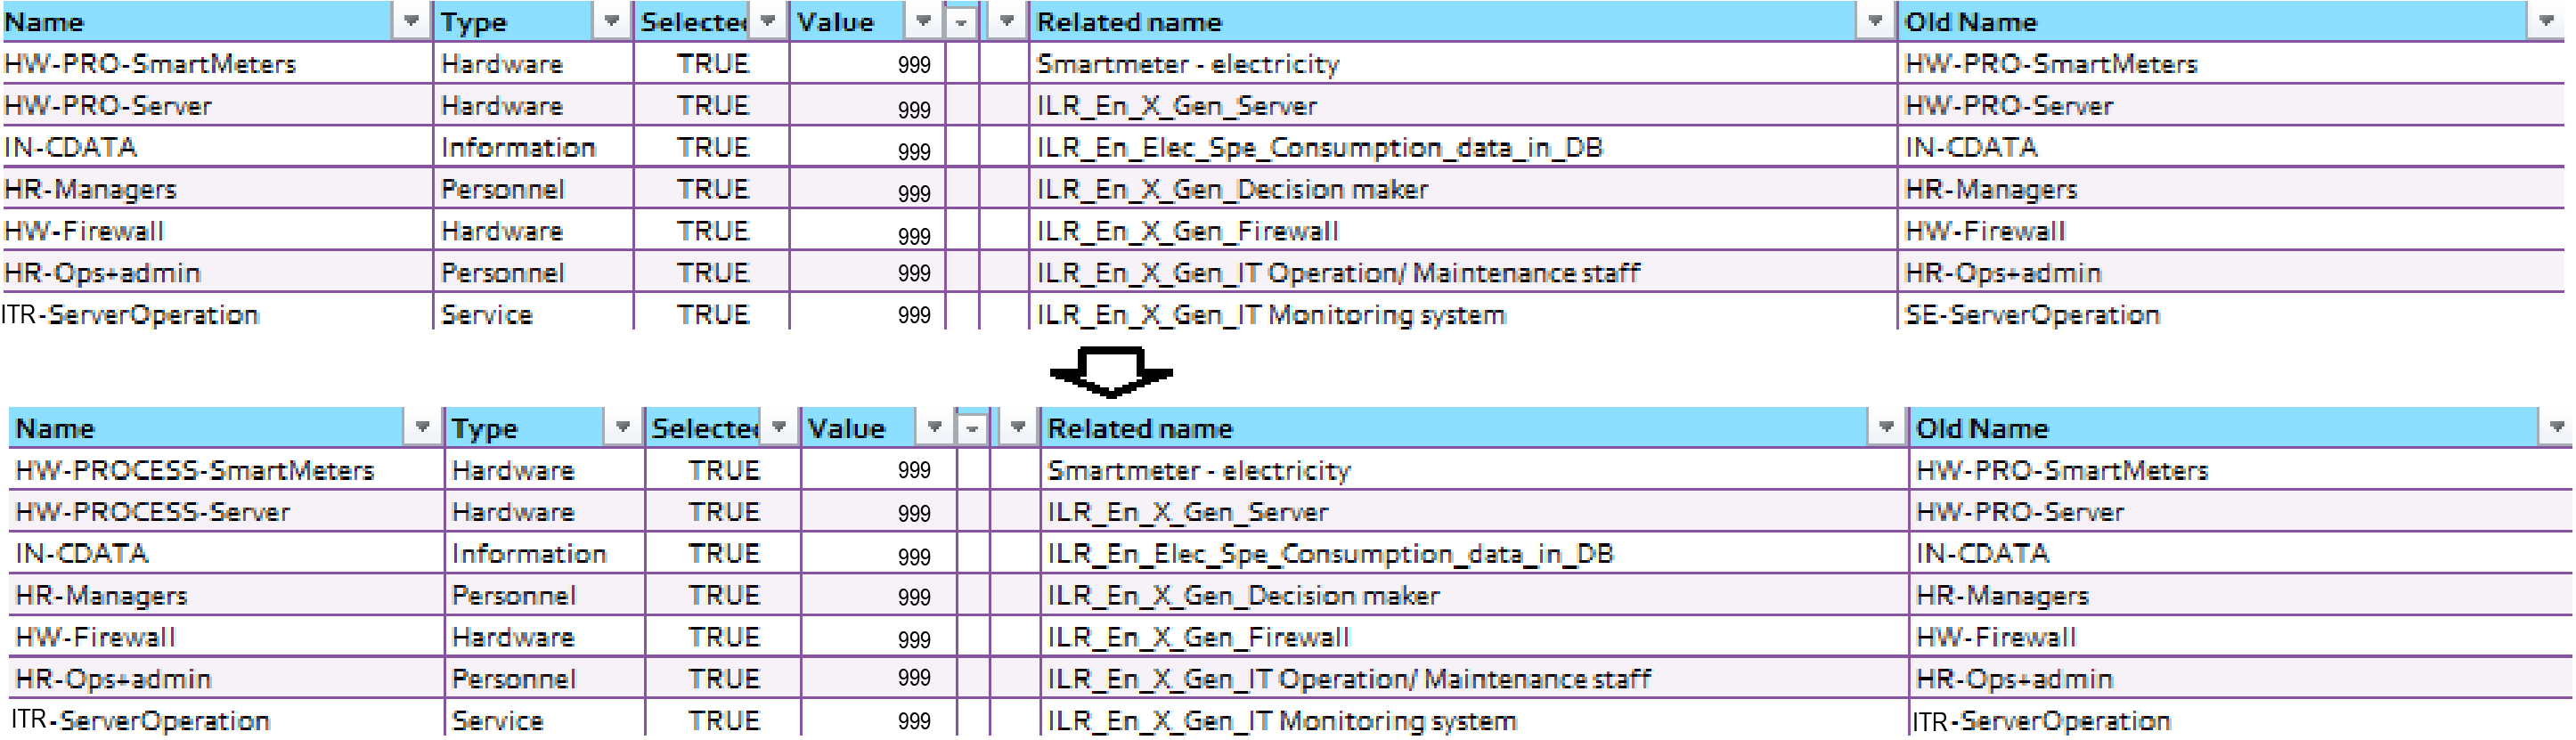
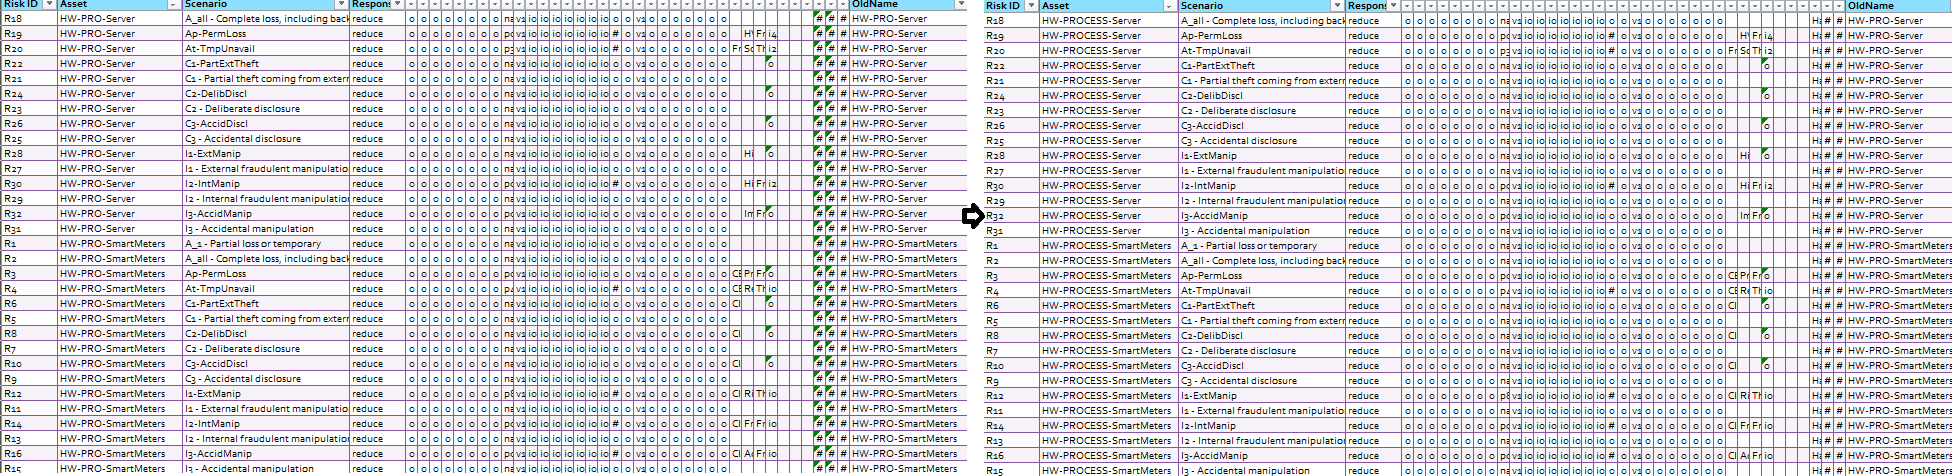
How to enable Statement of Applicability for Risk Analysis
If the statement of applicability is disabled for all standards, it will be hidden throughout the risk analysis. In order to enable SoA for a specific standard Refer [SECTION].
How to manage impact scales for Risk Analysis
The "Settings" menu allows the user to set impact scales by selecting "Manage impact scales". Refer [SECTION]
How to manage scales levels for Risk Analysis
The "Settings" menu allows the user to set impact levels by selecting "Manage scale levels". Refer [SECTION]
How to link a customer analysis to a ticketing system
A user analysis can be linked to a ticketing system, however it requires an initial token and access granted by the system administrator. Refer [SECTION]
How to add a quantitative eval model to trick
A quantitative evaluation model can be added to OpenTRICK by adding dynamic parameters to risk analysis.
- The following steps can be used to achieve this:
- Add Probe to access OpenTRICK API. Refer [SECTION]
- Enable probe subscription for the risk analysis. Refer [SECTION]
- Setup dynamic parameters for risk analysis. Use the script Push-To-TS in a power shell client to set dynamic parameters. Refer [FIGURE] for setting dynamic parameters defined in a CSV file (data.csv). All the analysis where the probe subscription is enabled will have the dynamic parameters defined after running this script on command line. Once set these parameters are visible in "Risk context" as "Dynamic probability parameters".
- Setup impacts based on dynamic parameters. Once the dynamic parameters are set these parameters can be used as arithmetic expressions to define impacts for the given risk analysis Refer [FIGURE] .
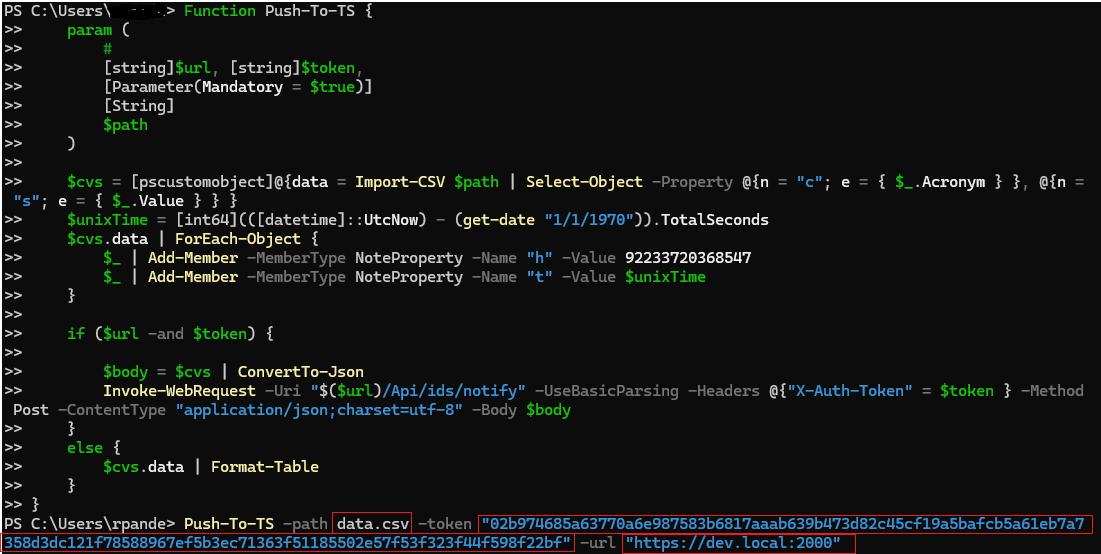
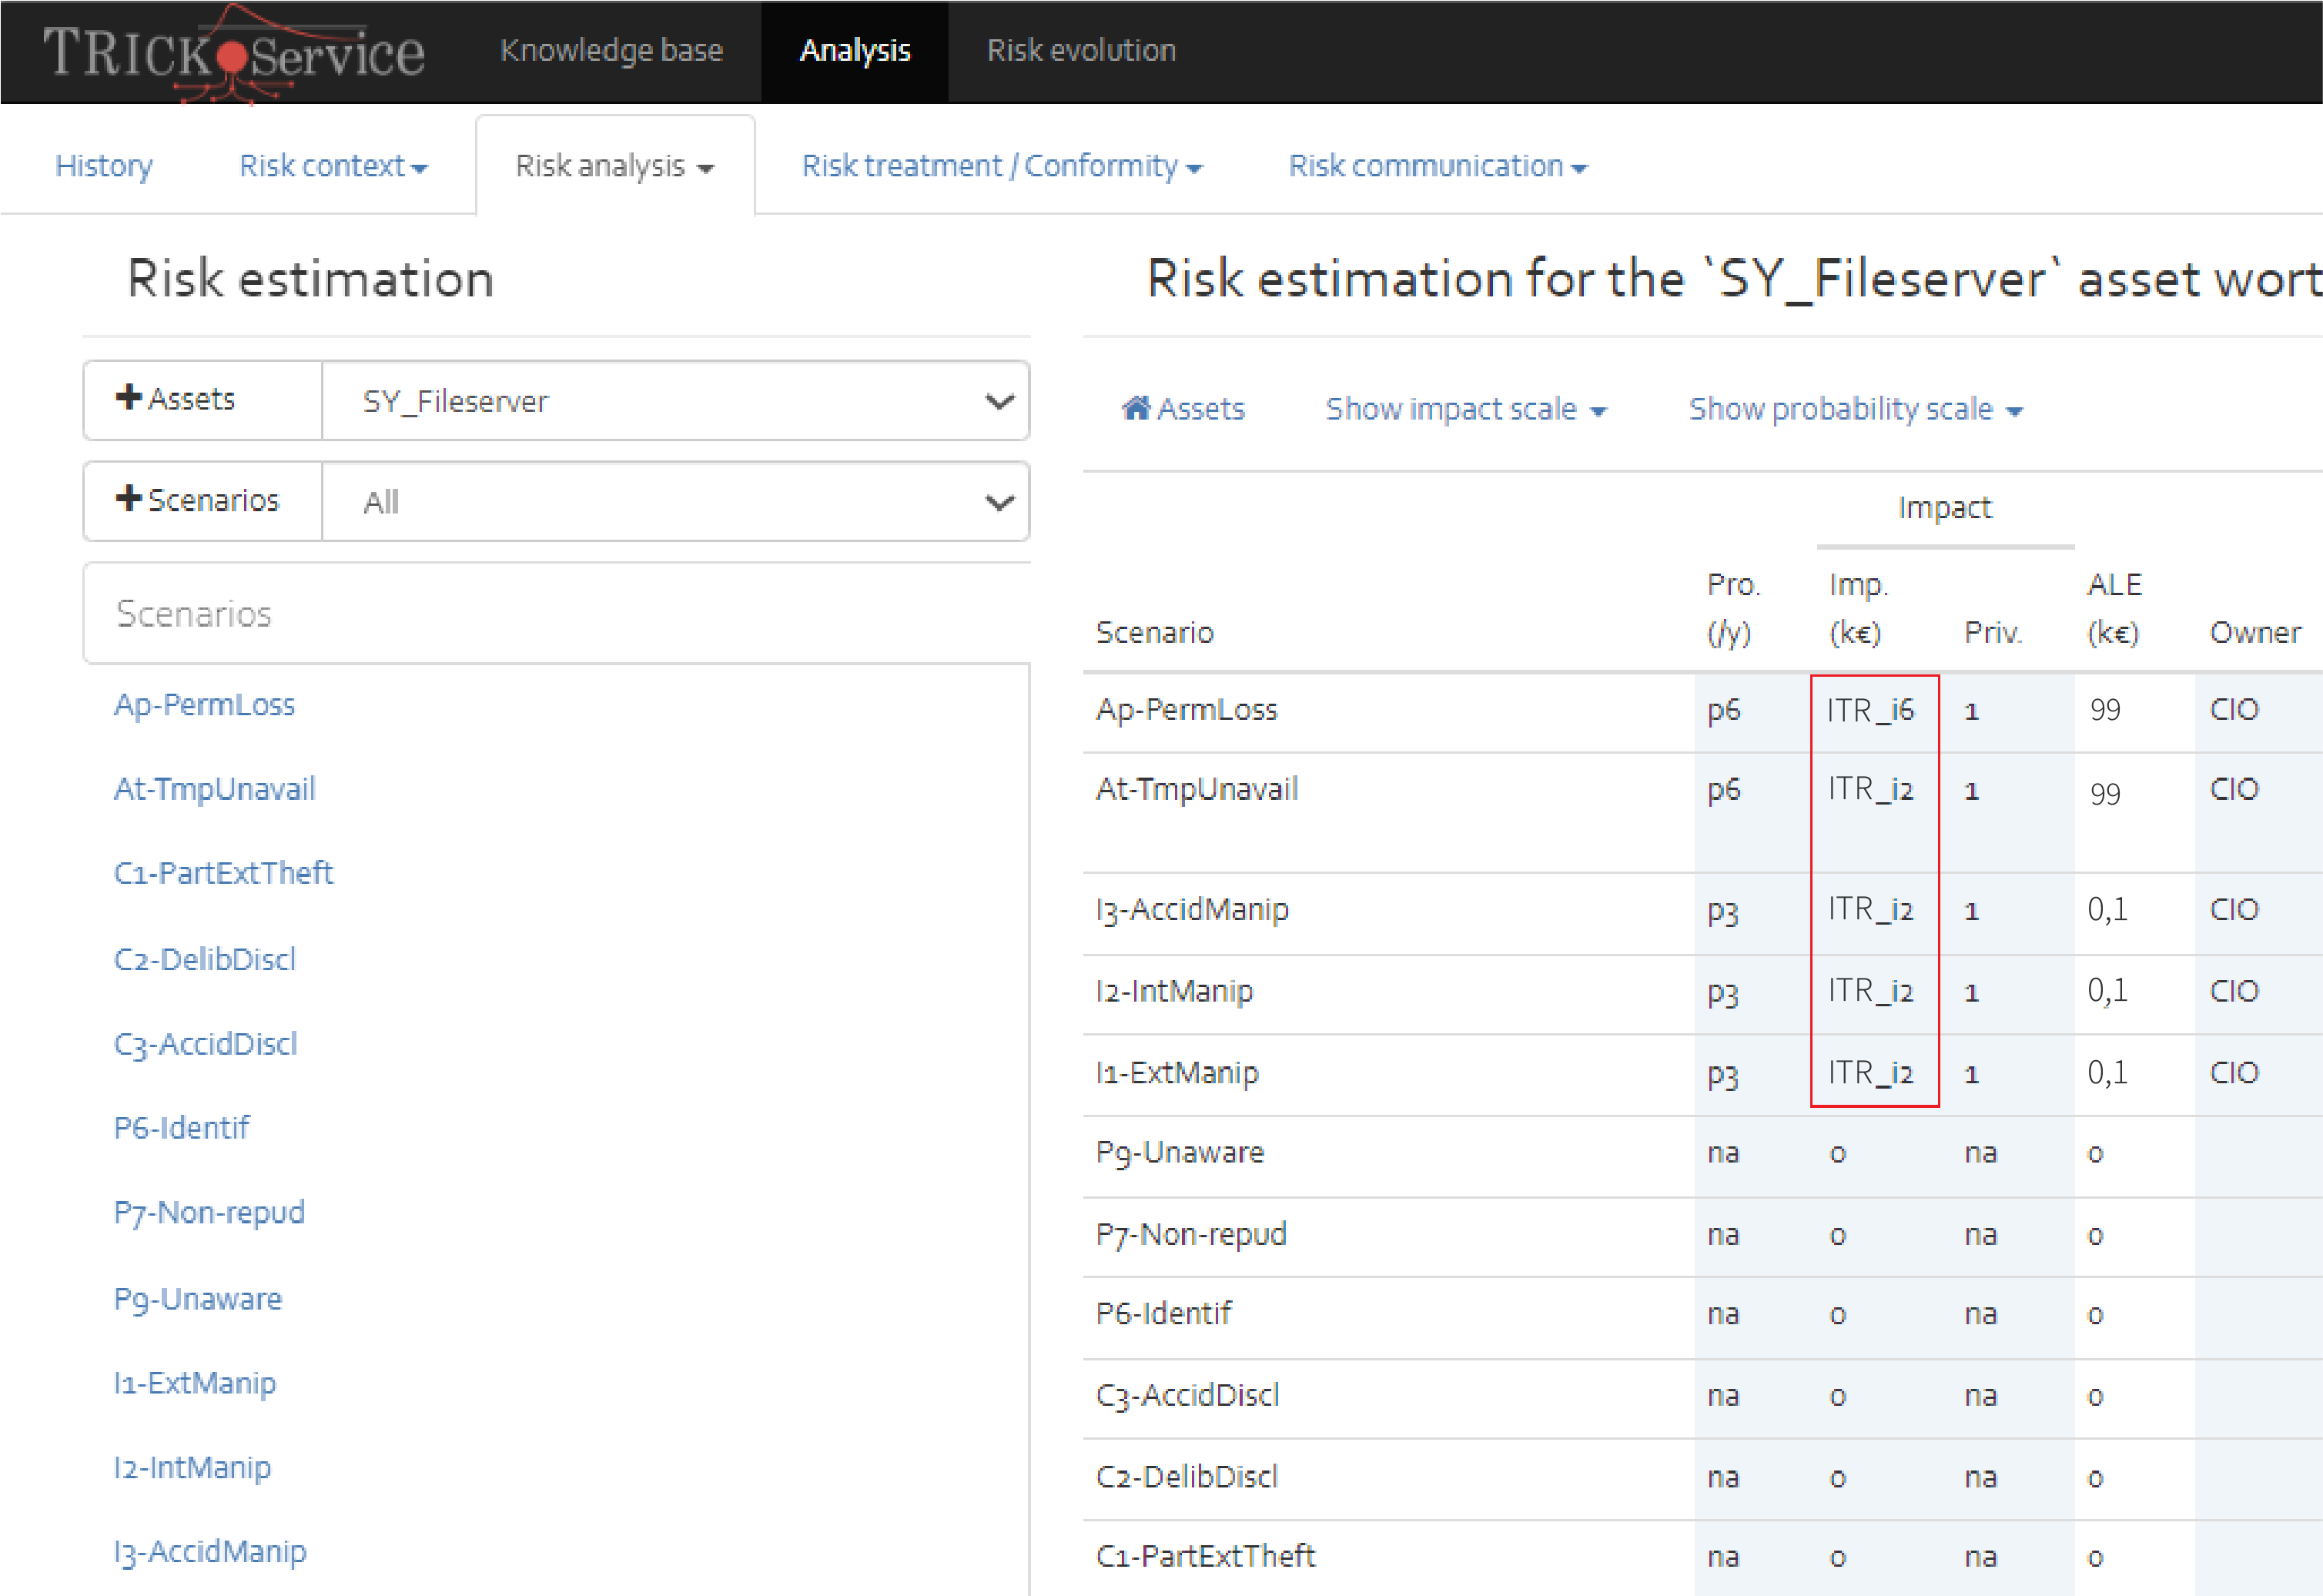
How to use a macro enabled template
In order to setup a risk estimation with additional columns involving formulas Refer [SECTION] . Additionally prior to exporting risk estimation involving formulas a Macro enabled Template requires to be setup for exporting analysis. Refer [SECTION] .